Bingo
一、前端初始化
【1】 Node.js的安装
Node.js是一个服务端语言,它的语法和JavaScript类似,所以可以说它是属于前端的后端语言,后端语言和前端语言的区别:
-
运行环境:后端语言一般运行在服务器端,前端语言运行在客户端的浏览器上
-
功能:后端语言可以操作文件,可以读写数据库,前端语言不能操作文件,不能读写数据库。
我们一般安装LTS(长线支持版本):
下载地址:https://nodejs.org/en/download/【上面已经安装了nvm,那么这里不用手动安装了】
下载之后双击安装,一路点击下一步就可以了。
node.js的版本有两大分支:
官方发布的node.js版本:0.xx.xx 这种版本号就是官方发布的版本
社区发布的node.js版本:xx.xx.x  就是社区开发的版本
Node.js如果安装成功,可以查看Node.js的版本,在终端输入如下命令:
node -v
npm  -v   # pip
在安装node.js完成后,在node.js中会同时帮我们安装一个包管理器npm。我们可以借助npm命令来安装node.js的第三方包。这个工具相当于python的pip管理器,php的composer,go语言的go get,java的maven。
【2】vite创建项目111
2.1、项目搭建
使用vue自动化工具可以快速搭建单页应用项目目录,vite为现代化的前端开发工作流提供了开箱即用的构建配置。所以我们只需要几分钟即可创建并启动一个带热重载、保存时静态检查以及可用于生产环境的构建配置的项目。
cd  C:\Users\Administrator\Desktop\bingo
yarn create vite

# ?Project name: › bingo_web
# ? Select a framework: › - Use arrow-keys. Return to submit.
# Vue
# ? Select a variant: › - Use arrow-keys. Return to submit.
# JavaScript
cd bingo_web
yarn && yarn dev
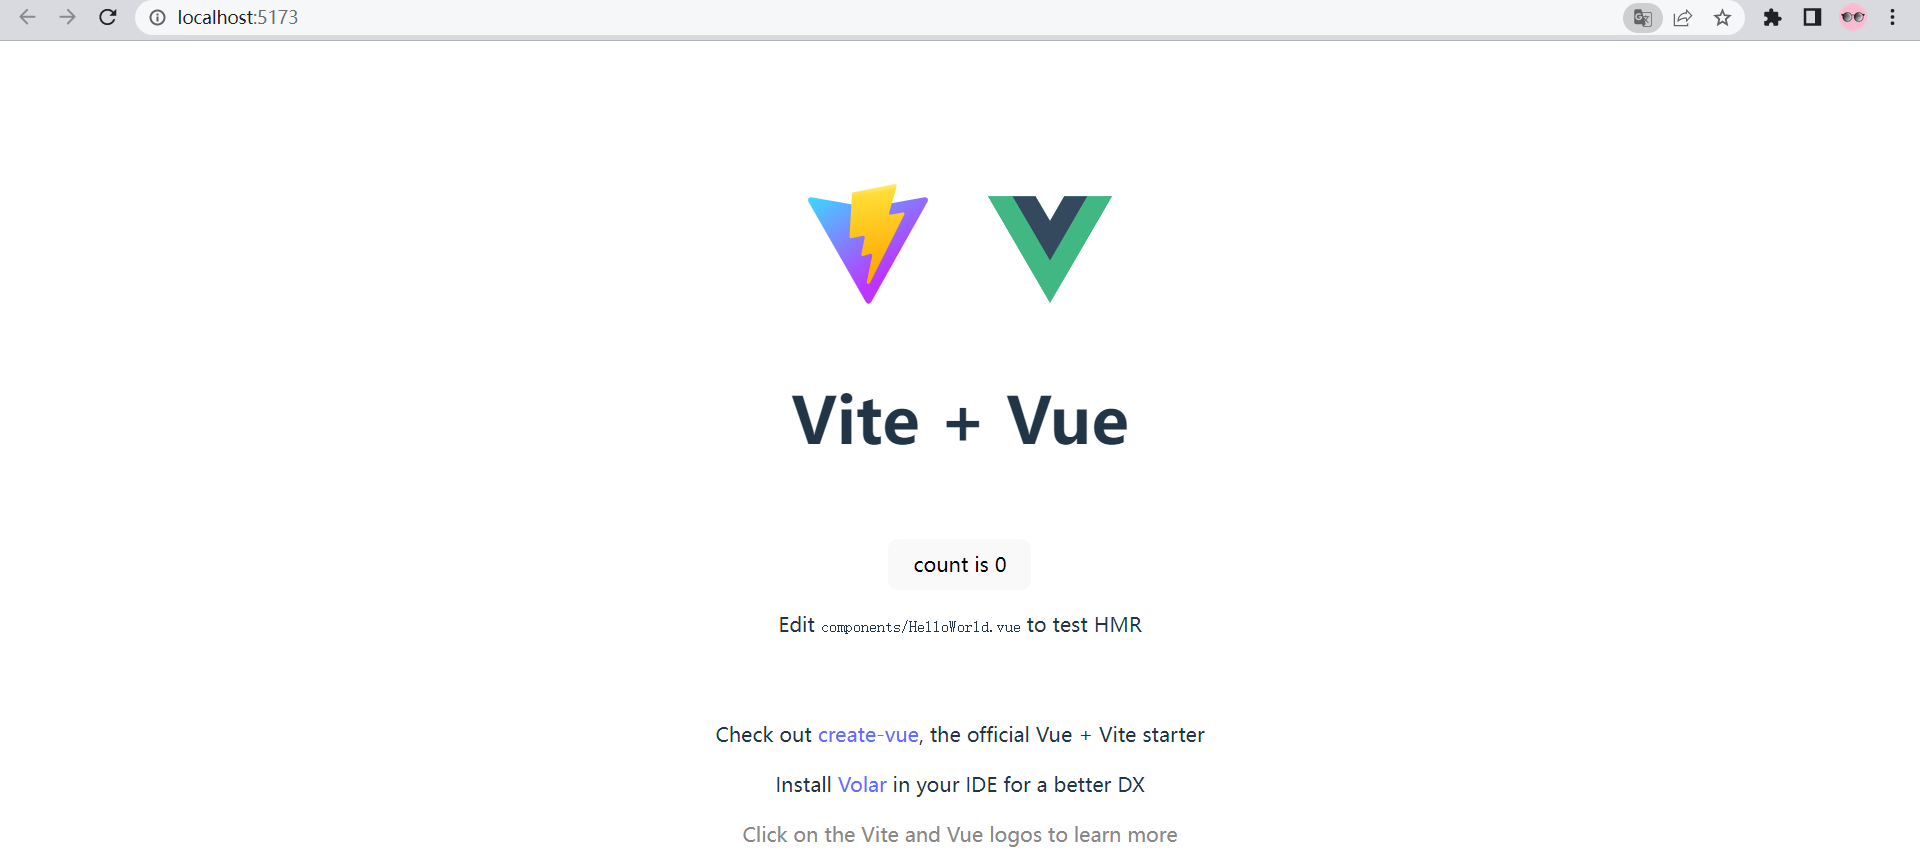
执行上面命令最终效果如下:

那么访问一下命令执行完成后提示出来的网址就可以看到网站了:http://localhost:5173/
基于goland设置启动项目按钮

2.2、项目目录结构介绍
项目创建完成之后,我们会看到bingo_web项目其实是一个文件夹,我们进入到文件夹内部就会发现一些目录和文件,我们简单回顾一下里面的部分核心目录与文件。
├─node_modules/ # node的包目录,项目运行的依赖包存储目录,package.json和package-lock.json文件中会自动记录了这个目录下所有的包以及包的版本信息,
├─public/ # 静态资源目录,项目中的静态资源(css,js,图片等文件)放在这个文件夹
├─src/ # 主开发目录,要开发的客户端代码文件(单文件组件,css样式、工具函数等等)全部在这个目录下
├─assets/ # 静态资源存储目录,与public目录作用类似。
├─router/ # 路由存储目录�,是我们创建项目的时候,如果选择安装vue-router,就自动会生成这个目录。
├─views/ # 组件页面存储目录,就是浏览器中用户看到的页面内容,views往往会加载并包含components中的组件进来
├─components/ # 组件存储目录,就是浏览器中用户看到的页面的一部分内容。
├─App.vue
├─main.js
└─style.css
├─index.html
└─package.json # 如果node_modules没有,但是有package.json,则可以在终端下,通过npm install进行恢复node_modules所有内容。
2.3、项目执行流程图

2.4、 css样式清除
清空src/App.vue的代码内容,代码:
<template>

</template>

<script setup>

</script>

<style>

</style>
清空src/style.css的样式内容,并根据https://github.com/necolas/normalize.css,补充css样式初始化代码。
/*! normalize.css v8.0.1 | MIT License | github.com/necolas/normalize.css */

/* Document
   ========================================================================== */

/**
 * 1. Correct the line height in all browsers.
 * 2. Prevent adjustments of font size after orientation changes in iOS.
 */

html {
  line-height: 1.15; /* 1 */
  -webkit-text-size-adjust: 100%; /* 2 */
}

/* Sections
   ========================================================================== */

/**
 * Remove the margin in all browsers.
 */

body {
  margin: 0;
}

/**
 * Render the `main` element consistently in IE.
 */

main {
  display: block;
}

/**
 * Correct the font size and margin on `h1` elements within `section` and
 * `article` contexts in Chrome, Firefox, and Safari.
 */

h1 {
  font-size: 2em;
  margin: 0.67em 0;
}

/* Grouping content
   ========================================================================== */

/**
 * 1. Add the correct box sizing in Firefox.
 * 2. Show the overflow in Edge and IE.
 */

hr {
  box-sizing: content-box; /* 1 */
  height: 0; /* 1 */
  overflow: visible; /* 2 */
}

/**
 * 1. Correct the inheritance and scaling of font size in all browsers.
 * 2. Correct the odd `em` font sizing in all browsers.
 */

pre {
  font-family: monospace, monospace; /* 1 */
  font-size: 1em; /* 2 */
}

/* Text-level semantics
   ========================================================================== */

/**
 * Remove the gray background on active links in IE 10.
 */

a {
  background-color: transparent;
}

/**
 * 1. Remove the bottom border in Chrome 57-
 * 2. Add the correct text decoration in Chrome, Edge, IE, Opera, and Safari.
 */

abbr[title] {
  border-bottom: none; /* 1 */
  text-decoration: underline; /* 2 */
  text-decoration: underline dotted; /* 2 */
}

/**
 * Add the correct font weight in Chrome, Edge, and Safari.
 */

b,
strong {
  font-weight: bolder;
}

/**
 * 1. Correct the inheritance and scaling of font size in all browsers.
 * 2. Correct the odd `em` font sizing in all browsers.
 */

code,
kbd,
samp {
  font-family: monospace, monospace; /* 1 */
  font-size: 1em; /* 2 */
}

/**
 * Add the correct font size in all browsers.
 */

small {
  font-size: 80%;
}

/**
 * Prevent `sub` and `sup` elements from affecting the line height in
 * all browsers.
 */

sub,
sup {
  font-size: 75%;
  line-height: 0;
  position: relative;
  vertical-align: baseline;
}

sub {
  bottom: -0.25em;
}

sup {
  top: -0.5em;
}

/* Embedded content
   ========================================================================== */

/**
 * Remove the border on images inside links in IE 10.
 */

img {
  border-style: none;
}

/* Forms
   ========================================================================== */

/**
 * 1. Change the font styles in all browsers.
 * 2. Remove the margin in Firefox and Safari.
 */

button,
input,
optgroup,
select,
textarea {
  font-family: inherit; /* 1 */
  font-size: 100%; /* 1 */
  line-height: 1.15; /* 1 */
  margin: 0; /* 2 */
}

/**
 * Show the overflow in IE.
 * 1. Show the overflow in Edge.
 */

button,
input { /* 1 */
  overflow: visible;
}

/**
 * Remove the inheritance of text transform in Edge, Firefox, and IE.
 * 1. Remove the inheritance of text transform in Firefox.
 */

button,
select { /* 1 */
  text-transform: none;
}

/**
 * Correct the inability to style clickable types in iOS and Safari.
 */

button,
[type="button"],
[type="reset"],
[type="submit"] {
  -webkit-appearance: button;
}

/**
 * Remove the inner border and padding in Firefox.
 */

button::-moz-focus-inner,
[type="button"]::-moz-focus-inner,
[type="reset"]::-moz-focus-inner,
[type="submit"]::-moz-focus-inner {
  border-style: none;
  padding: 0;
}

/**
 * Restore the focus styles unset by the previous rule.
 */

button:-moz-focusring,
[type="button"]:-moz-focusring,
[type="reset"]:-moz-focusring,
[type="submit"]:-moz-focusring {
  outline: 1px dotted ButtonText;
}

/**
 * Correct the padding in Firefox.
 */

fieldset {
  padding: 0.35em 0.75em 0.625em;
}

/**
 * 1. Correct the text wrapping in Edge and IE.
 * 2. Correct the color inheritance from `fieldset` elements in IE.
 * 3. Remove the padding so developers are not caught out when they zero out
 *    `fieldset` elements in all browsers.
 */

legend {
  box-sizing: border-box; /* 1 */
  color: inherit; /* 2 */
  display: table; /* 1 */
  max-width: 100%; /* 1 */
  padding: 0; /* 3 */
  white-space: normal; /* 1 */
}

/**
 * Add the correct vertical alignment in Chrome, Firefox, and Opera.
 */

progress {
  vertical-align: baseline;
}

/**
 * Remove the default vertical scrollbar in IE 10+.
 */

textarea {
  overflow: auto;
}

/**
 * 1. Add the correct box sizing in IE 10.
 * 2. Remove the padding in IE 10.
 */

[type="checkbox"],
[type="radio"] {
  box-sizing: border-box; /* 1 */
  padding: 0; /* 2 */
}

/**
 * Correct the cursor style of increment and decrement buttons in Chrome.
 */

[type="number"]::-webkit-inner-spin-button,
[type="number"]::-webkit-outer-spin-button {
  height: auto;
}

/**
 * 1. Correct the odd appearance in Chrome and Safari.
 * 2. Correct the outline style in Safari.
 */

[type="search"] {
  -webkit-appearance: textfield; /* 1 */
  outline-offset: -2px; /* 2 */
}

/**
 * Remove the inner padding in Chrome and Safari on macOS.
 */

[type="search"]::-webkit-search-decoration {
  -webkit-appearance: none;
}

/**
 * 1. Correct the inability to style clickable types in iOS and Safari.
 * 2. Change font properties to `inherit` in Safari.
 */

::-webkit-file-upload-button {
  -webkit-appearance: button; /* 1 */
  font: inherit; /* 2 */
}

/* Interactive
   ========================================================================== */

/*
 * Add the correct display in Edge, IE 10+, and Firefox.
 */

details {
  display: block;
}

/*
 * Add the correct display in all browsers.
 */

summary {
  display: list-item;
}

/* Misc
   ========================================================================== */

/**
 * Add the correct display in IE 10+.
 */

template {
  display: none;
}

/**
 * Add the correct display in IE 10.
 */

[hidden] {
  display: none;
}

/* 声明全局样式和项目的初始化样式 */
body,h1,h2,h3,h4,p,table,tr,td,ul,li,a,form,input,select,option,textarea{
  margin:0;
  padding: 0;
  font-size: 15px;
}
a{
  text-decoration: none;
  color: #333;
  cursor: pointer;
}
ul,li{
  list-style: none;
}
table{
  border-collapse: collapse; /* 合并边框 */
}
img{
  max-width: 100%;
  max-height: 100%;
}
input{
  outline: none;
}
2.5、主页面板组件
终端下安装router路由模块,命令如下:
cd bingo_web  # 注意,客户端安装模块的所有命令,务必在package.json所在目录下操作。
yarn add vue-router@4.0.13   --registry https://registry.npm.taobao.org
src/router/index.js,路由对象初始化,代码:
import { createRouter, createWebHistory } from 'vue-router'


const routes = [
  { path: '/', name: 'bingo', component: ()=>import("../views/bingo.vue")},  // 主页面板
]

const router = createRouter({
  history: createWebHistory(),
  routes
});


export default router;
src/main.js,加载路由对象,代码:
import { createApp } from 'vue'
import './style.css'
import App from './App.vue'
import router from './router'

createApp(App).use(router).mount('#app')
src/App.vue,代码:
<template>
  <router-view/>
</template>

<script setup>

</script>

<style scoped>

</style>
src目录下创建views页面组件目录并新建bingo.vue组件,src/views/Bingo.vue,代码:
<template>
<h3>Bingo主页面板</h3>
</template>

<script>
export default {
  name: "Bingo"
}
</script>

<style scoped>

</style>
访问http://localhost:5173/ 就看到了我们的主页面板页面。

【3】ant-design插件
3.1、Antd组件库
Ant Design是蚂蚁金服出品基于 React 实现的一套组件库开源框架,最早是在2015年发布的,可以说是目前国内使用率最高的UI组件库,在国际上也有很大的知名度。我们现在学习的是vue框架,官方已经开源出了一套ant-design for vue版本。
Ant Design 官方介绍: "在中台产品的研发过程中,会出现不同的设计规范和实现方式,但其中往往存在很多类似的页面和组件,给设计师和工程师带来很多困扰和重复建设,大大降低了产品的研发效率。"
特点:
- 专为Web应用程序设计的企业级UI。
- 开箱即用的一组高质量组件。
- 用具有可预测的静态类型的TypeScript编写。
- 整套设计资源和开发工具。
- 支持数十种语言的国际化。
- 强大的主题自定义细节。
常用网址:
Ant Design for React 官网:https://ant.design/
Ant Design of Vue 官网地址:https://www.antdv.com/components/overview-cn/
2.2.1 安装使用
终端下安装antd组件库,文档:https://next.antdv.com/docs/vue/getting-started-cn
命令如下:
cd bingo_web  # 注意,客户端安装模块的所有命令,务必在package.json所在目录下操作。
yarn add ant-design-vue@next  --registry https://registry.npm.taobao.org
在src/main.js文件中引入Antd框架。代码:
import { createApp } from 'vue'
import './style.css'
import App from './App.vue'
import router from './router'
import Antd from 'ant-design-vue';
import 'ant-design-vue/dist/antd.css'; // 在新版本的Antd中,已经被踢出,如果提示css无法加载导致出错,则删除掉这行代码

createApp(App).use(router).use(Antd).mount('#app')
下面我们在src/views/Bingo.vue页面组件中引入一个ant-design的button按钮,查看是否成功安装并引入。
文档:https://next.antdv.com/components/button-cn
代码:
<template>
  <div>站点首页</div>
  <a-button type="primary">Primary Button</a-button>
</template>

<script setup>

</script>

<style scoped>
/* 子组件中所有的css样式,都应该是局部的,只作用于当前组件,所以需要设置scoped属性 */

</style>
2.2.2 图表组件
作为一个运维项目,很多时候需要基于图表可视化展示服务器相关数据,所以我们还需要借助图表开源插件,比如echarts和Highcharts,我们本次采用的是百度开源的echarts。
Echarts官方:https://echarts.apache.org/zh/index.html
命令如下:
cd bingo_web  # 注意,客户端安装模块的所有命令,务必在package.json所在目录下操作。
yarn add echarts   --registry https://registry.npm.taobao.org
安装完成以后,直接可以在src/views/Bingo.vue页面组件中进行使用Echarts基本示例查看效果,代码:
<template>
  <div>站点首页</div>
  <a-button type="primary">Primary Button</a-button>
  <div class="chart" ref="chart"></div>
</template>

<script setup>
import {onMounted, ref} from 'vue';
import * as echarts from 'echarts';

const chart = ref();
const option = {
  title: {
    text: 'Referer of a Website',
    subtext: 'Fake Data',
    left: 'center'
  },
  tooltip: {
    trigger: 'item'
  },
  legend: {
    orient: 'vertical',
    left: 'left'
  },
  series: [
    {
      name: 'Access From',
      type: 'pie',
      radius: '50%',
      data: [
        {value: 1048, name: 'Search Engine'},
        {value: 735, name: 'Direct'},
        {value: 580, name: 'Email'},
        {value: 484, name: 'Union Ads'},
        {value: 300, name: 'Video Ads'}
      ],
      emphasis: {
        itemStyle: {
          shadowBlur: 10,
          shadowOffsetX: 0,
          shadowColor: 'rgba(0, 0, 0, 0.5)'
        }
      }
    }
  ]
};
onMounted(() => {

  console.log(":::", chart.value)
  let myChart = echarts.init(chart.value);
  myChart.setOption(option);
})
</script>

<style scoped>
/* 子组件中所有的css样式,都应该是局部的,只作用于当前组件,所以需要设置scoped属性 */
.chart {
  width: 500px;
  height: 500px;
  float: left;
  margin: 0 auto 0 100px;
}
</style>
等待项目重启,查看浏览器效果如下:

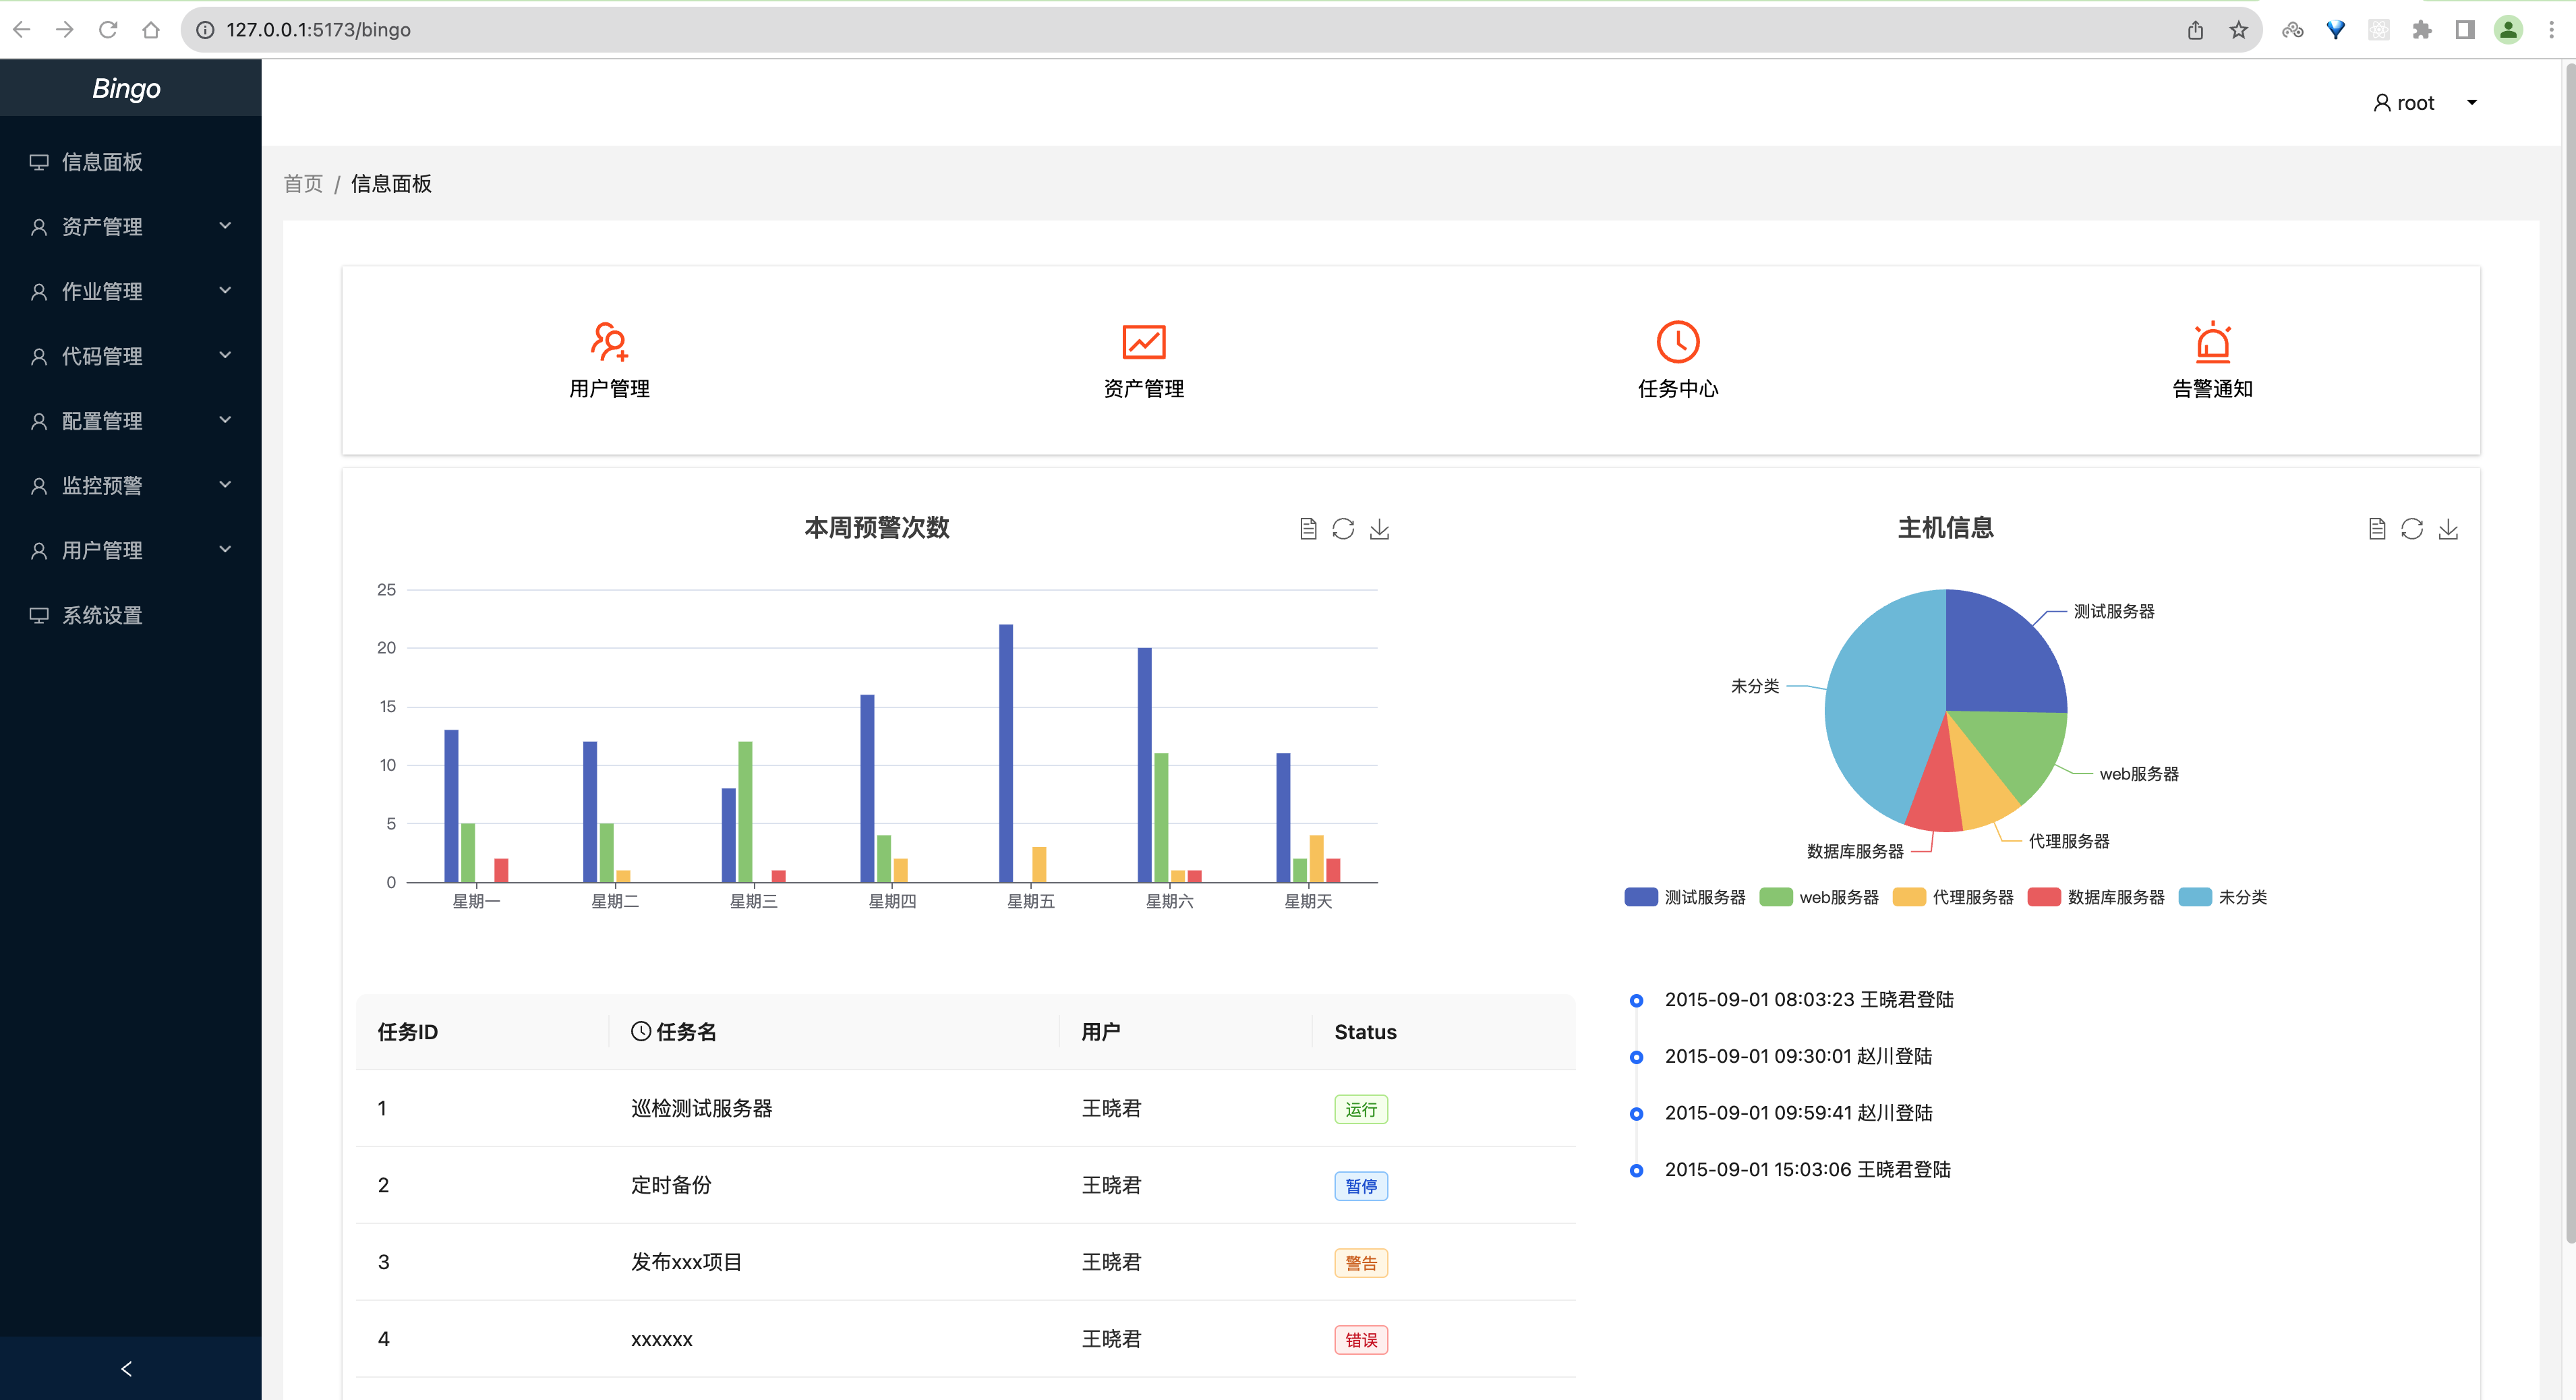
3.2、页面展示
3.2.1 首页面板
上面的主页面板代码太乱了,我们换个面板,让使用者清晰整个站点的重要数据。因为涉及到部分图标的展示,所以我们安装下Antd的图标组件。
cd bingo_web  # 注意,客户端安装模块的所有命令,务必在package.json所在目录下操作。
yarn add @ant-design/icons-vue --registry https://registry.npm.taobao.org
src/views/Bingo.vue,代码:
<template>
  <a-row class="top">
    <a-col class="item" :span="6">
      <div class="item-box">
        <usergroup-add-outlined class="icon-style" />
        <p>用户管理</p>
      </div>
    </a-col>
    <a-col class="item" :span="6">
      <div class="item-box">
        <fund-outlined class="icon-style" />
        <p>资产管理</p>
      </div>
    </a-col>
    <a-col class="item" :span="6">
      <div class="item-box">
        <clock-circle-outlined class="icon-style" />
        <p>任务中心</p>
      </div>
    </a-col>
    <a-col class="item" :span="6">
      <div class="item-box">
        <alert-outlined class="icon-style" />
        <p>告警通知</p>
      </div>
    </a-col>
  </a-row>
  <!-- 预警图表与主机信息图表 -->
  <a-row class="data-list">
    <a-col :span="12" class="item">
      <div class="item-box">
        <div class="alert-chart" ref="alert"></div>
      </div>
    </a-col>
    <a-col :span="12" class="item">
      <div class="item-box">
        <div class="host-chart" ref="host"></div>
      </div>
    </a-col>
    <a-col :span="14" class="task-data item">
      <div class="item-box">
        <a-table :columns="taskColumns" :data-source="taskData" :pagination="false">
          <template #headerCell="{ column }">
            <template v-if="column.key === 'title'">
              <span>
                <clock-circle-outlined />
                {{column.title}}
              </span>
            </template>
          </template>

          <template #bodyCell="{ column, record }">
            <template v-if="column.key === 'user'">
              <a>
                {{ record.user }}
              </a>
            </template>
            <template v-else-if="column.key === 'status'">
              <a-tag :color="['blue','green','orange','red'][record.status]">
                {{['暂停', '运行', '警告','错误'][record.status]}}
              </a-tag>
            </template>
          </template>
        </a-table>
      </div>
    </a-col>
    <a-col :span="8" class="item">
      <div class="item-box timeline">
          <a-timeline>
            <a-timeline-item>2015-09-01 08:03:23 王晓君登陆</a-timeline-item>
            <a-timeline-item>2015-09-01 09:30:01 赵川登陆</a-timeline-item>
            <a-timeline-item>2015-09-01 09:59:41 赵川登陆</a-timeline-item>
            <a-timeline-item>2015-09-01 15:03:06 王晓君登陆</a-timeline-item>
          </a-timeline>
      </div>
    </a-col>
  </a-row>
</template>

<script setup>
import {UsergroupAddOutlined, FundOutlined,ClockCircleOutlined, AlertOutlined, SmileOutlined, DownOutlined} from '@ant-design/icons-vue';
import { ref, onMounted } from 'vue';
import * as echarts from 'echarts';
import {AlertChartOption, HostChartOption} from "../charts/bingo.js";

// 预警图表
const alert = ref()
// 主机图表
const host = ref()

onMounted(()=>{
  echarts.init(alert.value).setOption(AlertChartOption);
  echarts.init(host.value).setOption(HostChartOption);
})

const taskColumns = [{
  title: '任务ID',
  dataIndex: 'id',
  key: 'id',
}, {
  title: '任务名',
  dataIndex: 'title',
  key: 'title',
}, {
  title: '用户',
  dataIndex: 'user',
  key: 'user',
}, {
  title: 'Status',
  dataIndex: 'status',
  key: 'status',
}];

const taskData = [{
  key: '1',
  id: 1,
  title: '巡检测试服务器',
  user: '王晓君',
  status: 1,
}, {
  key: '2',
  id: 2,
  title: '定时备份',
  user: '王晓君',
  status: 0,
}, {
  key: '3',
  id: 3,
  title: '发布xxx项目',
  user: '王晓君',
  status: 2,
}, {
  key: '4',
  id: 4,
  title: 'xxxxxx',
  user: '王晓君',
  status: 3,
}];

</script>

<style scoped>
/* 子组件中所有的css样式,都应该是局部的,只作用于当前组件,所以需要设置scoped属性 */
.top {
  margin: 10px 20px;
  box-shadow: 0 0 2px rgba(0,0,0,.125), 0 1px 3px rgba(0,0,0,.2);
}
.top .item {
  width: 60px;
  text-align: center;
  padding: 10px 0;
  cursor: pointer;
}
.item-box{
  border-radius: 5px;
  background: #fff;
  transition: all .5s linear;
}
.top .item-box:hover{
  background: #ff5500;
}
.top .item-box:hover .icon-style{
  color: #f0f0f0;
}
.top .item-box:hover p {
  color: #f0f0f0;
}
.icon-style{
  font-size: 32px;
  color: #ff5500;
}
.top .item p{
  margin-top: 10px;
}
.data-list{
  margin: 10px 20px;
  box-shadow: 0 0 1px rgba(0,0,0,.125), 0 1px 3px rgba(0,0,0,.2);
}
.alert-chart{
  width: 100%;
  height: 300px;
}

.host-chart{
  width: 100%;
  height: 300px;
}
.item-box{
  margin: 10px;
  padding-top: 20px;
  padding-bottom: 20px;
}

.timeline{
  padding-left: 20px;
}
</style>
因为图表相关的参数代码相对比较多,而且存在复用的可能性,所以我们在src目录下创建一个charts目录,按bingo.vue的页面组件名来创建一个独立的js文件bingo.js来保存图表相关代码,src/charts/bingo.js,代码:
export const AlertChartOption = {
    title: {
    text: '本周预警次数',
    left: 'center'
  },
  tooltip: {
    trigger: 'axis',
    axisPointer: {
      type: 'shadow'
    }
  },
  toolbox: {
    show: true,
    feature: {
      mark: { show: true },
      dataView: { show: true, readOnly: false },
      restore: { show: true },
      saveAsImage: { show: true }
    }
  },
  grid: {
    left: '2%',
    right: '2%',
    bottom: '1%',
    containLabel: true
  },
  xAxis: [
    {
      type: 'category',
      data: ['星期一', '星期二', '星期三', '星期四', '星期五', '星期六', '星期天'],
      axisTick: {
        alignWithLabel: true
      }
    }
  ],
  yAxis: [
    {
      type: 'value'
    }
  ],
  series: [
    {
      name: '注意',
      type: 'bar',
      barWidth: '10%',
      data: [13, 12, 8, 16, 22, 20, 11]
    },
    {
      name: '警告',
      type: 'bar',
      barWidth: '10%',
      data: [5, 5, 12, 4, 0, 11, 2]
    },
    {
      name: '故障',
      type: 'bar',
      barWidth: '10%',
      data: [0, 1, 0, 2, 3, 1, 4]
    },
    {
      name: '严重',
      type: 'bar',
      barWidth: '10%',
      data: [2, 0, 1, 0, 0, 1, 2]
    }
  ]
};


export const HostChartOption = {
  title: {
    text: '主机信息',
    left: 'center'
  },
  tooltip: {
    trigger: 'item'
  },
  toolbox: {
    show: true,
    feature: {
      mark: { show: true },
      dataView: { show: true, readOnly: false },
      restore: { show: true },
      saveAsImage: { show: true }
    }
  },
  legend: {
    top: 'bottom'
  },
  series: [
    {
      name: '主机信息',
      type: 'pie',
      radius: '60%',
      data: [
        { value: 45, name: '测试服务器' },
        { value: 25, name: 'web服务器' },
        { value: 15, name: '代理服务器' },
        { value: 14, name: '数据库服务器' },
        { value: 79, name: '未分类' }
      ],
      emphasis: {
        itemStyle: {
          shadowBlur: 10,
          shadowOffsetX: 0,
          shadowColor: 'rgba(0, 0, 0, 0.5)'
        }
      }
    }
  ]
};

3.2.2 公共页面
由于除了登录页面之外我们后面所有的组件都具备顶部导航栏和左侧菜单栏的效果,所以我们可以直接将公共部分页面内容放到了一个Base.vue组件中,里面通过 ant design vue中的布局组件来组织页面排版。
布局组件:https://next.antdv.com/components/layout-cn
src/views/Base.vue,代码:
<template>
  <a-layout style="min-height: 100vh">
    <a-layout-sider v-model:collapsed="collapsed" collapsible>
      <div class="logo" />
      <a-menu v-model:selectedKeys="selectedKeys" theme="dark" mode="inline">
        <a-menu-item key="1">
          <pie-chart-outlined />
          <span>Option 1</span>
        </a-menu-item>
        <a-menu-item key="2">
          <desktop-outlined />
          <span>Option 2</span>
        </a-menu-item>
        <a-sub-menu key="sub1">
          <template #title>
            <span>
              <user-outlined />
              <span>User</span>
            </span>
          </template>
          <a-menu-item key="3">Tom</a-menu-item>
          <a-menu-item key="4">Bill</a-menu-item>
          <a-menu-item key="5">Alex</a-menu-item>
        </a-sub-menu>
        <a-sub-menu key="sub2">
          <template #title>
            <span>
              <team-outlined />
              <span>Team</span>
            </span>
          </template>
          <a-menu-item key="6">Team 1</a-menu-item>
          <a-menu-item key="8">Team 2</a-menu-item>
        </a-sub-menu>
        <a-menu-item key="9">
          <file-outlined />
          <span>File</span>
        </a-menu-item>
      </a-menu>
    </a-layout-sider>
    <a-layout>
      <a-layout-header style="background: #fff; padding: 0" />
      <a-layout-content style="margin: 0 16px">
        <a-breadcrumb style="margin: 16px 0">
          <a-breadcrumb-item>User</a-breadcrumb-item>
          <a-breadcrumb-item>Bill</a-breadcrumb-item>
        </a-breadcrumb>
        <div :style="{ padding: '24px', background: '#fff', minHeight: '360px' }">
          Bill is a cat.
        </div>
      </a-layout-content>
      <a-layout-footer style="text-align: center">
        Ant Design ©2018 Created by Ant UED
      </a-layout-footer>
    </a-layout>
  </a-layout>
</template>
<script setup>
import { PieChartOutlined, DesktopOutlined, UserOutlined, TeamOutlined, FileOutlined } from '@ant-design/icons-vue';
import { ref } from 'vue';

const collapsed = ref(false);
const selectedKeys = ref(['1']);
</script>

<style>
#components-layout-demo-side .logo {
  height: 32px;
  margin: 16px;
  background: rgba(255, 255, 255, 0.3);
}

.site-layout .site-layout-background {
  background: #fff;
}
[data-theme='dark'] .site-layout .site-layout-background {
  background: #141414;
}
</style>
先注释掉原来的Bingo.vue组件的路由信息,src/rouer/index.js,代码:
import { createRouter, createWebHistory } from 'vue-router'

const routes = [
  // { path: '/bingo', meta: {title: "主页面板"}, name: 'bingo', component: ()=>import("../views/bingo.vue")},
  { path: '/bingo', meta: {title: ""}, name: 'Base', component: ()=>import("../views/Base.vue")},
]

const router = createRouter({
  history: createWebHistory(),
  routes
});

router.beforeEach((to, from, next) => {
  if(to.meta.title){
    // 修改页面原有标题
    document.title = to.meta.title
  }
  next();
});

export default router;
实现页面嵌套
src/views/Base.vue,代码:
<template>
<a-layout style="min-height: 100vh">
<a-layout-sider v-model:collapsed="collapsed" collapsible>
<div class="logo">
<span>bingo</span>
</div>
<a-menu v-for="menu in menu_list" v-model:selectedKeys="selectedKeys" theme="dark" mode="inline">
<a-menu-item v-if="menu.children.length===0" :key="menu.id">
<router-link :to="menu.menu_url">
<desktop-outlined/>
<span> {{ menu.title }}</span>
</router-link>
</a-menu-item>
<a-sub-menu v-else :key="menu.id">
<template #title>
<span>
<user-outlined/>
<span>{{ menu.title }}</span>
</span>
</template>
<a-menu-item v-for="child_menu in menu.children" :key="child_menu.id">
<router-link :to="child_menu.menu_url">{{ child_menu.title }}</router-link>
</a-menu-item>
</a-sub-menu>
</a-menu>
</a-layout-sider>
<a-layout>
<a-layout-header style="background: #fff;text-align: center">
<a-row>
<a-col :span="2" :offset="22">
<a-dropdown placement="bottom">
<p class="user"><UserOutlined /> root</p>
<template #overlay>
<a-menu>
<a-menu-item><LockOutlined/> 修改密码</a-menu-item>
<a-menu-item><LogoutOutlined/> 退出登陆</a-menu-item>
</a-menu>
</template>
</a-dropdown>
</a-col>
</a-row>
</a-layout-header>
<a-layout-content style="margin: 0 16px">
<a-breadcrumb style="margin: 16px 0">
<a-breadcrumb-item><a href="">首页</a></a-breadcrumb-item>
<a-breadcrumb-item>信息面板</a-breadcrumb-item>
</a-breadcrumb>
<div :style="{ padding: '24px', background: '#fff', minHeight: '550px'}">
<router-view></router-view>
</div>
</a-layout-content>
<a-layout-footer style="text-align: center">
<p>Copyright © 2023 bingo</p>
Power By <a href="">LinMo Jiang & Bazinga Yuan</a>
</a-layout-footer>
</a-layout>
</a-layout>
</template>
<script setup>
import { LogoutOutlined, LockOutlined, DesktopOutlined, UserOutlined} from '@ant-design/icons-vue';
import { ref } from 'vue';
const collapsed = ref(false);
const selectedKeys = ref(['1']);
const menu_list = ref([
{
id: 1, icon: 'mail', title: '信息面板', menu_url: '/bingo/', children: []
},
{
id: 2, icon: 'mail', title: '资产管理', menu_url: '/bingo/manage', children: [
{id: 9, icon: 'mail', title: '主机管理', menu_url: '/bingo/manage/host'},
{id: 10, icon: 'mail', title: 'DB管理', menu_url: '/bingo/manage/db'},
{id: 11, icon: 'mail', title: 'IDC机房', menu_url: '/bingo/manage/idc'},
{id: 12, icon: 'mail', title: '资产配置', menu_url: '/bingo/manage/config'},
]
},
{
"id": 3, icon: 'bold', title: '作业管理', menu_url: '/bingo/work', children: [
{id: 13, icon: 'mail', title: '批量任务', menu_url: '/bingo/work/tasks'},
{id: 14, icon: 'mail', title: '计划任务', menu_url: '/bingo/work/cron', children: []},
{id: 15, icon: 'mail', title: '任务模板', menu_url: '/bingo/work/template'},
]
},
{
id: 4, icon: 'highlight', title: '代码管理', menu_url: '/bingo/code', children: [
{id: 16, icon: 'mail', title: '应用管理', menu_url: '/bingo/code/app'},
{id: 17, icon: 'mail', title: '发布申请', menu_url: '/bingo/code/release'},
{id: 18, icon: 'mail', title: '代码仓库', menu_url: '/bingo/code/repo'},
{id: 19, icon: 'mail', title: '镜像仓库', menu_url: '/bingo/code/image'},
]
},
{
id: 5, icon: 'mail', title: '配置管理', menu_url: '/bingo/config', children: [
{id: 20, title: '环境管理', menu_url: '/bingo/config/env'},
{id: 21, title: '服务配置', menu_url: '/bingo/config/services'},
{id: 22, title: '应用配置', menu_url: '/bingo/config/app'}
]
},
{
id: 6, icon: 'mail', title: '监控预警', menu_url: '/bingo/monitor', children: [
{id: 23, title: '报警历史', menu_url: '/bingo/monitor/history'},
{id: 24, title: '报警联系人', menu_url: '/bingo/monitor/user'},
{id: 25, title: '报警联系组', menu_url: '/bingo/monitor/group'}
]
},
{
id: 7, icon: 'mail', title: '用户管理', menu_url: '/bingo/auth', children: [
{id: 26, title: '账户管理', menu_url: '/bingo/auth/user'},
{id: 27, title: '角色管理', menu_url: '/bingo/auth/role'},
{id: 28, title: '权限管理', menu_url: '/bingo/auth/permission'},
{id: 29, title: '菜单管理', menu_url: '/bingo/auth/menu'},
]
},
{
id: 8, icon: 'mail', title: '系统设置', menu_url: '/bingo/sys', children: []
},
])
</script>
<style>
.logo {
font-style: italic;
text-align: center;
font-size: 20px;
color:#fff;
margin: 0 0 10px;
line-height: 42px;
height: 42px;
background: rgba(255, 255, 255, 0.1);
}
.user{
position: relative;
}
.user:after{
content: "";
border: 4px solid transparent;
border-top: 4px solid #000;
position: absolute;
width: 0;
height: 0;
top: 30px;
right: 12px;
margin: auto;
}
</style>
基于router的嵌套子路由实现页面嵌套效果,所以在上面56行代码中,我们使用了<router-view></router-view>用于提供给路由组件将来替换子模板内容,接下来,我们还需要修改下路由配置才能看到真正效果。src/router/index.js,代码:
import { createRouter, createWebHistory } from 'vue-router'

const routes = [
  { path: '/bingo', meta: {title: ""}, name: 'Base', component: ()=>import("../views/Base.vue"), children: [
      { path: '', meta: {title: "主页面板"}, name: 'bingo', component: ()=>import("../views/Bingo.vue")},
    ]},
]

const router = createRouter({
  history: createWebHistory(),
  routes
});

router.beforeEach((to, from, next) => {
  if(to.meta.title){
    // 修改页面原有标题
    document.title = to.meta.title
  }
  next();
});

export default router;
等待项目重启,效果如下:
接下来,我们可以再次创建一个页面组件,用于将来管理公司的主机资产,src/views/Host.vue,代码:
<template>
  <div class="host">
    <h1>host页面</h1>
  </div>
</template>

<script setup>

</script>

<style scoped>

</style>
绑定路由,src/router/index.js,代码:
import { createRouter, createWebHistory } from 'vue-router'

const routes = [
  { path: '/bingo', meta: {title: ""}, name: 'Base', component: ()=>import("../views/Base.vue"), children: [
      { path: '', meta: {title: "主页面板"}, name: 'bingo', component: ()=>import("../views/bingo.vue")},
      { path: 'manage/host', meta: {title: "主机管理"}, name: 'Host', component: ()=>import("../views/Host.vue")},
    ]},
]

const router = createRouter({
  history: createWebHistory(),
  routes
});

router.beforeEach((to, from, next) => {
  if(to.meta.title){
    // 修改页面原有标题
    document.title = to.meta.title
  }
  next();
});

export default router;

3.2.3 登陆界面
src/views/Login.vue,代码:
<template>
  <div class="login box">
    <img src=".https://iteshell.oss-cn-beijing.aliyuncs.com/bookshell/golang/assets/login.jpg" alt="">
    <div class="login">
      <div class="login-title">
        <p class="hi">Hello,Bingo!</p>
      </div>
      <div class="login_box">
        <div class="title">
          <span>登录</span>
        </div>
        <div class="inp">
          <a-input v-model:value="username" type="text" placeholder="用户名" class="user"></a-input>
          <a-input v-model:value="password" type="password" class="pwd" placeholder="密码"></a-input>
          <div class="remember">
            <a-checkbox type="checkbox" v-model:checked="remember">记住密码</a-checkbox>
          </div>
          <button class="login_btn" @click="login">登录</button>
        </div>
      </div>
    </div>
  </div>
</template>

<script setup>
import {ref} from "vue";

const username = ref('');
const password = ref('');
const remember = ref(true);

const login = () => {

}
</script>

<style scoped>
.login.box {
  overflow: hidden;
  height: 100vh;
}

.login .hi {
  font-size: 20px;
  font-style: italic;
}

.box {
  width: 100%;
  height: 100%;
  position: relative;
  overflow: hidden;
}

.box img {
  width: 100%;
  min-height: 100%;
}

.box .login {
  position: absolute;
  width: 500px;
  height: 400px;
  left: 0;
  margin: auto;
  right: 0;
  bottom: 0;
  top: -338px;
}

.login .login-title {
  width: 100%;
  text-align: center;
}

.login-title img {
  width: 190px;
  height: auto;
}

.login-title p {
  font-size: 18px;
  color: #fff;
  letter-spacing: .29px;
  padding-top: 10px;
  padding-bottom: 50px;
}

.login_box {
  width: 400px;
  height: auto;
  background: rgba(255, 255, 255, 0.3);
  box-shadow: 0 2px 4px 0 rgba(0, 0, 0, .5);
  border-radius: 4px;
  margin: 0 auto;
  padding-bottom: 40px;
}

.login_box .title {
  font-size: 20px;
  color: #9b9b9b;
  letter-spacing: .32px;
  border-bottom: 1px solid #e6e6e6;
  display: flex;
  justify-content: space-around;
  padding: 50px 60px 0 60px;
  margin-bottom: 20px;
  cursor: pointer;
}

.login_box .title span:nth-of-type(1) {
  color: #4a4a4a;
  border-bottom: 2px solid #396fcc;
}

.inp {
  width: 350px;
  margin: 0 auto;
}

.inp input {
  outline: 0;
  width: 100%;
  height: 45px;
  border-radius: 4px;
  border: 1px solid #d9d9d9;
  text-indent: 20px;
  font-size: 14px;
  background: #fff !important;
}

.inp .user {
  margin-bottom: 16px;
}

.login_btn {
  width: 100%;
  height: 45px;
  background: #396fcc;
  border-radius: 5px;
  font-size: 16px;
  color: #fff;
  letter-spacing: .26px;
  margin-top: 30px;
}

.remember {
  margin-top: 10px;
}
</style>
登陆页面不存在菜单等公共部分页面,所以我们单独注册路由,src/router/index.js,代码:
import { createRouter, createWebHistory } from 'vue-router'

const routes = [
  { path: '/bingo', meta: {title: ""}, name: 'Base', component: ()=>import("../views/Base.vue"), children: [
      { path: '', meta: {title: "主页面板"}, name: 'bingo', component: ()=>import("../views/bingo.vue")},
      { path: 'manage/host', meta: {title: "主机管理"}, name: 'Host', component: ()=>import("../views/Host.vue")},
    ]},

  { path: '/', meta: {title: "用户登录"}, name: 'Login', component: ()=>import("../views/Login.vue")},
]

const router = createRouter({
  history: createWebHistory(),
  routes
});

router.beforeEach((to, from, next) => {
  if(to.meta.title){
    // 修改页面原有标题
    document.title = to.meta.title
  }
  next();
});

export default router;
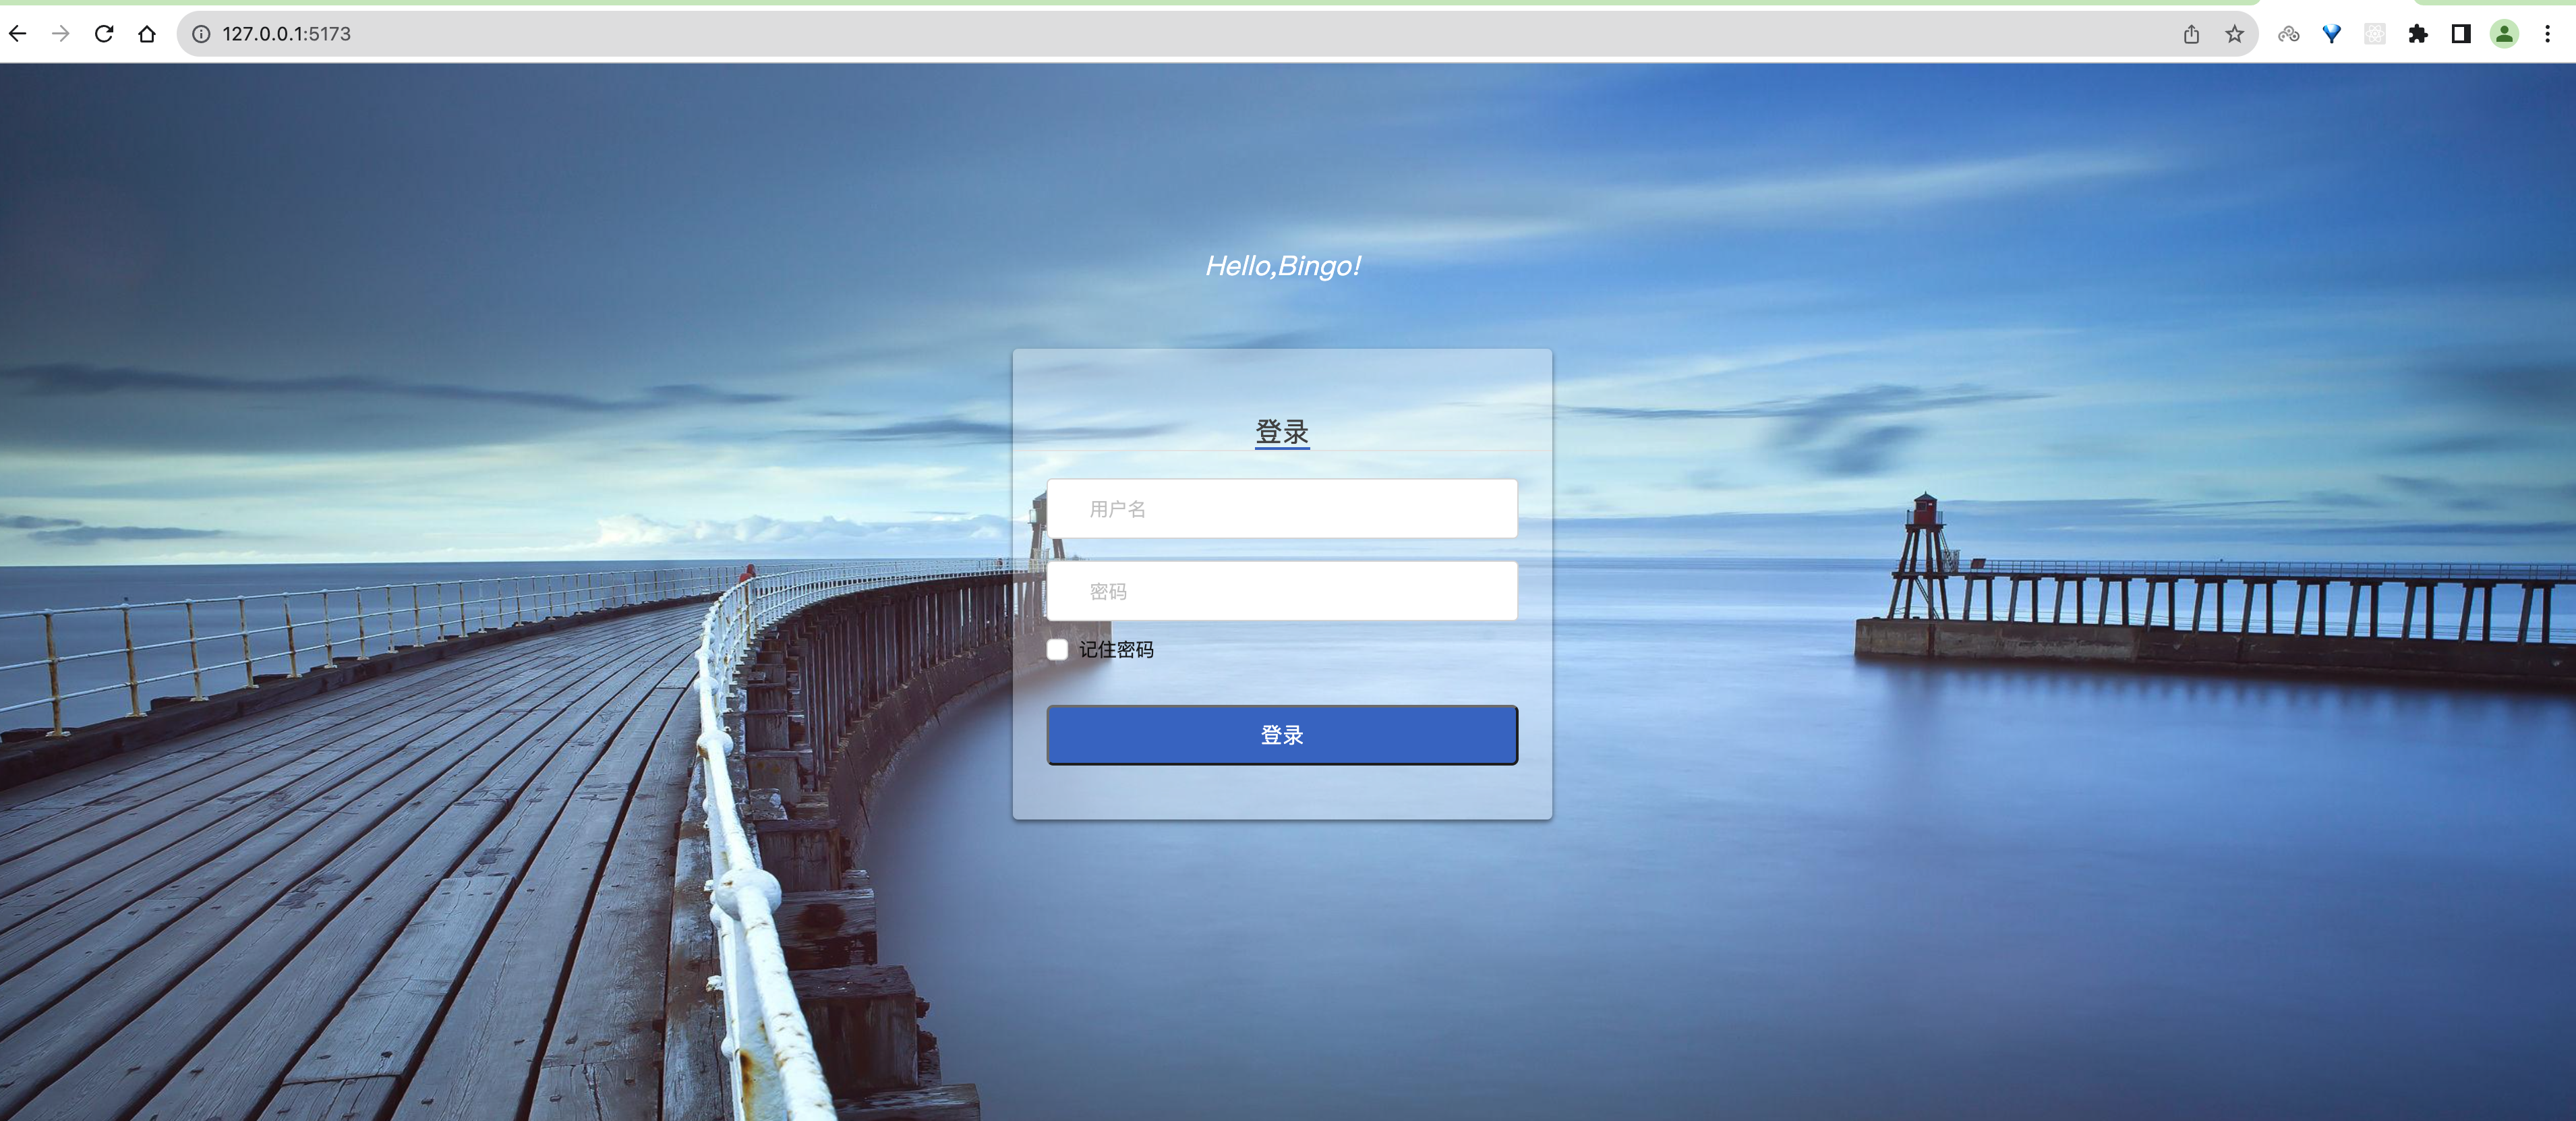
登陆界面效果如下:
二、后端初始化
2.1、搭建项目
mkdir bingo_api
cd bingo_api
go mod init bingo_api
创建好项目之后,通过goland打开,在编辑器的配置中,切换源代理GOPROXY


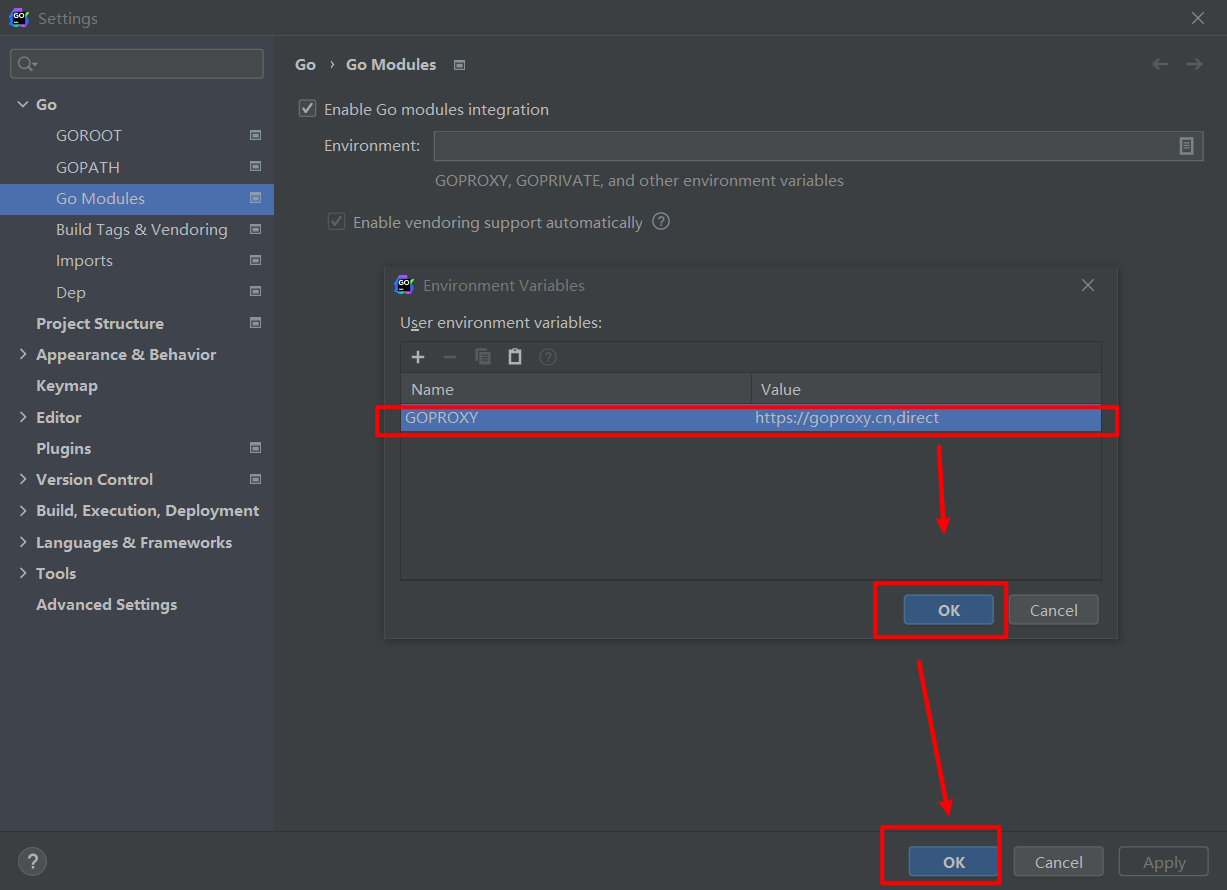
GOPROXY https://proxy.golang.org,direct
# 阿里云
export GOPROXY=https://mirrors.aliyun.com/goproxy/
# 七牛云
export GOPROXY= https://goproxy.cn
如果没有goland的同学,可以自己买个激活码,当然也可以使用其他的编辑器。
2.2、目录结构
└── bingo_api/
     ├── logs/          # 项目运行时/开发时日志目录
     └── application/   # 开发主应用目录
          ├── api/        # 接口层目录
          ├── config/     # 配置目录
          ├── constants/  # 全局常量目录
          ├── initialize/ # 项目初始化目录
          ├── middleware/ # 中间件层目录
          ├── model/      # 模型层目录
          ├── router/     # 路由目录
          ├── services/   # 业务层目录
          ├── utils/      # 工具库目录
          ├── validator/  # 验证逻辑目录
          └── main.go     # 项目入口文件
上面的目录结构图可以在终端下使用tree输出。如果没有安装tree,安装下就有了。
安装gin框架
go get -u github.com/gin-gonic/gin
application/main.go,代码:
package main

import (
	"github.com/gin-gonic/gin"
	"net/http"
)

func main() {
	// 1.创建路由
	router := gin.Default()
	// 2.绑定路由规则,执行的函数
	// gin.Context,封装了request和response
	router.GET("/", func(c *gin.Context) {
		// panic(&middleware.Api{Code: http.StatusInternalServerError, Message: "测试错误!"})
		c.String(http.StatusOK, "Hello Bingo!")
	})
	// 3.监听端口,默认在8080,因为客户端的vue已经运行占用了8080了,所以改成8000
	router.Run(":8080")
}
2.3、路由初始化
application/main.go,代码:
package main

import (
	"bingo_api/application/initialize"
)

func main() {
	// 1. 路由初始化
	Router := initialize.InitRouter()
	// 2.监听端口,默认在8080
	Router.Run(":8080")
}
application/initialize/router.go,代码:
package initialize

import (
	"github.com/gin-gonic/gin"
)

func InitRouter() *gin.Engine {

	// 1. 创建路由
	Router := gin.Default()
	// 2. Api路由分组
	ApiGroup := Router.Group("/test")
	ApiGroup.GET("/", func(context *gin.Context) {
		context.String(200, "Bingo Start")
	})

	return Router
}
2.4、配置初始化
初始化配置模块,application/config/config.go,代码:
package config

import (
	"encoding/json"
	"io/ioutil"
)

// 外界go开发项目: 配置文件都是 json、yaml、ini

// Config 整个项目的配置
type Config struct {
	Mode string `json:"mode"`
  Host string `json:"host"`
	Port int    `json:"port"`
}

// Conf 全局配置变量
var Conf = new(Config)

// Init 初始化配置;从指定文件加载配置文件
func Init(filePath string) error {
	/**
	filePath 配置文件json文件的路径
	*/
	b, err := ioutil.ReadFile(filePath)
	if err != nil {
		return err
	}
	return json.Unmarshal(b, Conf)
}
准备一个配置文件,项目根目录下创建config.json,代码:
{
  "host": "api.bingo.cn",
  "mode": "debug",
  "port": 8000
}
调用配置初始化函数,applicaton/main.go,代码:
package main

import (
	"bingo_api/application/config"
	"bingo_api/application/initialize"
	"fmt"
	"github.com/gin-gonic/gin"
	"path/filepath"
)

func main() {
	// 1. filepath.Dir(".") 是一个 Go 语言中的函数调用,用于获取当前目录的父目录。
	dir, err := filepath.Abs(filepath.Dir("."))
	if err != nil {
		panic(err.Error())
	}

	fmt.Println("dir", dir)

	// 2. 配置初始化
	if err := config.Init(fmt.Sprintf("%s/config.json", dir)); err != nil {
		panic(err.Error())
	}

	// 3. 设置调试模式
	gin.SetMode(config.Conf.Mode)

	// 4. 创建路由
	Router := initialize.InitRouter()

	// 监听端口
	Router.Run(fmt.Sprintf("%s:%d", config.Conf.Host, config.Conf.Port))
}
2.5、日志初始化
zap是Uber开发的非常快的、结构化的,分日志级别的Go日志库。根据Uber-go Zap的文档,它的性能比类似的结构化日志包更好,也比标准库更快。
github地址:https://github.com/uber-go/zap
安装
go get -u go.uber.org/zap
go get -u go.uber.org/zap/zapcore
go get -u github.com/natefinch/lumberjack
【1】日志等级
从上往下,等级越高。
DebugLevel   zap.S().Debug  // 调试,开发人员自己调试程序时输入的信息
InfoLevel    zap.S().Info   // 信息,程序在运行过程中,输入的细节信息
WarnLevel    zap.S().Warn   // 警告,程序遇到一些能运行,但是有可能在运行以后出现不预期的结果。
ErrorLevel   zap.S().Error  // 错误,程序遇到了一些功能性上,程序在判断上,出现了预期的错误。
PanicLevel   zap.S().Panic  // 异常,程序遇到了一些功能性上,程序在判断上,出现了不预期的错误。
FatalLevel   zap.S().Fatal  // 致命,程序遇到了致命语法级别错误,根本可能不能运行的,或者运行以后,无法执行的。
【2】基本使用
application/initialize/logger.go,代码:
package initialize

import "go.uber.org/zap"

func InitLogger() {
	// 日志初始化
	// logger, _ := zap.NewProduction()  // 用于项目生产阶段,格式: json【适合用于集成到第三方日志分析系统中的】
	logger, _ := zap.NewDevelopment()    // 用于项目开发阶段,格式: 普通文本格式【适合在终端查看】
	// 替换了zap的全局日志配置
	zap.ReplaceGlobals(logger)
}
main.go,代码:
package main

import (
	"bingo_api/application/config"
	"bingo_api/application/initialize"
	"fmt"
	"github.com/gin-gonic/gin"
	"go.uber.org/zap"
	"path/filepath"
)

func main() {
	// 获取一个基于整个目录入口所在的路径
	dir, err := filepath.Abs(filepath.Dir("."))
	if err != nil {
		panic(err.Error())
	}

	// 配置初始化
	if err := config.Init(fmt.Sprintf("%s/config.json", dir)); err != nil {
		panic(err.Error())
	}

	// 设置调试模式
	gin.SetMode(config.Conf.Mode)

	// 创建路由
	Router := initialize.InitRouter()

	// 日志初始化
	initialize.InitLogger()
	// zap 提供了一个S函数和L函数给我们开发者使用,调用S函数或L函数,可以得到一个全局的线程安全的logger对象
	zap.S().Infof("服务端启动...端口:%d", config.Conf.Port)

	// 监听端口
	if err := Router.Run(fmt.Sprintf("%s:%d", config.Conf.Host, config.Conf.Port)); err != nil {
		zap.S().Panic("服务端启动失败:", err.Error())
	}
}
【3】日志配置
配置文件中指定日志输出的文件名,单个日志文件的大小,周期,以及日志文件的备份数量。
新增日志相关的配置项,application/config/config.go,代码:
package config

import (
	"encoding/json"
	"io/ioutil"
)

// Config 整个项目的配置
type Config struct {
	Mode       string `json:"mode"`
  Host       string `json:"host"`
	Port       int    `json:"port"`
	*LogConfig `json:"log"`
}

// LogConfig 日志配置
type LogConfig struct {
	Level      string `json:"level"`
	Filename   string `json:"filename"`
	MaxSize    int    `json:"maxsize"`
	MaxAge     int    `json:"max_age"`
	MaxBackups int    `json:"max_backups"`
}

// Conf 全局配置变量
var Conf = new(Config)

// Init 初始化配置;从指定文件加载配置文件
func Init(filePath string) error {
	b, err := ioutil.ReadFile(filePath)
	if err != nil {
		return err
	}
	return json.Unmarshal(b, Conf)
}
config.json,代码:
{
  "mode": "debug",
  "host": "api.bingo.cn",
  "port": 8080,
  "log": {
    "level": "debug",
    "filename": "logs/bingo.log",
    "maxsize": 300,
    "max_age": 7,
    "max_backups": 10
  }
}
application/initialize/logger.go,代码:
package initialize

import (
	"github.com/natefinch/lumberjack"
	"go.uber.org/zap"
	"go.uber.org/zap/zapcore"
	"bingo_api/application/config"
)

var Logger *zap.Logger

func InitLogger(cfg *config.LogConfig) (err error) {
	// 日志初始化
	// 定制日志的格式
	writeSyncer := getLogWriter(cfg.Filename, cfg.MaxSize, cfg.MaxBackups, cfg.MaxAge)
	encoder := getEncoder()
	var l = new(zapcore.Level)
	if err = l.UnmarshalText([]byte(cfg.Level)); err != nil {
		return
	}
	core := zapcore.NewCore(encoder, writeSyncer, l)
	Logger = zap.New(core, zap.AddCaller())
	// logger, _ := zap.NewProduction()  // 用于项目生产阶段,格式: json【适合用于集成到第三方日志分析系统中的】
	// logger, _ := zap.NewDevelopment()    // 用于项目开发阶段,格式: 普通文本格式【适合在终端查看】
	// 替换了zap的全局日志配置
	zap.ReplaceGlobals(Logger)
	return
}

func getEncoder() zapcore.Encoder {
	encoderConfig := zap.NewProductionEncoderConfig()
	encoderConfig.EncodeTime = zapcore.ISO8601TimeEncoder
	encoderConfig.TimeKey = "time"
	encoderConfig.EncodeLevel = zapcore.CapitalLevelEncoder
	encoderConfig.EncodeDuration = zapcore.SecondsDurationEncoder
	encoderConfig.EncodeCaller = zapcore.ShortCallerEncoder
	return zapcore.NewJSONEncoder(encoderConfig)
}

func getLogWriter(filename string, maxSize, maxBackup, maxAge int) zapcore.WriteSyncer {
	lumberJackLogger := &lumberjack.Logger{
		Filename:   filename,
		MaxSize:    maxSize,
		MaxBackups: maxBackup,
		MaxAge:     maxAge,
	}
	return zapcore.AddSync(lumberJackLogger)
}
application/main.go,代码:
package main

import (
	"fmt"
	"github.com/gin-gonic/gin"
	"go.uber.org/zap"
	"path/filepath"
	"bingo_api/application/config"
	"bingo_api/application/initialize"
)

func main() {
	// 1. 获取一个基于整个目录入口所在的路径
	dir, err := filepath.Abs(filepath.Dir("."))
	if err != nil {
		panic(err.Error())
	}

	// 2. 配置初始化
	if err := config.Init(fmt.Sprintf("%s/config.json", dir)); err != nil {
		panic(err.Error())
	}

	// 设置调试模式
	gin.SetMode(config.Conf.Mode)

	// 3. 日志初始化
	if err := initialize.InitLogger(config.Conf.LogConfig); err != nil {
		fmt.Printf("init logger failed, err:%v\n", err)
		return
	}

	zap.S().Debugf("调试信息:%d", config.Conf.Port)

	// 4.创建路由
	Router := initialize.InitRouter()

	// 5. zap 提供了一个S函数和L函数给我们开发者使用,调用S函数或L函数,可以得到一个全局的线程安全的logger对象
	zap.S().Infof("服务端启动...端口:%d", config.Conf.Port)

	// 监听端口
	if err := Router.Run(fmt.Sprintf("%s:%d", config.Conf.Host, config.Conf.Port)); err != nil {
		zap.S().Panic("服务端启动失败:", err.Error())
	}
}
中间件中对每次的请求响应进行日志记录,application/middleware/logger.go,代码:
package middleware

import (
	"github.com/gin-gonic/gin"
	"go.uber.org/zap"
	"net"
	"net/http"
	"net/http/httputil"
	"os"
	"runtime/debug"
	"strings"
	"time"
)

// GinLogger 接收gin框架默认的日志
func GinLogger() gin.HandlerFunc {
	// 需要记录的是每次客户端访问时的上下文信息,所以此处返回一个匿名函数,在客户端请求时,触发中间件的时候,自动执行这个匿名函数
	return func(c *gin.Context) {
		start := time.Now()
		path := c.Request.URL.Path
		c.Next()
		cost := time.Since(start)
		// 记录日志
		zap.S().Info(path,
			zap.Int("status", c.Writer.Status()),
			zap.String("method", c.Request.Method),
			zap.String("ip", c.ClientIP()),
			zap.String("user-agent", c.Request.UserAgent()),
			zap.Duration("cost timer", cost),
		)
	}
}
注册中间件,application/initialize/router.go,代码:
package initialize

import (
	"bingo_api/application/middleware"
	"github.com/gin-gonic/gin"
)

func InitRouter() *gin.Engine {

	// 1. 创建路由
	Router := gin.Default()
	Router.Use(middleware.GinLogger())

	// 2. Api路由分组
	ApiGroup := Router.Group("/test")

	ApiGroup.GET("/", func(context *gin.Context) {
		context.String(200, "Bingo Start")
	})

	return Router
}
2.6、全局异常处理
applicaton/middleware/exceptions.go,代码:
package middleware

import (
	"github.com/gin-gonic/gin"
	"go.uber.org/zap"
	"net/http"
)

type Api struct {
	Code    int
	Message string
}

func ExceptionMiddleware(c *gin.Context) {
	 /**
	 异常处理
	 */
	defer func() {
		if r := recover(); r != nil {
			switch t := r.(type) {
			case *Api:
				zap.S().Error(t.Message)
				c.JSON(t.Code, gin.H{
					"message": t.Message,
				})
			default:
				zap.S().Error("服务器内部异常")
				c.JSON(http.StatusInternalServerError, gin.H{
					"message": "服务器内部异常",
				})
			}
			c.Abort()
		}
	}()

	c.Next()
}
initialize/router.go,代码:
Router.Use(middleware.ExceptionMiddleware)

2.7、数据库初始化
【1】mysql的初始化
1. 创建数据库
create database bingo default charset=utf8mb4;
-- mysql5.5以后推出的utf8mb4,这个是真正的utf8,能够容纳所有的中文,以前的utf-8会出现错乱的中文编码。
为当前项目创建数据库用户[这个用户只能看到bingo这个数据库]
# 创建用户:create user '用户名'@'主机地址' identified by '密码';
create user 'bingo_user'@'%' identified by 'bingo';  # %表示任意主机都可以通过当前账户登录到mysql
# 分配权限:grant 权限选项 on 数据库名.数据表 to '用户名'@'主机地址' with grant option;
grant all privileges on bingo.* to 'bingo_user'@'%' with grant option;
2. MySQL初始化
文档:https://gorm.io/zh_CN/docs/
增加数据库连接的配置项,config/config.go,代码:
package config

import (
	"encoding/json"
	"io/ioutil"
)

// 外界go开发项目: 配置文件都是 json、yaml、ini

// LogConfig 日志配置
type LogConfig struct {
	Level      string `json:"level"`
	Filename   string `json:"filename"`
	MaxSize    int    `json:"maxsize"`
	MaxAge     int    `json:"max_age"`
	MaxBackups int    `json:"max_backups"`
}

// DatabaseConfig 数据库配置
type DatabaseConfig struct {
	Driver          string `json:"driver"`
	Host            string `json:"host"`
	Port            string `json:"port"`
	Database        string `json:"database"`
	Username        string `json:"username"`
	Password        string `json:"password"`
	Charset         string `json:"charset"`
	MaximumConn     int    `json:"maximum_connection"`
	MaximumFreeConn int    `json:"maximum_free_connection"`
	TimeOut         int    `json:"timeout"`
}

// Config 整个项目的配置
type Config struct {
	Mode            string `json:"mode"`
  Host            string `json:"host"`
	Port            int    `json:"port"`
	*LogConfig      `json:"log"`
	*DatabaseConfig `json:"database"`
}

// Conf 全局配置变量
var Conf = new(Config)

// Init 初始化配置;从指定文件加载配置文件
func Init(filePath string) error {
	/**
	filePath 配置文件json文件的路径
	*/
	b, err := ioutil.ReadFile(filePath)
	if err != nil {
		return err
	}
	return json.Unmarshal(b, Conf)
}
增加数据库连接的配置项,applicetion/config.json,代码:
{
  "mode": "debug",
  "host": "api.bingo.cn",
  "port": 8080,
  "log": {
    "level": "debug",
    "filename": "logs/bingo.log",
    "maxsize": 300,
    "max_age": 7,
    "max_backups": 10
  },
  "database": {
    "driver": "mysql",
    "host": "127.0.0.1",
    "port": "3306",
    "database": "bingo",
    "username": "bingo_user",
    "password": "bingo",
    "charset": "utf8mb4",
    "maximum_connection": 10,
    "maximum_free_connection": 50,
    "timeout": -1
  }
}
封装初始化数据库连接工具函数,applicetion/database/mysql.go,代码:
package database

import (
	"bingo_api/application/config"
	"fmt"
	"github.com/jinzhu/gorm"
	_ "github.com/jinzhu/gorm/dialects/mysql"
	"go.uber.org/zap"
	"time"
)

var Orm *gorm.DB

func GetOrm(cfg *config.DatabaseConfig) *gorm.DB {
	dsn := fmt.Sprintf("%s:%s@tcp(%s:%s)/%s?charset=%s&parseTime=true&loc=Local",
		cfg.Username,
		cfg.Password,
		cfg.Host,
		cfg.Port,
		cfg.Database,
		cfg.Charset)
	var err error
	Orm, err = gorm.Open(cfg.Driver, dsn)
	if err != nil {
		zap.S().Errorf("database connection fail: %v", err.Error())
		panic(err.Error())
	}
	// 最大链接数
	Orm.DB().SetMaxOpenConns(cfg.MaximumConn)
	// 最大空闲连接数
	Orm.DB().SetMaxIdleConns(cfg.MaximumFreeConn)
	// 每个链接的最大生命周期
	Orm.DB().SetConnMaxLifetime(time.Duration(cfg.TimeOut))
	if Orm.Error != nil {
		zap.S().Errorf("database error: %v", Orm.Error)
		panic(Orm.Error)
	}

	zap.S().Infof("mysql连接成功: %v", dsn)

	return Orm
}

/*
最大连接数(MaxOpenConns):它限制了连接池中可以同时打开的连接数量。
通过设置最大连接数,可以防止过多的连接同时被创建,从而避免数据库服务器过载或资源耗尽的情况。
如果达到最大连接数限制,新的数据库连接请求将被阻塞,直到有连接被释放回连接池。

最大空闲连接数(MaxIdleConns):它限制了连接池中可以保持空闲的连接数量。
连接池中的空闲连接可以避免频繁地创建和销毁连接,从而提高性能。
设置适当的最大空闲连接数可以根据应用程序的负载情况平衡连接的创建和销毁成本,确保连接池中始终有足够的连接供应用程序使用。

设置连接的最大生命周期可以确保连接在一段时间后被释放,以防止连接长时间保持打开状态而导致资源耗尽。
*/
applicetion/initialize/db.go,代码:
package initialize

import (
	"bingo_api/application/config"
	"bingo_api/application/database"
	"bingo_api/application/model"
)

func InitDB(cfg *config.DatabaseConfig) {
	Orm := database.GetOrm(cfg)
	Orm.AutoMigrate(&model.User{})
	// 禁用复数
	Orm.SingularTable(true)
}
main.go,代码:
// 数据库初始化
initialize.InitDB(config.Conf.DatabaseConfig)
2.8、热自启
要在 Go Gin 项目中实现热重启(Hot Reload),可以使用第三方工具 fresh。fresh 是一个 Go 应用程序的自动重启工具,它能够在代码发生变化时重新编译并启动应用程序。
go get -u github.com/pilu/fresh
修改dir的值即可,bingo_api/application/main.go
终端下要在main.go入门程序所在位置,运行执行如下命令:
fresh
2.9、axios&跨域支持
2.9.1、安装配置axios
后面需要获取服务端的api接口数据,意味着要发送http请求,我们使用axios模块来请求服务端。
cd bingo_web  # 注意,客户端安装模块的所有命令,务必在package.json所在目录下操作。
yarn add axios@1.2.1  --registry https://registry.npm.taobao.org
创建src/http/index.js,编写axos对象初始化代码:
import axios from "axios";
import settings from "../settings";

const http =  axios.create({
  baseURL: settings.host,
  withCredentials: false,
})

// 请求拦截器
http.interceptors.request.use((config)=>{
    console.log("http请求之前进行请求头组装,会自动执行请求拦截器");
    return config;
}, (error)=>{
    console.log("http请求之后发生错误,会自动执行请求拦截器");
    return Promise.reject(error);
});


// 响应拦截器
http.interceptors.response.use((response)=>{
    console.log("服务端响应数据以后在执行then之前,会自动执行响应拦截器");
    return response;
}, (error)=>{
    console.log("服务端响应错误以后在执行catch之前,会自动执行响应拦截器");
    return Promise.reject(error);
});

export default http;
src/settings/index.js,代码:
const settings = {
    host: "http://api.bingo.cn:8000/",
}

export default settings;
从上面效果,可以看到当前客户端已经安装配置好了router路由模块以及axios请求模块,并可以正常使用的。
2.9.2、跨域支持
先用postman发送请求测试一下接口是否正常:

src/http/requests.js,代码:
import http from "./index.js";

// 获取站点配置信息
export const get_api_test = (params, headers) => {
    return http.get("test/", {params, headers})
};
然后在views\Host.vue发送ajax请求:
<template>
  <div class="host">
    <h1>host页面</h1>
  </div>
</template>

<script setup>
import {get_api_test} from "../http/requests.js";

get_api_test().then(response => {
  console.log("response:::", response)
})

</script>

<style scoped>

</style>
遇到跨域请求失败

【1】服务端实现跨域支持
基于gin的官方CORS中间件实现跨域资源共享,bingo_api/applicaton/middleware/cors.go,代码:
package middleware

import (
	"github.com/gin-contrib/cors"
	"time"
)

var CORS = cors.New(cors.Config{
	//准许跨域请求网站,多个使用,分开,限制使用*
	AllowOrigins: []string{"*"},
	//准许使用的请求方式
	AllowMethods: []string{"PUT", "PATCH", "POST", "GET", "DELETE"},
	//准许使用的请求表头
	AllowHeaders: []string{"Origin", "Authorization", "Content-Type"},
	//显示的请求表头
	ExposeHeaders: []string{"Content-Type"},
	//凭证共享,确定共享
	AllowCredentials: true,
	//容许跨域的原点网站,可以直接return true就万事大吉了
	AllowOriginFunc: func(origin string) bool {
		return true
	},
	//超时时间设定
	MaxAge: 24 * time.Hour,
})
调用中间件,在bingo_api/application/initialize/router.go,代码:
Router.Use(middleware.CORS)
完成了上面的步骤,我们就可以再访问host,通过后端提供数据给前端使用ajax访问了。

【2】客户端实现跨域支持
在vue.config.js中
/* 跨域代理 */
proxy: {
    "/api": {
        /* 目标代理服务器地址 */
        target: "http://api.bingo_api.cn:8080/api", //
        /* 允许跨域 */
        changeOrigin: true,
        ws: true,
        pathRewrite: {
            "^/api": ""   //  /api表示需要去匹配请求时的url,然后替换成target的值,由node.js发出请求
        }
    }
}
三、用户中心
3.1、用户模型
创建用户模型,测试数据库初始化是否正常使用/application/model/user.go,代码:
package model

import (
	. "bingo_api/application/database"
	"gorm.io/gorm"
)

/**
用户实体
*/

type User struct {
	gorm.Model
	Username     string `gorm:"unique_index;size:255;comment:'账户名'" json:"username" sql:"index"`
	HashPassword string `gorm:"not null;size:255;comment:'密码'" json:"-"`
	Password     string `gorm:"-" json:"password,omitempty"`
	Nickname     string `gorm:"size:255;comment:'昵称'" json:"nickname" sql:"index"`
	Mobile       string `gorm:"index;size:15;comment:'手机';" json:"mobile"`
	Email        string `valid:"email" gorm:"index;size:255;comment:'邮箱';" json:"email"`
	Avatar       string `gorm:"size:255;comment:'头像'" json:"avatar"`
	Sex          bool   `gorm:"type:boolean;default:true;comment:'性别'" json:"sex"`
	Ip           string `valid:"ip" gorm:"size:255;comment:'IP地址';" json:"ip"`
	Status       bool   `gorm:"type:boolean;default:true;comment:'状态'" json:"status"`
}

/**
设置表名
*/

func (User) TableName() string {
	return "user_info"
}

/**
创建用户
*/

func (user User) Insert() (id uint, err error) {
	//添加数据
	result := Orm.Create(&user)
	return user.ID, result.Error
}

/**
根据指定ID获取用户
*/

func (user *User) GetOneById(id uint) {
	Orm.First(&user, id)
}

/**
根据账户信息(用户名、手机、邮箱)获取用户
*/

func (user *User) GetOneByAccount(account string) {
	Orm.First(&user, "username = ? or mobile = ? or email= ?", account, account, account)
}

/**
获取所有用户
*/

func (user User) GetAll() []User {
	var users []User
	Orm.Find(&users)
	return users
}

/**
更新密码
*/

func (user User) ChangePassword(HashPasswrd string) {
	user.HashPassword = HashPasswrd
	Orm.Save(&user)
}
项目初始化并数据迁移,initialize/db.go,代码:
package initialize

import (
	"bingo_api/application/config"
	"bingo_api/application/database"
	"bingo_api/application/model"
	"fmt"
)

func InitDB(cfg *config.DatabaseConfig) {
	fmt.Println("hello ...")
	Orm := database.GetOrm(cfg)
	// 禁用复数
	Orm.SingularTable(true)
	// 数据迁移
	Orm.AutoMigrate(&model.User{})
}
3.2、创建账户的API接口
该接口目前仅用于测试添加超级用户,将来需要补充上权限。
业务层代码,bingo_api/application/services/user.go,代码:
package services

import (
	. "bingo_api/application/model"
	. "bingo_api/application/utils"
	"github.com/gin-gonic/gin"
)

/**
创建用户
*/

func CreateUser(ctx *gin.Context) (uint, error) {
	user := User{}
	var err error
	if err = ctx.ShouldBindJSON(&user); err != nil {
		return 0, err
	}

	user.HashPassword, err = MakeHashPassword(user.Password)
	if err != nil {
		return 0, err
	}

	return user.Insert()
}

/**
获取指定ID的用户
*/

func GetUserById(id uint) (user User) {
	user = User{}
	user.GetOneById(id)
	return user
}

/**
根据账户信息(用户名、手机、邮箱)获取用户
*/

func GetUserByAccount(account string) (user User) {
	user = User{}
	user.GetOneByAccount(account)
	return user
}

/**
获取所有用户
*/

func GetAllUser() []User {
	user := User{}
	return user.GetAll()
}

/**
更新密码
*/

func ChangeUserPassword(user User, RawPassword string) {
	password, _ := MakeHashPassword(RawPassword)
	user.ChangePassword(password)
}
工具方法,bingo_api/application/utils/string.go,代码:
package utils

import (
	. "bingo_api/application/constants"
	"golang.org/x/crypto/bcrypt"
	"math/rand"
	"time"
)

func Random(n int, chars string) string {
	if n <= 0 {
		return ""
	}
	r := rand.New(rand.NewSource(time.Now().UnixNano()))
	bytes := make([]byte, n, n)
	l := len(chars)
	for i := 0; i < n; i++ {
		bytes[i] = chars[r.Intn(l)]
	}
	return string(bytes)
}

func RandomLetters(n int) string {
	/**
	生成指定长度的字符串(字母)
	*/
	return Random(n, LETTERS)
}

func RandomNumeric(n int) string {
	/**
	生成指定长度的字符串(数字)
	*/
	return Random(n, NUMBERS)
}

func RandomLettersNumeric(n int) string {
	/**
	生成指定长度的字符串(数字+字母)
	*/
	return Random(n, LETTERS_NUMBERIC)
}

func RandomAscii(n int) string {
	/**
	生成指定长度的字符串(字母+数字+特殊字符)
	*/
	return Random(n, ASCII)
}

/*
 加密密码
*/

func MakeHashPassword(RawPassword string) (HashPasswrd string, err error) {
	pwd := []byte(RawPassword)
	hash, err := bcrypt.GenerateFromPassword(pwd, bcrypt.MinCost)
	if err != nil {
		return
	}
	HashPasswrd = string(hash)
	return
}

/**
验证密码
*/

func CheckPassword(HashPassword string, RawPassword string) bool {
	ByteHash := []byte(HashPassword)
	BytePwd := []byte(RawPassword)
	err := bcrypt.CompareHashAndPassword(ByteHash, BytePwd)
	if err != nil {
		return false
	}
	return true
}
常量文件中创建常用字符集合的常量,bingo_api/application/constants/common.go,代码:
package constants

/**
常用字符集合
*/

const NUMBERS string = "0123456789"
const LETTERS string = "ABCDEFGHIJKLMNOPQRSTUVWXYZabcdefghijklmnopqrstuvwxyz"
const SPECIALS string = "~!@#$%^*()_+-=[]{}|;:,./<>?"
const LETTERS_NUMBERIC string = LETTERS + NUMBERS
const ASCII string = LETTERS_NUMBERIC + SPECIALS
接口层,bingo_api/application/api/user.go,代码:
package api

import (
	"bingo_api/application/constants"
	. "bingo_api/application/services"
	"github.com/gin-gonic/gin"
	"net/http"
)

/**
用户认证登陆
*/

func UserAuthenticate(ctx *gin.Context) {
	var data map[string]string = map[string]string{
		"userame": "xiaoming",
		"age":     "16",
	}
	ctx.JSON(http.StatusOK, data)
}

/**
创建用户
*/

func UserCreate(ctx *gin.Context) {

	id, err := CreateUser(ctx)
	if err != nil || id < 1 {
		ctx.JSON(http.StatusOK, gin.H{
			"code":    constants.CodeCreateUserFail,
			"message": constants.CreateUserFail,
		})
		return
	}

	ctx.JSON(http.StatusCreated, gin.H{
		"code":    constants.CodeSuccess,
		"message": constants.CreateUserSuccess,
		"data":    id,
	})
}
消息提示常量,bingo_api/application/constants/message.go,代码:
package constants

const (
	CreateUserSuccess = "创建用户成功!"
	CreateUserFail    = "创建用户失败!"
)
消息ID常量,bingo_api/application/constants/code.go,代码:
package constants

const (
	CodeSuccess = 0 // 成功!
	CodeCreateUserFail = 1001  // 创建用户失败!
)
路由层,bingo_api/application/router/user.go,代码:
package router

import (
	"bingo_api/application/api"
	"bingo_api/application/utils"
	"github.com/gin-gonic/gin"
)

func InitUserRouter(Router *gin.RouterGroup) {
	/**
	用户相关的路由组
	*/
	UserRouter := Router.Group("user")
	{
		// 用户认证登陆
		utils.Register(UserRouter, []string{"GET", "POST"}, "authenticate", api.UserAuthenticate)
		// 用户创建
		utils.Register(UserRouter, []string{"POST"}, "", api.UserCreate)
	}
}
bingo_api/application/utils/router,
package utils

import "github.com/gin-gonic/gin"

func Register(r *gin.RouterGroup, httpMethods []string, relativePath string, handlers ...gin.HandlerFunc) gin.IRoutes {
	/**
	路由注册函数[一次性给同一个视图绑定多个不同的HTTP请求方法]
	*/
	var routes gin.IRoutes
	for _, httpMethod := range httpMethods {
		routes = r.Handle(httpMethod, relativePath, handlers...)
	}
	return routes
}
bingo_api/application/initialize/router,
package initialize

import (
	"bingo_api/application/middleware"
	. "bingo_api/application/router"
	"github.com/gin-gonic/gin"
)

func InitRouter() *gin.Engine {

	// 1. 创建路由
	Router := gin.Default()
	Router.Use(middleware.GinLogger())
	Router.Use(middleware.ExceptionMiddleware)
	Router.Use(middleware.CORS)

	// 2. Api路由分组
	ApiGroup := Router.Group("/test")

	ApiGroup.GET("/", func(context *gin.Context) {
		//panic("raise an error!!!")
		context.String(200, "Bingo Start")
	})

	InitUserRouter(ApiGroup)

	return Router
}
3.3、validator User
接下来,我们肯定是需要验证客户端提交的数据是否合法。因此,我们还需要安装一个插件:validator。validator本身提供了基于struct结构体的tag标签提供了一系列的验证规则和提供了自定义验证规范的方式给我们可以快速的完成客户端数据的校验工作。但是,validator默认返回的错误信息是英文的,因为我们还要翻译下错误信息。
# 验证模块
go get -u github.com/go-playground/validator/v10
# 翻译模块
go get -u github.com/go-playground/locales/zh
go get -u github.com/go-playground/universal-translator
go get -u github.com/go-playground/validator/v10/translations/zh
model/user.go代码:
/**
用户实体
*/

type User struct {
	gorm.Model
	Username      string `validate:"required,gte=5" label:"账户名" gorm:"unique_index;size:255;comment:'账户名'" json:"username"`
	HashPassword  string `gorm:"not null;size:255;comment:'密码'" json:"-"`
	Password      string `validate:"required" label:"登陆密码" gorm:"-" json:"password,omitempty"`
	Nickname      string `label:"昵称" gorm:"size:255;comment:'昵称'" json:"nickname" sql:"index"`
	Mobile        string `gorm:"index;size:15;comment:'手机';" json:"mobile"`
	Email         string `validate:"omitempty,email" gorm:"index;size:255;comment:'邮箱';" json:"email"`
	Avatar        string `gorm:"size:255;comment:'头像'" json:"avatar"`
	Sex           bool   `gorm:"type:boolean;default:true;comment:'性别'" json:"sex"`
	Ip            string `validate:"omitempty,ipv4" gorm:"size:255;comment:'IP地址';" json:"ip"`
	Status        bool   `gorm:"type:boolean;default:true;comment:'状态'" json:"status"`
}
bingo_api/application/utils/vaidator.go,代码:
package utils

import (
	"github.com/go-playground/locales/zh"
	ut "github.com/go-playground/universal-translator"
	"github.com/go-playground/validator/v10"
	. "github.com/go-playground/validator/v10/translations/zh"
	"reflect"
)

/**
生成验证器
*/

func GenValidate() (*validator.Validate, ut.Translator) {
	zhCh := zh.New()
	validate := validator.New()
	//注册一个函数,获取struct tag里自定义的label作为字段名
	validate.RegisterTagNameFunc(func(fld reflect.StructField) string {
		name := fld.Tag.Get("label")
		return name
	})

	UniversalTranslator := ut.New(zhCh)
	trans, _ := UniversalTranslator.GetTranslator("zh")
	_ = RegisterDefaultTranslations(validate, trans)
	return validate, trans
}
application/validator/user.go,代码:
package validator

import (
	. "bingo_api/application/model"
	. "bingo_api/application/utils"
	"errors"
	"github.com/go-playground/validator/v10"
)

/**
登录验证器
*/

func UserValidator(user *User) error {
	validate, trans := GenValidate()
	err := validate.Struct(user)
	if err != nil {
		for _, err := range err.(validator.ValidationErrors) {
			return errors.New(err.Translate(trans))
		}
	}
	return nil
}
services/user.go,代码:
package services

import (
	"bingo_api/application/constants"
	. "bingo_api/application/model"
	. "bingo_api/application/utils"
	"bingo_api/application/validator"
	"errors"
	"fmt"
	"github.com/gin-gonic/gin"
)

/**
用户登录认证
*/

func UserLogin(ctx *gin.Context) (user User, err error) {
	user = User{}
	if err = ctx.ShouldBindJSON(&user); err != nil {
		return user, err
	}

	// 校验输入字段
	if err = validator.UserValidator(&user); err != nil {
		return user, err
	}

	user.GetOneByAccount(user.Username)
	if user.ID < 1 {
		return user, errors.New(constants.NoSuchUser)
	}

	ret := CheckPassword(user.HashPassword, user.Password)

	if !ret {
		err = errors.New(constants.PasswordError)
		return
	}

	return
}

/**
创建用户
*/

func CreateUser(ctx *gin.Context) (uint, error) {
	user := User{}
	var err error
	if err = ctx.ShouldBindJSON(&user); err != nil {
		return 0, err
	}

	// 校验输入字段
	if err = validator.UserValidator(&user); err != nil {
		fmt.Println("err:::", err)
		return 0, err
	}

	user.HashPassword, err = MakeHashPassword(user.Password)
	if err != nil {
		return 0, err
	}

	return user.Insert()
}

/**
获取指定ID的用户
*/

func GetUserById(id uint) (user User) {
	user = User{}
	user.GetOneById(id)
	return user
}

/**
根据账户信息(用户名、手机、邮箱)获取用户
*/

func GetUserByAccount(account string) (user User) {
	user = User{}
	user.GetOneByAccount(account)
	return user
}

/**
获取所有用户
*/

func GetAllUser() []User {
	user := User{}
	return user.GetAll()
}

/**
更新密码
*/

func ChangeUserPassword(user User, RawPassword string) {
	password, _ := MakeHashPassword(RawPassword)
	user.ChangePassword(password)
}
api/user.go,代码:
package api

import (
	"bingo_api/application/constants"
	. "bingo_api/application/services"
	"github.com/gin-gonic/gin"
	"net/http"
)

/**
用户认证登陆
*/

func UserAuthenticate(ctx *gin.Context) {
	user, err := UserLogin(ctx)

	if err != nil || user.ID < 1 {
		ctx.JSON(http.StatusOK, gin.H{
			"code":    constants.CodeNoSuchUser,
			"message": err.Error(),
		})
		return
	}

	ctx.JSON(http.StatusCreated, gin.H{
		"code":    constants.CodeSuccess,
		"message": constants.Success,
		"data":    user,
	})
}

/**
创建用户
*/

func UserCreate(ctx *gin.Context) {

	id, err := CreateUser(ctx)

	if err != nil || id < 1 {
		ctx.JSON(http.StatusOK, gin.H{
			"code":    constants.CodeCreateUserFail,
			"message": constants.CreateUserFail + err.Error(),
		})
		return
	}

	ctx.JSON(http.StatusCreated, gin.H{
		"code":    constants.CodeSuccess,
		"message": constants.CreateUserSuccess,
		"data":    id,
	})
}
constants/message.go,代码:
package constants

const (
	Success           = "成功!"
	CreateUserFail    = "创建用户失败!"
	CreateUserSuccess = "创建用户成功!"
	NoSuchUser        = "用户不存在!"
	PasswordError     = "密码错误!"
)
constants/code.go,代码:
package constants

const (
	CodeSuccess = 0 // 成功!
	CodeCreateUserFail = 1001  // 创建用户失败!
	CodeNoSuchUser = 1002  // 当前用户不存在!
)

3.4、JWT
在用户注册或登录后,我们想记录用户的登录状态,或者为用户创建身份认证的凭证。我们使用Json Web Token认证机制。
很多公司开发的一些移动端可能不支持cookie,并且我们通过cookie和session做接口登录认证的话,效率其实并不是很高,我们的接口可能提供给多个客户端,session数据保存在服务端,那么就需要每次都调用session数据进行验证,比较耗时,所以引入了token认证的概念,我们可以通过jwt来完成原来cookie或者session的认证效果,接下来看看jwt是怎么实现的。
Json web token (JWT), 是为了在网络应用环境间传递声明(token,一段字符串)而执行的一种基于JSON的开放标准((RFC 7519).该token被设计为紧凑且安全的,特别适用于分布式站点的单点登录(SSO)场景。JWT的声明(token,一段字符串)一般被用来在身份提供者和服务提供者间传递被认证的用户身份信息,以便于从资源服务器获取资源,也可以增加一些额外的其它业务逻辑所必须的声明信息,该token也可直接被用于身份认证,也可被数据加密。

JWT就一段字符串,由三段信息构成的,将这三段信息文本用.拼接一起就构成了Jwt字符串。就像这样:
eyJhbGciOiJIUzI1NiIsInR5cCI6IkpXVCJ9.eyJzdWIiOiIxMjM0NTY3ODkwIiwibmFtZSI6IkpvaG4gRG9lIiwiYWRtaW4iOnRydWV9.TJVA95OrM7E2cBab30RMHrHDcEfxjoYZgeFONFh7HgQ
第一部分我们称它为头部(header),第二部分我们称其为载荷(payload, 类似于飞机上承载的物品),第三部分是签证(signature).
header
jwt的头部承载两部分信息:
- 声明token类型,这里是jwt,除了jwt就是Bearer
- 声明签名加密的算法 通常直接使用 HMAC SHA256
完整的头部就像下面这样的JSON/map:
map[string]string{
  "typ": "JWT",
  "alg": "HS256"
}
然后将头部进行base64.StdEncoding.EncodeToString编码,构成了第一部分.
eyJhbGciOiJIUzI1NiIsInR5cCI6IkpXVCJ9
Test:
package main

import (
	"encoding/base64"
	"encoding/json"
	"fmt"
	"strings"
)

func main() {
	// 头部信息
	headerData := map[string]string{
		"typ": "JWT",
		"alg": "HS256",
	}

	headerJson, _ := json.Marshal(headerData)
	headerBytes := []byte(string(headerJson))
	// base64编码
	headerString := strings.TrimRight(base64.URLEncoding.EncodeToString(headerBytes), "=")
	fmt.Println(headerString)

	// base64解码
	headerBytes, _ = base64.URLEncoding.DecodeString(headerString)
	fmt.Println(string(headerBytes)) // {"alg":"HS256","typ":"JWT"}

	type Header struct {
		Alg string `json:"alg"`
		Typ string `json:"typ"`
	}

	header := Header{}
	json.Unmarshal([]byte(headerBytes), &header)
	fmt.Printf("%#v", header)
}

// 各个语言中都有base64编码和解码的功能,所以我们jwt为了安全,需要配合第三段签证加密
payload
载荷就是存放有效信息的地方。这个名字像是特指飞机上承载的货品,这些有效信息可以存放下面三个部分信息。
- 标准声明(注册声明、预定义声明,registered claims)
- 公共声明(public claims)
- 私有声明(private claims)
标准声明 (官方规范,是建议但不强制使用) :
iss: jwt签发者
sub: jwt所面向的用户
aud: 接收jwt的一方
exp: jwt的过期时间,这个过期时间必须要大于签发时间
nbf: 定义在什么时间之前,该jwt都是不可用的.
iat: jwt的签发时间
jti: jwt的唯一身份标识,主要用来作为一次性token,从而回避重放攻击。
以上是JWT 规定的7个官方字段,供选用
公共声明 : 公共的声明可以添加任何的信息,一般添加用户的相关信息或其他业务需要的必要信息.但不建议添加敏感信息,因为该部分在客户端直接可以查看.
私有声明 : 私有声明是服务端和客户端所共同定义的声明,一般使用了ace算法进行对称加密和解密的,意味着该部分信息可以归类为明文信息。
定义一个payload,json格式的数据:
map[string]string{
    "sub":   "1234567890",
		"exp":   "3422335555",
		"name":  "yuan",
		"admin": "1",
		"info":  "123abc456",
}
然后将其进行base64.StdEncoding.EncodeToString编码,得到JWT的第二部分。
eyJhZG1pbiI6IjEiLCJleHAiOiIzNDIyMzM1NTU1IiwiaW5mbyI6IjEyM2FiYzQ1NiIsIm5hbWUiOiJ5dWFuIiwic3ViIjoiMTIzNDU2Nzg5MCJ9
package main

import (
	"encoding/base64"
	"encoding/json"
	"fmt"
	"strings"
)

func main() {

	payloadData := map[string]string{
		"sub":   "1234567890",
		"exp":   "3422335555",
		"name":  "yuan",
		"admin": "1",
		"info":  "123abc456",
	}
	payloadBytes, _ := json.Marshal(payloadData)

	// base64编码
	payloadString := strings.TrimRight(base64.URLEncoding.EncodeToString(payloadBytes), "=")
	fmt.Println(payloadString)

	// base64解码
	payloadBytes, _ = base64.URLEncoding.DecodeString(payloadString)
	fmt.Println(string(payloadBytes))

	type Payload struct {
		Sub   string `json:"sub"`
		Exp   string `json:"exp"`
		Name  string `json:"name"`
		Admin string `json:"admin"`
		Info  string `json:"info"`
	}

	payload := Payload{}
	json.Unmarshal([]byte(payloadBytes), &payload)
	fmt.Printf("%#v", payload)

}
signature
JWT的第三部分是一个签证信息,这个签证信息由三部分组成:
- header (base64编码后的)
- payload (base64编码后的)
- secret 密钥
这个部分需要base64加密后的header和base64加密后的payload使用.连接组成的字符串,然后通过header中声明的加密算法进行加盐secret组合加密,然后就构成了jwt的第三部分。
package main

import (
	"crypto/hmac"
	"crypto/sha256"
	"encoding/base64"
	"encoding/hex"
	"encoding/json"
	"fmt"
	"strings"
)

func main() {

	// 头部
	header := map[string]string{
		"typ": "JWT",
		"alg": "HS256",
	}
	ret, _ := json.Marshal(header)
	headerString := base64.URLEncoding.EncodeToString(ret)
	fmt.Println(headerString)

	// 载荷
	payload := map[string]string{
		"sub":   "1234567890",
		"exp":   "3422335555",
		"name":  "yuan",
		"admin": "1",
		"info":  "123abc456",
	}
	ret, _ = json.Marshal(payload)

	// base64编码
	payloadString := strings.TrimRight(base64.URLEncoding.EncodeToString(ret), "=")
	fmt.Println(payloadString)

	// 签证
	// HMACSHA256(base64UrlEncode(header) + "." + base64UrlEncode(payload), secret)
	secret := "secret"
	sign := fmt.Sprintf("%s.%s", headerString, payloadString)
	key := []byte(secret)
	h := hmac.New(sha256.New, key)
	h.Write([]byte(sign))
	signature := hex.EncodeToString(h.Sum(nil))

	fmt.Printf("%s.%s.%s", headerString, payloadString, signature)
}
将这三部分用.连接成一个完整的字符串,构成了最终的jwt:
eyJhbGciOiJIUzI1NiIsInR5cCI6IkpXVCJ9.eyJhZG1pbiI6IjEiLCJleHAiOiIzNDIyMzM1NTU1IiwiaW5mbyI6IjEyM2FiYzQ1NiIsIm5hbWUiOiJ5dWFuIiwic3ViIjoiMTIzNDU2Nzg5MCJ9.d7346bb5a519703477f400fc5e2eb5c341c79acce75b699f0aed0cbaf0e2fcfb
注意:secret是保存在服务器端的,jwt的签发生成也是在服务器端的,secret就是用来进行jwt的签发和jwt的验证,所以,它就是你服务端的私钥,在任何场景都不应该流露出去。一旦客户端得知这个secret, 那就意味着客户端是可以自我签发jwt了。
jwt的优点:
1. 实现分布式的单点登陆非常方便
2. 数据实际保存在客户端,所以我们可以分担服务端的存储压力
3. JWT不仅可用于认证,还可用于信息交换。善用JWT有助于减少服务器请求数据库的次数,jwt的构成非常简单,字节占用很小,所以它是非��常便于传输的。
jwt的缺点:
1. 数据保存在了客户端,我们服务端只认jwt,不识别客户端。
2. jwt可以设置过期时间,但是因为数据保存在了客户端,所以对于过期时间不好调整。
3. 因为jwt发放以后保存在了客户端,而且验证过程中并没有到数据库查验用户的状态,所以会出现用户被删除了/被拉黑,依然可以通过token访问进来。
# secret_key轻易不要改,一改所有客户端都要重新登录
3.5、go-jwt基本使用
(1)go-jwt的基本功能测试
关于签发和核验JWT,我们可以使用go-jwt包来完成。
go get -u github.com/dgrijalva/jwt-go
Test/jwt/main.go,测试代码,代码:
package main

import (
	"errors"
	"fmt"
	"github.com/dgrijalva/jwt-go"
	"time"
)

// 消息提示常量
const (
	TokenExpired     = "认证令牌过期!"
	TokenNotValidYet = "令牌尚未激活!"
	TokenMalformed   = "认证令牌格式有误!"
	TokenInvalid     = "无效的认证令牌!"
)

// SecretKey 秘钥
var (
	SecretKey string = "secret"
)

/**
JWT
*/

type JWT struct {
	SigningKey []byte
}

/**
载荷
*/

type PublicClaims struct {
	ID       string `json:"id"`
	Username string `json:"username"`
	jwt.StandardClaims
}

/**
新建一个jwt实例
*/

func NewJWT() *JWT {
	return &JWT{
		[]byte(GetSecretKey()),
	}
}

/**
获取SecretKey
*/

func GetSecretKey() string {
	return SecretKey
}

/**
生成一个AccessToken
*/

func (j *JWT) AccessToken(claims PublicClaims) (string, error) {
	token := jwt.NewWithClaims(jwt.SigningMethodHS256, claims)
	return token.SignedString(j.SigningKey)
}

/**
从Token中提取载荷
*/

func (j *JWT) GetPayloadByToken(tokenString string) (*PublicClaims, error) {
	token, err := jwt.ParseWithClaims(tokenString, &PublicClaims{}, func(token *jwt.Token) (interface{}, error) {
		return j.SigningKey, nil
	})
	if err != nil {
		if ve, ok := err.(*jwt.ValidationError); ok {
			if ve.Errors&jwt.ValidationErrorMalformed != 0 {
				return nil, errors.New(TokenMalformed)
			} else if ve.Errors&jwt.ValidationErrorExpired != 0 {
				return nil, errors.New(TokenExpired)
			} else if ve.Errors&jwt.ValidationErrorNotValidYet != 0 {
				return nil, errors.New(TokenNotValidYet)
			} else {
				return nil, errors.New(TokenInvalid)
			}
		}
	}
	if claims, ok := token.Claims.(*PublicClaims); ok && token.Valid {
		return claims, nil
	}
	return nil, errors.New(TokenInvalid)
}

/**
更新token
*/

func (j *JWT) RefreshToken(tokenString string) (string, error) {
	jwt.TimeFunc = func() time.Time {
		return time.Unix(0, 0)
	}
	token, err := jwt.ParseWithClaims(tokenString, &PublicClaims{}, func(token *jwt.Token) (interface{}, error) {
		return j.SigningKey, nil
	})
	if err != nil {
		return "", err
	}
	if claims, ok := token.Claims.(*PublicClaims); ok && token.Valid {
		jwt.TimeFunc = time.Now
		println(time.Now().Add(1 * time.Hour).Unix())
		claims.StandardClaims.ExpiresAt = time.Now().Add(1 * time.Hour).Unix()
		return j.AccessToken(*claims)
	}
	return "", errors.New(TokenInvalid)
}

func main() {
	publicClaims := PublicClaims{
		ID:       "1",
		Username: "yuan",
	}
	newJwt := NewJWT()
	token, _ := newJwt.AccessToken(publicClaims)
	println(token)

	refreshToken, _ := newJwt.RefreshToken(token)
	fmt.Println("refresh token:", refreshToken)

}
接下来,把jwt集成到项目中即可在用户注册或登录成功后,返回token即可。
(2)基于go-jwt的jwt包封装
新增配置项,把秘钥设置为配置信息,bingo_api/application/config/config.go,代码:
package config

import (
	"encoding/json"
	"github.com/dgrijalva/jwt-go"
	"io/ioutil"
)

// ... 代码省略
// ... 代码省略
// ... 代码省略

// Config 整个项目的配置
type Config struct {
	Mode                string `json:"mode"`
	Port                int    `json:"port"`
	SecretKey           string `json:"secret_key"`
	*LogConfig          `json:"log"`
	*DatabaseConfig     `json:"database"`
	*jwt.StandardClaims `json:"jwt"`
}
// ... 代码省略
// ... 代码省略
// ... 代码省略
bingo_api/application/config.json,代码:
{
  "mode": "debug",
  "port": 8000,
  // 代码省略...
  "secret_key": "Ub=~sV,U1QXmvHObh_My6#6-O9>}zK{8",
  "jwt": {
    "exp": 1800
  }
}
bingo_api/application/utils/jwt.go,代码:
package utils

import (
	"errors"
	"github.com/dgrijalva/jwt-go"
	"time"
	"bingo_api/application/config"
	. "bingo_api/application/constants"
)


/**
JWT基本结构体
*/

type JWT struct {
	SigningKey []byte
}


/**
 载荷
 */

type PublicClaims struct {
	ID         string `json:"id"`
	Username   string `json:"username"`
	Nickname   string `json:"nickname"`
	Avatar     string `json:"avatar"`
	jwt.StandardClaims
}


/**
新建一个jwt实例
*/

func NewJWT() *JWT {
	return &JWT{
		[]byte(config.Conf.SecretKey),
	}
}


/**
生成一个AccessToken
*/

func (j *JWT) AccessToken(claims PublicClaims) (string, error) {
	// 获取当前时间
	now := time.Now()
	// 获取当前时间的Unix时间戳
	nowAt := now.Unix()
	// 设置token的签发时间
	claims.IssuedAt = nowAt
	// 设置jwt的唯一身份标识,主要用来作为一次性token,从而回避重放攻击。
	claims.Id = uuid4()
	// 判断:如果配置项中有设置token的过期时间
	if config.Conf.ExpiresAt > 0 {
		// 则在token的载荷信息中记录,当前token的起用时间和过期时间
		expAt := now.Add(time.Duration(config.Conf.ExpiresAt) * time.Second).Unix()
		claims.ExpiresAt = expAt
		claims.NotBefore = nowAt
	}
	// 判断:如果配置中有设置token的起用时间
	if config.Conf.NotBefore > 0 {
		// 则在token的载荷信息中记录,当前token的起用时间
		nbfAt := now.Add(time.Duration(config.Conf.NotBefore) * time.Second).Unix()
		claims.NotBefore = nbfAt
	}

	token := jwt.NewWithClaims(jwt.SigningMethodHS256, claims)
	return token.SignedString(j.SigningKey)
}


/**
从Token中提取载荷
*/

func (j *JWT) GetPayloadByToken(tokenString string) (*PublicClaims, error) {
	token, err := jwt.ParseWithClaims(tokenString, &PublicClaims{}, func(token *jwt.Token) (interface{}, error) {
		return j.SigningKey, nil
	})
	if err != nil {
		if ve, ok := err.(*jwt.ValidationError); ok {
			if ve.Errors&jwt.ValidationErrorMalformed != 0 {
				return nil, errors.New(TokenIsMalformed)
			} else if ve.Errors&jwt.ValidationErrorExpired != 0 {
				return nil, errors.New(TokenIsExpired)
			} else if ve.Errors&jwt.ValidationErrorNotValidYet != 0 {
				return nil, errors.New(TokenIsNotValidYet)
			} else {
				return nil, errors.New(TokenIsInvalid)
			}
		}
	}
	if claims, ok := token.Claims.(*PublicClaims); ok && token.Valid {
		return claims, nil
	}
	return nil, errors.New(TokenIsInvalid)
}


/**
更新token
*/

func (j *JWT) RefreshToken(tokenString string) (string, error) {
	jwt.TimeFunc = func() time.Time {
		return time.Unix(0, 0)
	}
	token, err := jwt.ParseWithClaims(tokenString, &PublicClaims{}, func(token *jwt.Token) (interface{}, error) {
		return j.SigningKey, nil
	})
	if err != nil {
		return "", err
	}
	if claims, ok := token.Claims.(*PublicClaims); ok && token.Valid {
		jwt.TimeFunc = time.Now
		println(time.Now().Add(1 * time.Hour).Unix())
		claims.StandardClaims.ExpiresAt = time.Now().Add(1 * time.Hour).Unix()
		return j.AccessToken(*claims)
	}
	return "", errors.New(TokenIsInvalid)
}
声明错误提示的常量,bingo_api/application/constants/message.go,代码:
package constants

const (
	Success           = "成功!"
	CreateUserFail    = "创建用户失败!"
	CreateUserSuccess = "创建用户成功!"
	NoSuchUser        = "用户不存在!"
	PasswordError     = "密码错误!"

	TokenIsExpired     = "认证令牌过期!"
	TokenIsNotValidYet = "令牌尚未激活!"
	TokenIsMalformed   = "认证令牌格式有误!"
	TokenIsInvalid     = "无效的认证令牌!"
)
bingo_api/application/constants/code.go,代码:
package constants

const (
	CodeSuccess        = 0    // 成功!
	CodeFail           = -1   // 失败!
	CodeAuthticateFail = -2   // 认证失败!
	CodeCreateUserFail = 1001 // 创建用户失败!
	CodeNoSuchUser     = 1002 // 当前用户不存在
)
声明一个辅助函数,用于生成UUID格式字符串,提供给jwt的载荷。
go get -u github.com/satori/go.uuid
bingo_api/application/utils/string.go,代码:
package utils

import (
	"fmt"
	uuid "github.com/satori/go.uuid"
	"golang.org/x/crypto/bcrypt"
	"math/rand"
	"time"
	. "bingo_api/application/constants"
)

// 代码省略...
// 代码省略...
// 代码省略...

/**
 生成UUID4
 */

func uuid4() string {
	return fmt.Sprintf("%s", uuid.NewV4())
}
生成token接口测试
services/user.go
func UserLogin(ctx *gin.Context) (user User, err error) {
	user = User{}
	if err = ctx.ShouldBindJSON(&user); err != nil {
		return user, err
	}

	if err = validator.UserValidator(&user); err != nil {
		return user, err
	}

	user.GetOneByAccount(user.Username)
	if user.ID < 1 {
		return user, errors.New(constants.NoSuchUser)
	}

	ret := CheckPassword(user.HashPassword, user.Password)

	if !ret {
		err = errors.New(constants.PasswordError)
		return
	}

	return
}
bingo_api/application/api/user.go,代码:
package api

import (
	"github.com/gin-gonic/gin"
	"net/http"
	"strconv"
	"bingo_api/application/constants"
	. "bingo_api/application/services"
	. "bingo_api/application/utils"
)


/**
用户认证登陆
*/

func UserAuthenticate(ctx *gin.Context){

	// 用户登陆认证业务
	user, err := UserLogin(ctx)

	if err != nil || user.ID < 1 {
		ctx.JSON(http.StatusOK, gin.H{
			"code":    constants.CodeNoSuchUser,
			"message": constants.NoSuchUser+err.Error(),
		})
		return
	}

	// 生成token
	newJwt := NewJWT()
	publicClaims := PublicClaims {
		ID: strconv.Itoa(int(user.ID)),
		Username: user.Username,
		Nickname: user.Nickname,
		Avatar  : user.Avatar,
	}

	token, err := newJwt.AccessToken(publicClaims)
	if err != nil {
		panic(err.Error())
	}

	ctx.JSON(http.StatusCreated, gin.H{
		"code": constants.CodeSuccess,
		"message": constants.Success,
		"data": map[string]interface{}{
			"token": token,
		},
	})
}


// 代码省略...
// 代码省略...
// 代码省略...

验证token
声明中间件用于验证JWT token 的合法性(有效期、格式)。
bingo_api/application/middleware/jwt.go,代码:
package middleware

import (
"github.com/gin-gonic/gin"
"go.uber.org/zap"
"net/http"
"bingo_api/application/constants"
. "bingo_api/application/utils"
)

// JWTAuthorization 验证token
func JWTAuthorization() gin.HandlerFunc {
	return func(c *gin.Context) {
		token := c.Request.Header.Get("Authorization")
		if token == "" {
			c.JSON(http.StatusOK, gin.H{
				"code": constants.CodeAuthticateFail,
				"message": constants.TokenIsInvalid,
			})
			c.Abort()
			return
		}

		zap.S().Debugf("get token: %#v", token)

		j := NewJWT()
		// parseToken 解析token包含的信息
		claims, err := j.GetPayloadByToken(token)
		if err != nil {
			c.JSON(http.StatusOK, gin.H{
				"code": constants.CodeAuthticateFail,
				"message": err.Error(),
			})
			c.Abort()
			return
		}

		// 存储认证的载荷信息和token,保留至后面使用。
		c.Set("claims", claims)
		c.Set("access_token", token)
		c.Next()
	}
}
测试,给之前声明的创建用户的接口,加上token验证中间件。
在 initialize/router.go中设置jwt验证中间件
// 注册中间件
Router.Use(middleware.JWTAuthorization(), middleware.GinLogger(), middleware.GinRecovery(true))
这是全局中间件,像登录这样的请求不可能有token的,所以不要设置全局
比如我们给创建用户时添加token验证,在bingo_api/application/router/user.go,代码:
package router

import (
	"github.com/gin-gonic/gin"
	"bingo_api/application/middleware"
	"bingo_api/application/utils"

	"bingo_api/application/api"
)

func InitUserRouter(Router *gin.RouterGroup) {
	/**
	用户相关的路由组
	*/
	UserRouter := Router.Group("user")
  // UserRouter.Use(middleware.JWTAuthorization())
	{
		// 用户认证登陆
		utils.Register(UserRouter, []string{"GET", "POST"}, "authenticate", api.UserAuthenticate)
		// 用户创建
		// utils.Register(UserRouter, []string{"POST"}, "", api.UserCreate)
		utils.Register(UserRouter, []string{"POST"}, "", middleware.JWTAuthorization(), api.UserCreate)
	}

}
通过postman测试,可以发现,Token认证中间件正常工作。

3.6、token本地存储
如果要在项目中使用axios进行ajax请求,肯定需要在新建一个axios的初始化脚本文件src/utils/http.js中进行初始化配置。
axios的初始化配置一般包括以下3部分:
- 创建axios请求实例对象
- 配置baseURL设置整个站点ajax请求的api服务端站点公共地址
- 配置axios请求拦截器和响应拦截器。
src/utils/http.js,代码:
import axios from "axios"

const http = axios.create({
    // timeout: 2500,                          // 请求超时,有大文件上传需要关闭这个配置
    baseURL: "http://api.bingo.cn:8080/api",     // 设置api服务端的默认地址[如果基于服务端实现的跨域,这里可以填写api服务端的地址,如果基于nodejs客户端测试服务器实现的跨域,则这里不能填写api服务端地址]
    withCredentials: false,                    // 是否允许客户端ajax请求时携带cookie
})

// 请求拦截器
http.interceptors.request.use((config) => {
    console.log("http请求之前");
    return config;
}, (error) => {
    console.log("http请求错误");
    return Promise.reject(error);
});

// 响应拦截器
http.interceptors.response.use((response) => {
    console.log("服务端响应数据成功以后,返回结果给客户端的第一时间,执行then之前");
    if (response.data.code === -2) {
        router.push("/login")
    }
    return response;
}, (error) => {
    console.log("服务端响应错误内容的时候。...");
    return Promise.reject(error);
});

export default http;
Login.vue
<template>
  <div class="login box">
    <img src=".https://iteshell.oss-cn-beijing.aliyuncs.com/bookshell/golang/assets/login.jpg" alt="">
    <div class="login">
      <div class="login-title">
        <p class="hi">Hello,bingo!</p>
      </div>
      <div class="login_box">
        <div class="title">
          <span>登录</span>
        </div>
        <div class="inp">
          <a-input v-model:value="user.account" type="text" placeholder="用户名" class="user"></a-input>
          <a-input v-model:value="user.password" type="password" class="pwd" placeholder="密码"></a-input>
          <div class="rember">
            <p>
              <a-checkbox v-model:checked="user.remember">记住密码</a-checkbox>
            </p>
          </div>
          <button class="login_btn" @click="loginHandler">登录</button>

        </div>

      </div>
    </div>
  </div>
</template>

<script setup>
import http from "../http"
import {reactive} from "vue"
import {message} from 'ant-design-vue';
import router from '../router/index.js'


const user = reactive({
  account: "",  // 登录账号/手机号/邮箱
  password: "", // 登录密码
  remember: false, // 是否记住登录状态
  login() {
    // 用户登录
    return http.post("/user/authenticate", {
      "username": this.account,
      "password": this.password,
    })
  }
})

const loginHandler = () => {
  user.login().then((response) => {
    // 先清空原有的token
    localStorage.removeItem("token");
    sessionStorage.removeItem("token");

    if (response.data.code === 0) {
      if (user.remember) {
        // 记住登录
        localStorage.token = response.data.data.token;
      } else {
        sessionStorage.token = response.data.data.token;
      }
      // 跳转到首页

      message.success({
        duration: 0.8,
        content: `登录成功!`,
        onClose() {
          router.push("/bingo/")
        }
      })
    } else {
      message.error('用户名或者密码有误,请重新输入!');
    }

  })
}

</script>

<style scoped>
.login .hi {
  font-size: 20px;
  font-family: "Times New Roman";
  font-style: italic;
}

.box {
  width: 100%;
  height: 100%;
  position: relative;
  overflow: hidden;
}

.box img {
  width: 100%;
  min-height: 100%;
}

.box .login {
  position: absolute;
  width: 500px;
  height: 400px;
  left: 0;
  margin: auto;
  right: 0;
  bottom: 0;
  top: -338px;
}

.login .login-title {
  width: 100%;
  text-align: center;
}

.login-title img {
  width: 190px;
  height: auto;
}

.login-title p {
  font-size: 18px;
  color: #fff;
  letter-spacing: .29px;
  padding-top: 10px;
  padding-bottom: 50px;
}

.login_box {
  width: 400px;
  height: auto;
  background: rgba(255, 255, 255, 0.3);
  box-shadow: 0 2px 4px 0 rgba(0, 0, 0, .5);
  border-radius: 4px;
  margin: 0 auto;
  padding-bottom: 40px;
}

.login_box .title {
  font-size: 20px;
  color: #9b9b9b;
  letter-spacing: .32px;
  border-bottom: 1px solid #e6e6e6;
  display: flex;
  justify-content: space-around;
  padding: 50px 60px 0 60px;
  margin-bottom: 20px;
  cursor: pointer;
}

.login_box .title span:nth-of-type(1) {
  color: #4a4a4a;
  border-bottom: 2px solid #396fcc;
}

.inp {
  width: 350px;
  margin: 0 auto;
}

.inp input {
  outline: 0;
  width: 100%;
  height: 45px;
  border-radius: 4px;
  border: 1px solid #d9d9d9;
  text-indent: 20px;
  font-size: 14px;
  background: #fff !important;
}

.inp input.user {
  margin-bottom: 16px;
}

.inp .rember {
  display: flex;
  justify-content: space-between;
  align-items: center;
  position: relative;
  margin-top: 10px;
}

.inp .rember p:first-of-type {
  font-size: 12px;
  color: #4a4a4a;
  letter-spacing: .19px;
  margin-left: 22px;
  display: -ms-flexbox;
  display: flex;
  -ms-flex-align: center;
  align-items: center;
  /*position: relative;*/
}

.inp .rember p:nth-of-type(2) {
  font-size: 14px;
  color: #9b9b9b;
  letter-spacing: .19px;
  cursor: pointer;
}

.inp .rember input {
  outline: 0;
  width: 30px;
  height: 45px;
  border-radius: 4px;
  border: 1px solid #d9d9d9;
  text-indent: 20px;
  font-size: 14px;
  background: #fff !important;
}

.inp .rember p span {
  display: inline-block;
  font-size: 12px;
  width: 100px;
  /*position: absolute;*/
  /*left: 20px;*/

}

#geetest {
  margin-top: 20px;
}

.login_btn {
  width: 100%;
  height: 45px;
  background: #396fcc;
  border-radius: 5px;
  font-size: 16px;
  color: #fff;
  letter-spacing: .26px;
  margin-top: 30px;
}

.inp .go_login {
  text-align: center;
  font-size: 14px;
  color: #9b9b9b;
  letter-spacing: .26px;
  padding-top: 20px;
}

.inp .go_login span {
  color: #84cc39;
  cursor: pointer;
}
</style>
3.7、封装token管理文件
一般情况下,我们会在js文件中存放一些需要在多个界面中进行共享的信息。比如用户的登录状态、用户名称、头像、地理位置信息、商品的收藏、购物车中的物品等,这些状态信息,我们可以放在统一的地方,对它进行保存和管理。
Login.vue中调用storage.js中的方法管理token
<template>
  <div class="login box">
    <img src=".https://iteshell.oss-cn-beijing.aliyuncs.com/bookshell/golang/assets/login.jpg" alt="">
    <div class="login">
      <div class="login-title">
        <p class="hi">Hello,bingo!</p>
      </div>
      <div class="login_box">
        <div class="title">
          <span>登录</span>
        </div>
        <div class="inp">
          <a-input v-model:value="user.account" type="text" placeholder="用户名" class="user"></a-input>
          <a-input v-model:value="user.password" type="password" class="pwd" placeholder="密码"></a-input>
          <div class="rember">
            <p>
              <a-checkbox v-model:checked="user.remember">记住密码</a-checkbox>
            </p>
          </div>
          <button class="login_btn" @click="loginHandler">登录</button>

        </div>

      </div>
    </div>
  </div>
</template>

<script setup>
import http from "../http"
import {reactive} from "vue"
import {message} from 'ant-design-vue';
import router from '@/router/index.js'
import storage from '@/utils/storage.js'


const user = reactive({
  account: "",  // 登录账号/手机号/邮箱
  password: "", // 登录密码
  remember: false, // 是否记住登录状态
  login() {
    // 用户登录
    return http.post("/user/authenticate", {
      "username": this.account,
      "password": this.password,
    })
  }
})

const loginHandler = () => {
  user.login().then((response) => {

    if (response.data.code === 0) {
      // vuex存储用户登录信息,保存token
      storage.tokenHandle(response.data.data.token)

      // 跳转到首页
      message.success({
        duration: 0.8,
        content: `登录成功!`,
        onClose() {
          router.push("/bingo/")
        }
      })
    } else {
      message.error('用户名或者密码有误,请重新输入!');
    }

  })
}

</script>

<style scoped>
.login .hi {
  font-size: 20px;
  font-family: "Times New Roman";
  font-style: italic;
}

.box {
  width: 100%;
  height: 100%;
  position: relative;
  overflow: hidden;
}

.box img {
  width: 100%;
  min-height: 100%;
}

.box .login {
  position: absolute;
  width: 500px;
  height: 400px;
  left: 0;
  margin: auto;
  right: 0;
  bottom: 0;
  top: -338px;
}

.login .login-title {
  width: 100%;
  text-align: center;
}

.login-title img {
  width: 190px;
  height: auto;
}

.login-title p {
  font-size: 18px;
  color: #fff;
  letter-spacing: .29px;
  padding-top: 10px;
  padding-bottom: 50px;
}

.login_box {
  width: 400px;
  height: auto;
  background: rgba(255, 255, 255, 0.3);
  box-shadow: 0 2px 4px 0 rgba(0, 0, 0, .5);
  border-radius: 4px;
  margin: 0 auto;
  padding-bottom: 40px;
}

.login_box .title {
  font-size: 20px;
  color: #9b9b9b;
  letter-spacing: .32px;
  border-bottom: 1px solid #e6e6e6;
  display: flex;
  justify-content: space-around;
  padding: 50px 60px 0 60px;
  margin-bottom: 20px;
  cursor: pointer;
}

.login_box .title span:nth-of-type(1) {
  color: #4a4a4a;
  border-bottom: 2px solid #396fcc;
}

.inp {
  width: 350px;
  margin: 0 auto;
}

.inp input {
  outline: 0;
  width: 100%;
  height: 45px;
  border-radius: 4px;
  border: 1px solid #d9d9d9;
  text-indent: 20px;
  font-size: 14px;
  background: #fff !important;
}

.inp input.user {
  margin-bottom: 16px;
}

.inp .rember {
  display: flex;
  justify-content: space-between;
  align-items: center;
  position: relative;
  margin-top: 10px;
}

.inp .rember p:first-of-type {
  font-size: 12px;
  color: #4a4a4a;
  letter-spacing: .19px;
  margin-left: 22px;
  display: -ms-flexbox;
  display: flex;
  -ms-flex-align: center;
  align-items: center;
  /*position: relative;*/
}

.inp .rember p:nth-of-type(2) {
  font-size: 14px;
  color: #9b9b9b;
  letter-spacing: .19px;
  cursor: pointer;
}

.inp .rember input {
  outline: 0;
  width: 30px;
  height: 45px;
  border-radius: 4px;
  border: 1px solid #d9d9d9;
  text-indent: 20px;
  font-size: 14px;
  background: #fff !important;
}

.inp .rember p span {
  display: inline-block;
  font-size: 12px;
  width: 100px;
  /*position: absolute;*/
  /*left: 20px;*/

}

#geetest {
  margin-top: 20px;
}

.login_btn {
  width: 100%;
  height: 45px;
  background: #396fcc;
  border-radius: 5px;
  font-size: 16px;
  color: #fff;
  letter-spacing: .26px;
  margin-top: 30px;
}

.inp .go_login {
  text-align: center;
  font-size: 14px;
  color: #9b9b9b;
  letter-spacing: .26px;
  padding-top: 20px;
}

.inp .go_login span {
  color: #84cc39;
  cursor: pointer;
}
</style>
在src/utils中创建storage.js文件
const storage = {
    state: {
        user: {},
        token: "",
        remember: false
    },
    getUserInfo() {
        console.log("this.state.token:::", this.state)
        if (this.state.token === "") {
            return false
        }
        let payload = this.state.token.split(".")[1]  // 载荷
        let payload_data = JSON.parse(atob(payload)) // 用户信息
        console.log("payload_data:::", payload_data)
        // 从jwt的载荷中提取用户信息
        let now = parseInt((new Date() - 0) / 1000);
        if (payload_data.exp === undefined) {
            // 没登录
            this.clearStorage()
            return {}
        }

        if (parseInt(payload_data.exp) < now) {
            // 过期处理
            this.clearStorage()
            return {}
        }
        return payload_data;
    },
    tokenHandle(token) {
        this.state.token = token;
        // 解析token,获取用户载荷
        this.state.user = this.getUserInfo()
        // 同步本地存储
        this.setStorage()

    },
    key: 'login',
    setStorage() {
        if (this.state.remember) {
            localStorage[this.key] = JSON.stringify(this.state)
        } else {
            sessionStorage[this.key] = JSON.stringify(this.state)
        }
    },
    getStorage() {
        console.log("localStorage[this.key]:::", localStorage[this.key])
        console.log("sessionStorage[this.key]:::", sessionStorage[this.key])

        if (localStorage[this.key] === undefined && sessionStorage[this.key] === undefined) {
            return {}
        }
        if (localStorage[this.key]) {
            this.state = JSON.parse(localStorage[this.key])
        } else {
            this.state = JSON.parse(sessionStorage[this.key])
        }
        console.log("state:::", this.state)
    },
    clearStorage() {

        this.state = {
            user: {},
            token: "",
            remember: false
        }
        localStorage.removeItem(this.key)
        sessionStorage.removeItem(this.key)

    }

}


export default storage
3.8、路由守卫
完成了登录功能以后,我们要防止用户翻墙访问需要认证身份的页面时,可以基于vue-router的导航守卫来完成。
没有登陆状态,没有token的用户无法进入项目站点,src/router/index.js,代码:
import {createRouter, createWebHistory} from 'vue-router'
import storage from "../utils/storage";

const routes = [

    {
        path: '/bingo',
        name: 'Base',
        component: () => import("../views/Base.vue"),
        children: [
            {
                path: '',
                meta: {
                    title: "面板管理",
                    authorization: false
                },
                name: 'bingo',
                component: () => import("../views/Bingo.vue")
            },
            {
                path: 'manage/host',
                meta: {
                    title: "主机管理",
                    authorization: true
                },
                name: 'host',
                component: () => import("../views/Host.vue")
            },
        ]
    },

    {
        path: '/',
        meta: {
            title: '账户登陆',
            authorization: false
        },
        name: 'login',
        component: () => import("../views/Login.vue")
    },
]

const router = createRouter({
    history: createWebHistory(),
    routes
});


router.beforeEach((to, from, next) => {
    console.log("from:", from)
    console.log("to:", to)
    document.title = to.meta.title
    storage.getStorage()


    if (to.meta.authorization && !storage.getUserInfo()) {
        next({"name": "login"})
    } else {
        next()
    }
});


export default router;
本地拿到token以后,我们发送任何需要登录之后才能发送的请求,都需要先对token的有效性进行认证,然后将token携带到请求头中,来通过后台接口的 token的校验。
3.9、客户端注销登陆
src/views/Base.vue,代码:
import storage from '../utils/storage.js'
...
const logout = () => {
  storage.clearStorage()
  router.push("/login")
}
四、资产管理
4.1、主机管理
1. 主机前端页面
Host.vue
<template>
  <div class="host">

    <div>
      <a-button type="primary" @click="showModal" style="margin: 8px 0">添加主机</a-button>
      <a-modal width="860px" v-model:visible="visible" title="Basic Modal" @ok="handleOk" @cancel="cancelForm">

        <a-form
            ref="formRef"
            name="custom-validation"
            :model="hostForm.form"
            :rules="hostForm.rules"
            v-bind="layout"
            @finish="handleFinish"
            @validate="handleValidate"
            @finishFailed="handleFinishFailed"
        >
          <a-form-item label="主机类别" prop="zone" name="category">
            <a-row>
              <a-col :span="12">
                <a-select
                    ref="select"
                    v-model:value="hostForm.form.category"
                    @change="handleCategorySelectChange"

                >
                  <a-select-option :value="category.id" v-for="category in categoryList.data" :key="category.id">
                    {{ category.name }}
                  </a-select-option>
                </a-select>
              </a-col>

            </a-row>

          </a-form-item>

          <a-form-item has-feedback label="主机名称" name="name">
            <a-input v-model:value="hostForm.form.name" type="text" autocomplete="off"/>
          </a-form-item>


          <a-form-item label="连接地址" name="username">

            <a-row>
              <a-col :span="8">
                <a-input placeholder="用户名" addon-before="ssh" v-model:value="hostForm.form.username" type="text"
                         autocomplete="off"/>
              </a-col>
              <a-col :span="8">
                <a-input placeholder="ip地址" addon-before="@" v-model:value="hostForm.form.ip_addr" type="text"
                         autocomplete="off"/>
              </a-col>
              <a-col :span="8">
                <a-input placeholder="端口号" addon-before="-p" v-model:value="hostForm.form.port" type="text"
                         autocomplete="off"/>
              </a-col>
            </a-row>
          </a-form-item>

          <a-form-item has-feedback label="连接密码" name="password">
            <a-input v-model:value="hostForm.form.password" type="password" autocomplete="off"/>
          </a-form-item>

          <a-form-item has-feedback label="备注信息" name="remark">
            <a-textarea placeholder="请输入主机备注信息" v-model:value="hostForm.form.remark" type="text"
                        :auto-size="{ minRows: 3, maxRows: 5 }" autocomplete="off"/>
          </a-form-item>


          <a-form-item :wrapper-col="{ span: 14, offset: 4 }">
            <a-button @click="resetForm">Reset</a-button>
          </a-form-item>
        </a-form>

      </a-modal>
    </div>

    <a-table bordered :data-source="dataSource" :columns="columns">
      <template #bodyCell="{ column, text, record }">
        <template v-if="column.dataIndex === 'name'">
          <div class="editable-cell">
            <div v-if="editableData[record.key]" class="editable-cell-input-wrapper">
              <a-input v-model:value="editableData[record.key].name" @pressEnter="save(record.key)"/>
              <check-outlined class="editable-cell-icon-check" @click="save(record.key)"/>
            </div>
            <div v-else class="editable-cell-text-wrapper">
              {{ text || ' ' }}
              <edit-outlined class="editable-cell-icon" @click="edit(record.key)"/>
            </div>
          </div>
        </template>
        <template v-else-if="column.dataIndex === 'operation_edit'">

          <a>edit</a>

        </template>
        <template v-else-if="column.dataIndex === 'operation_del'">
          <a-popconfirm
              v-if="dataSource.length"
              title="Sure to delete?"
              @confirm="onDelete(record.key)"
          >
            <a>Delete</a>
          </a-popconfirm>
        </template>
      </template>
    </a-table>
  </div>
</template>

<script setup>
import {computed, reactive, ref} from 'vue';
import {CheckOutlined, EditOutlined} from '@ant-design/icons-vue';
import {cloneDeep} from 'lodash-es';


// 主机表格
const columns = [{
  title: '类别',
  dataIndex: 'category_name',
}, {
  title: '主机名称',
  dataIndex: 'name',
}, {
  title: 'IP地址',
  dataIndex: 'ip_addr',
}, {
  title: '端口',
  dataIndex: 'port',
}, {
  title: '备注',
  dataIndex: 'remark',
}, {
  title: '编辑',
  dataIndex: 'operation_edit',
}, {
  title: '删除',
  dataIndex: 'operation_del',
}];
const dataSource = ref([
  {
    'id': 1,
    'category_name': '数据库服务器',
    'name': 'izbp13e05jqwodd605vm3gz',
    'ip_addr': '47.58.131.12',
    'port': 22,
    'remark': ''
  },
  {
    'id': 2,
    'category_name': '数据库服务器',
    'name': 'iZbp1a3jw4l12ho53ivhkkZ',
    'ip_addr': '12.18.125.22',
    'port': 22,
    'remark': ''
  },
  {
    'id': 3,
    'category_name': '缓存服务器',
    'name': 'iZbp1b1xqfqw257gs563k2iZ',
    'ip_addr': '12.19.135.130',
    'port': 22,
    'remark': ''
  },
  {
    'id': 4,
    'category_name': '缓存服务器',
    'name': 'iZbp1b1jw4l01ho53muhkkZ',
    'ip_addr': '47.98.101.89',
    'port': 22,
    'remark': ''
  }
]);
const count = computed(() => dataSource.value.length + 1);
const editableData = reactive({});
const edit = key => {
  editableData[key] = cloneDeep(dataSource.value.filter(item => key === item.key)[0]);
};
const save = key => {
  Object.assign(dataSource.value.filter(item => key === item.key)[0], editableData[key]);
  delete editableData[key];
};
const onDelete = key => {
  dataSource.value = dataSource.value.filter(item => item.key !== key);
};

// 添加主机
const visible = ref(false);
const showModal = () => {
  visible.value = true;
};
const handleOk = e => {
  resetForm()
  visible.value = false;
};

const cancelForm = e => {
  resetForm()
  visible.value = false;
};
const hostForm = reactive({
  labelCol: {span: 6},
  wrapperCol: {span: 14},
  other: '',
  form: {
    name: '',
    category: "",
    ip_addr: '',
    username: '',
    port: '',
    remark: '',
    password: ''
  },
  rules: {
    name: [
      {required: true, message: '请输入主机名称', trigger: 'blur'},
      {min: 3, max: 30, message: '长度在3-10位之间', trigger: 'blur'}
    ],
    password: [
      {required: true, message: '请输入连接密码', trigger: 'blur'},
      {min: 3, max: 30, message: '长度在3-10位之间', trigger: 'blur'}
    ],
    category: [
      {required: true, message: '请选择类别', trigger: 'change'}
    ],
    username: [
      {required: true, message: '请输入用户名', trigger: 'blur'},
      {min: 3, max: 30, message: '长度在3-10位', trigger: 'blur'}
    ],
    ip_addr: [
      {required: true, message: '请输入连接地址', trigger: 'blur'},
      {max: 30, message: '长度最大15位', trigger: 'blur'}
    ],
    port: [
      {required: true, message: '请输入端口号', trigger: 'blur'},
      {max: 5, message: '长度最大5位', trigger: 'blur'}
    ]
  }
});
const formRef = ref();
const layout = {
  labelCol: {
    span: 4,
  },
  wrapperCol: {
    span: 24,
  },
};
const handleFinish = values => {
  console.log(values, hostForm);
};

const handleFinishFailed = errors => {
  console.log(errors);
};

const resetForm = () => {
  formRef.value.resetFields();
};

const handleValidate = (...args) => {
  console.log(args);
};
const categoryList = reactive({
  data: []
})
</script>

<style scoped>

</style>

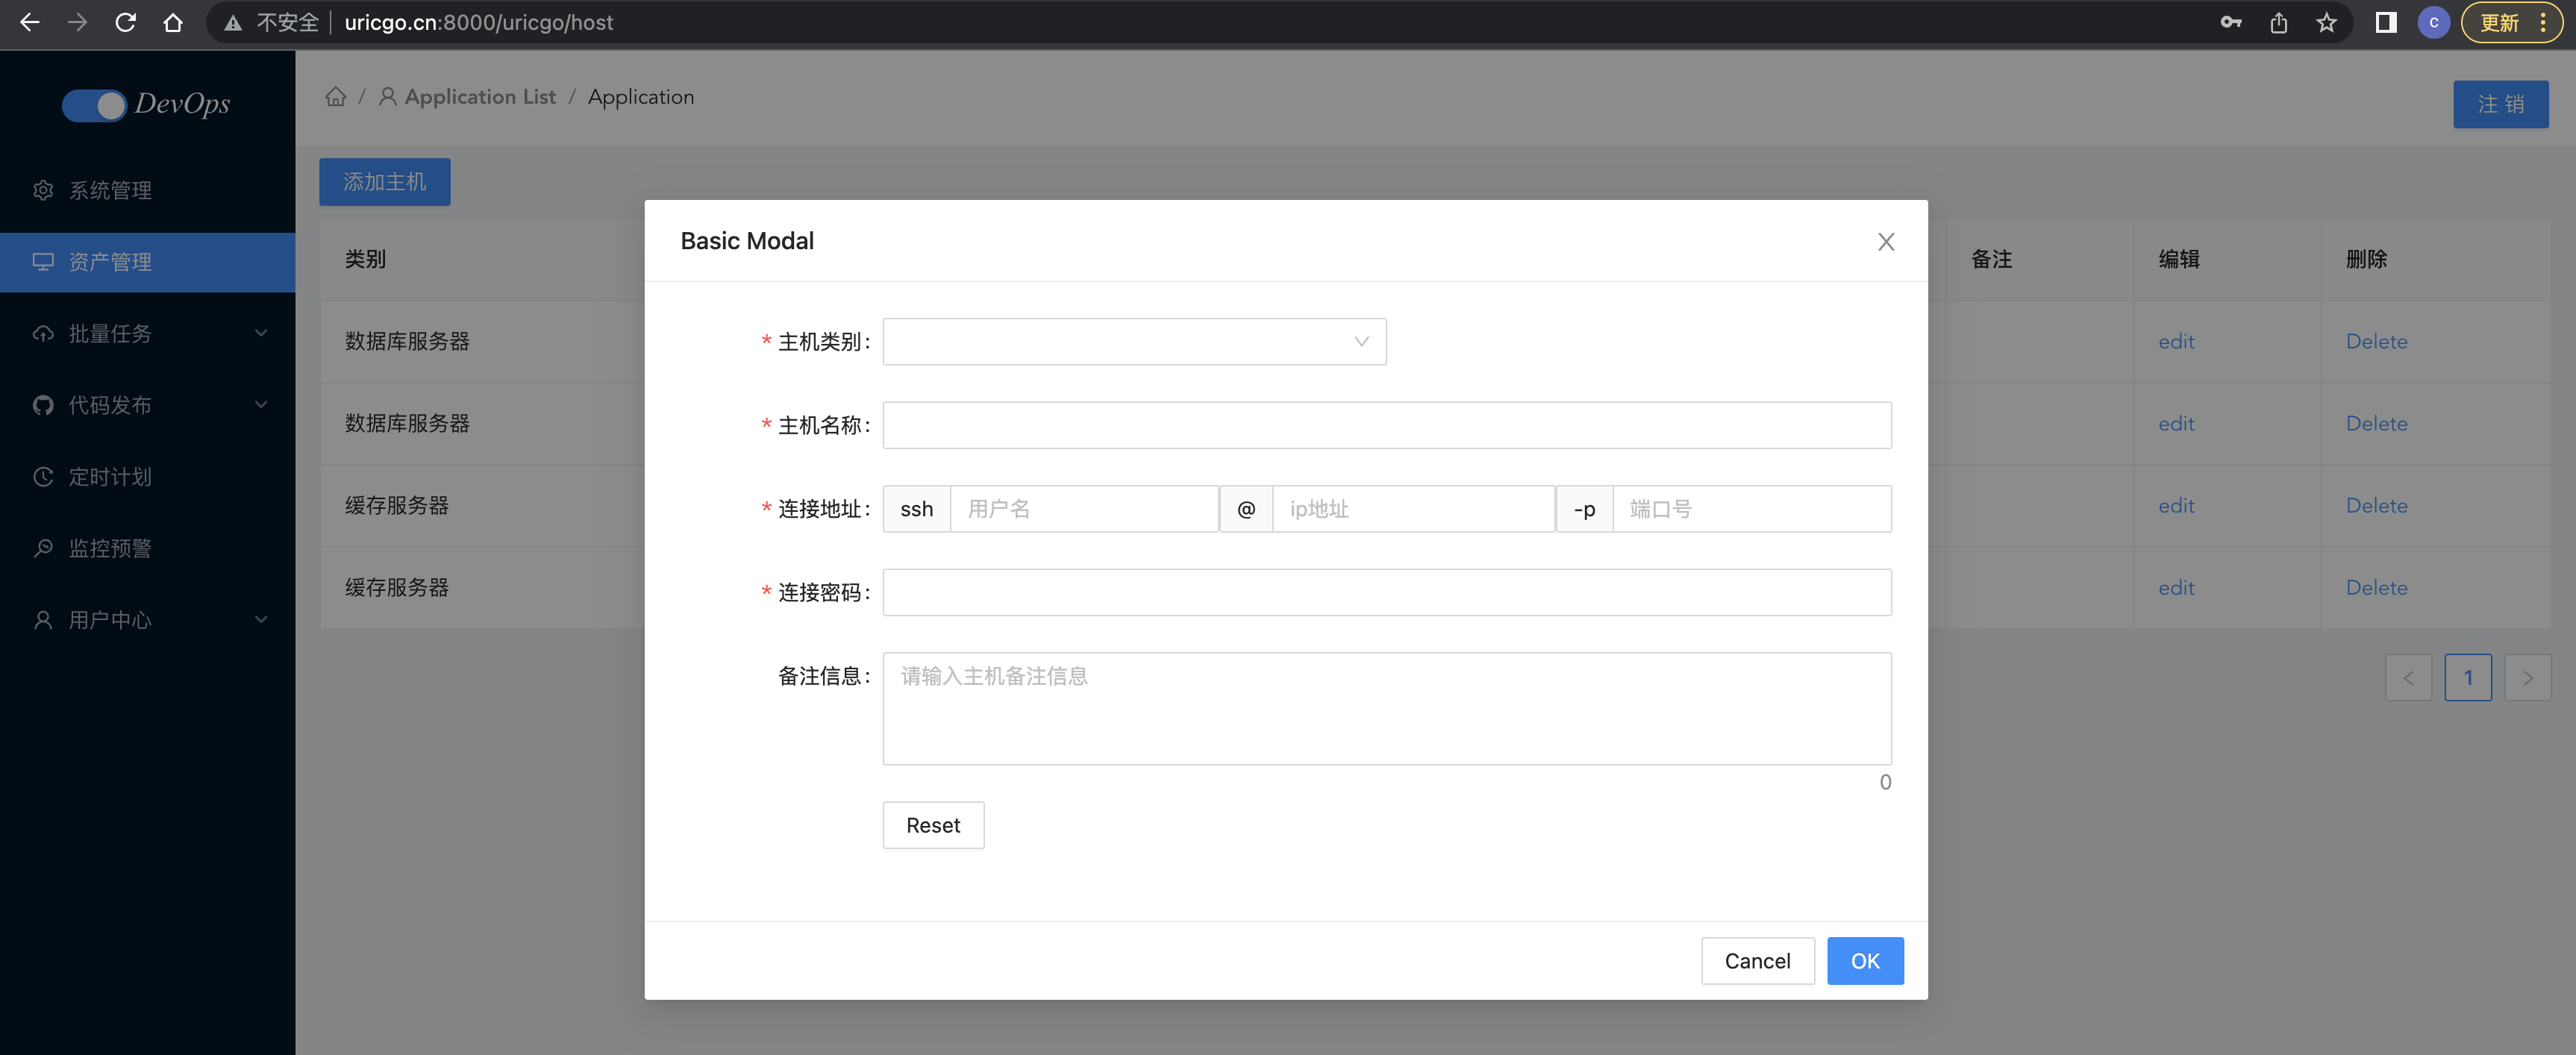
2. 主机模型
bingo_api/application/model/host.go,代码:
package model

import (
	"github.com/jinzhu/gorm"
	. "bingo_api/application/database"
)

/**
主机类别实体
*/

type HostCategory struct {
	gorm.Model
	// 唯一索引 unique_index
	Name string `json:"name" gorm:"type:varchar(255); unique_index"`
}

type HostCategoryInstance struct {
	ID   uint   `json:"id"`
	Name string `json:"name"`
}

/**
设置表名
*/

func (category HostCategory) TableName() string {
	return "host_category"
}

/**
添加主机类别
*/

func (category *HostCategory) Insert() error {
	err := Orm.Create(&category).Error
	return err
}

/**
获取主机分类列表
*/

func (category HostCategory) GetAll() ([]HostCategoryInstance, error) {
	var categories []HostCategoryInstance
	err := Orm.Table(category.TableName()).Order(" id DESC ").Select("id, name").Scan(&categories).Error
	return categories, err
}

/**
根据指定ID获取主机类别
*/

func (category *HostCategory) GetOneById(id uint) error {
	err := Orm.First(&category, id).Error
	return err
}

/**
主机信息模型
*/

type Host struct {
	gorm.Model
	Name           string       `json:"name" gorm:"type:varchar(255)"`
	IpAddr         string       `json:"ip_addr" gorm:"type:varchar(255)"`
	Port           uint         `json:"port" gorm:"type:int"`
	Username       string       `json:"username" gorm:"varchar(255)"`
	Password       string       `json:"password,omitempty" gorm:"varchar(255)"`
	Remark         string       `json:"remark,omitempty" gorm:"varchar(255)"`
	HostCategoryID uint         `json:"host_category_id"`
	HostCategory   HostCategory `json:"host_category"  gorm:"foreignKey:HostCategoryID;references:ID"`
}

type HostInstance struct {
	ID           uint   `json:"id"`
	Name         string `json:"name"`
	IpAddr       string `json:"ip_addr"`
	Port         uint   `json:"port"`
	Username     string `json:"username"`
	CategoryID   uint   `json:"category_id"`
	CategoryName string `json:"category_name"`
	Remark       string `json:"remark"`
}

/**
设置表名
*/

func (host Host) TableName() string {
	return "host_info"
}

/**
添加主机
*/

func (host *Host) Insert() error {
	err := Orm.Create(&host).Error
	return err
}

/**
获取所有主机列表
*/

func (host Host) GetAll(name string, hostCategoryId uint, IpAddr string) ([]Host, error) {
	var hosts []Host
	query := Orm.Table(host.TableName())
	if name != "" {
		query = query.Where(" name LIKE ? ", "%"+name+"%")
	}
	if hostCategoryId > 0 {
		query = query.Where(" host_category_id = ? ", hostCategoryId)
	}
	if IpAddr != "" {
		query = query.Where(" ip_addr LIKE ? ", "%"+IpAddr+"%")
	}

	err := query.Order(" id DESC ").Preload("HostCategory").Find(&hosts).Error
	return hosts, err
}

/**
根据指定ID获取主机
*/

func (host *Host) GetOneById(id uint) error {
	err := Orm.First(&host, id).Error
	return err
}

/**
删除主机
*/

func (host *Host) Delete() (err error) {
	err = Orm.Delete(&host).Error
	return err
}
bingo_api/application/main.go,代码:
func main() {
	// ... 代码省略
	// ... 代码省略

	// 数据迁移
	Orm.AutoMigrate(&model.User{})
	Orm.AutoMigrate(&model.Host{})
	Orm.AutoMigrate(&model.HostCategory{})

	// ... 代码省略
	// ... 代码省略
}
项目重启后,项目就会自动新生成主机表和主机分类表。
3、主机相关API开发
【1】添加主机类别
bingo_api/application/services/host.go,代码:
package services

import (
	"github.com/gin-gonic/gin"
	. "bingo_api/application/model"
	"bingo_api/application/validator"
)

/**
添加主机类别
*/

func CreateHostCategory(ctx *gin.Context) (HostCategoryInstance, error) {
	hostCategory := HostCategory{}
	var instance HostCategoryInstance
	var err error
	if err = ctx.ShouldBindJSON(&hostCategory); err != nil {
		return instance, err
	}
	if err = validator.HostCategoryValidator(&hostCategory); err != nil {
		return instance, err
	}
	err = hostCategory.Insert()
	instance = HostCategoryInstance{
		ID:   hostCategory.ID,
		Name: hostCategory.Name,
	}
	return instance, err
}
bingo_api/application/validator/host.go,代码:
package validator

import (
	"errors"
	"github.com/go-playground/validator/v10"
	. "bingo_api/application/model"
	. "bingo_api/application/utils"
)

/**
添加主机类别的验证器
*/

func HostCategoryValidator(hostCategory *HostCategory) error {
	validate, trans := GenValidate()
	err := validate.Struct(hostCategory)
	if err != nil {
		for _, err := range err.(validator.ValidationErrors) {
			return errors.New(err.Translate(trans))
		}
	}
	return nil
}
bingo_api/application/api/host.go,代码:
package api

import (
	"github.com/gin-gonic/gin"
	"net/http"
	"bingo_api/application/constants"
	"bingo_api/application/model"
	. "bingo_api/application/services"
)

/**
添加主机类别
*/

func HostCategoryCreate(ctx *gin.Context) {
	hostCategory, err := CreateHostCategory(ctx)
	if err != nil || hostCategory.ID < 1 {
		ctx.JSON(http.StatusBadRequest, gin.H{
			"code":    constants.CodeCreateHostCategoryFail,
			"message": err.Error(),
		})
		return
	}

	ctx.JSON(http.StatusOK, gin.H{
		"code":    constants.CodeSuccess,
		"message": constants.Success,
		"data": map[string]model.HostCategoryInstance{
			"hostCategory": hostCategory,
		},
	})
}
bingo_api/application/constants/code.go,代码:
CodeCreateHostCategoryFail = 1010 // 创建主机类别失败!
CodeGetHostCategoryFail    = 1011 // 无法获取主机类别列表!
CodeCreateHostFail         = 1012 // 添加主机信息失败!
CodeHostCategoryNotExist   = 1013 // 主机类别不存在!
CodeGetHostFail            = 1014 // 无法获取主机列表
设计主机应用路由,bingo_api/application/router/host.go,代码:
package router

import (
	"github.com/gin-gonic/gin"
	"bingo_api/application/api"
	"bingo_api/application/middleware"
	"bingo_api/application/utils"
)

func InitHostRouter(Router *gin.RouterGroup) {
	/**
	主机相关的路由组
	*/
	HostRouter := Router.Group("host")

	{
		// 主机类别-添加
		utils.Register(HostRouter, []string{"POST"}, "category", middleware.JWTAuthorization(), api.HostCategoryCreate)
	}
}
注册主机应用路由 bingo_api/application/initialize/router.go,代码:
package initialize

import (
	"github.com/gin-gonic/gin"
	"go.uber.org/zap"
	"bingo_api/application/middleware"
	"bingo_api/application/router"
)

func InitRouter() *gin.Engine {
	// 1. 创建路由
	Router := gin.Default()
	Router.Use(middleware.GinLogger(), middleware.GinRecovery(true))
	Router.Use(middleware.ExceptionMiddleware)
	Router.Use(middleware.CORS)
	// 2. Api路由分组
	ApiGroup := Router.Group("/api")
	// 3. 初始化用户相关路由
	router.InitUserRouter(ApiGroup)
	router.InitHostRouter(ApiGroup)
	zap.S().Info("路由初始化完成....")
	return Router
}

【2】查看主机类别
bingo_api/application/services/host.go,代码:
/**
获取主机类别列表
*/

func GetHostCategoryList(ctx *gin.Context) ([]HostCategoryInstance, error){
	hostCategory := HostCategory{}
	hostCategoryList, err := hostCategory.GetAll()
	return hostCategoryList, err
}
bingo_api/application/api/host.go,代码:
/**
获取所有主机类别
*/

func HostCategoryList(ctx *gin.Context){
	// 调用业务层获取主机类别列表
	hostCategoryList, err := GetHostCategoryList(ctx)
	if err != nil {
		ctx.JSON(http.StatusBadRequest, gin.H{
			"code":    constants.CodeGetHostCategoryFail,
			"message": err.Error(),
		})
		return
	}

	ctx.JSON(http.StatusOK, gin.H{
		"code":    constants.CodeSuccess,
		"message": constants.Success,
		"data": map[string]interface{}{
			"host_category_list": hostCategoryList,
		},
	})
}
bingo_api/application/router/host.go,代码:
package router

import (
	"github.com/gin-gonic/gin"
	"bingo_api/application/api"
	"bingo_api/application/middleware"
	"bingo_api/application/utils"
)

func InitHostRouter(Router *gin.RouterGroup) {
	/**
	主机相关的路由组
	*/
	HostRouter := Router.Group("host")

	{
		// 主机类别-添加
		utils.Register(HostRouter, []string{"POST"}, "category", middleware.JWTAuthorization(), api.HostCategoryCreate)
		// 主机类别-查看
		utils.Register(HostRouter, []string{"GET"}, "category", middleware.JWTAuthorization(), api.HostCategoryList)
	}
}
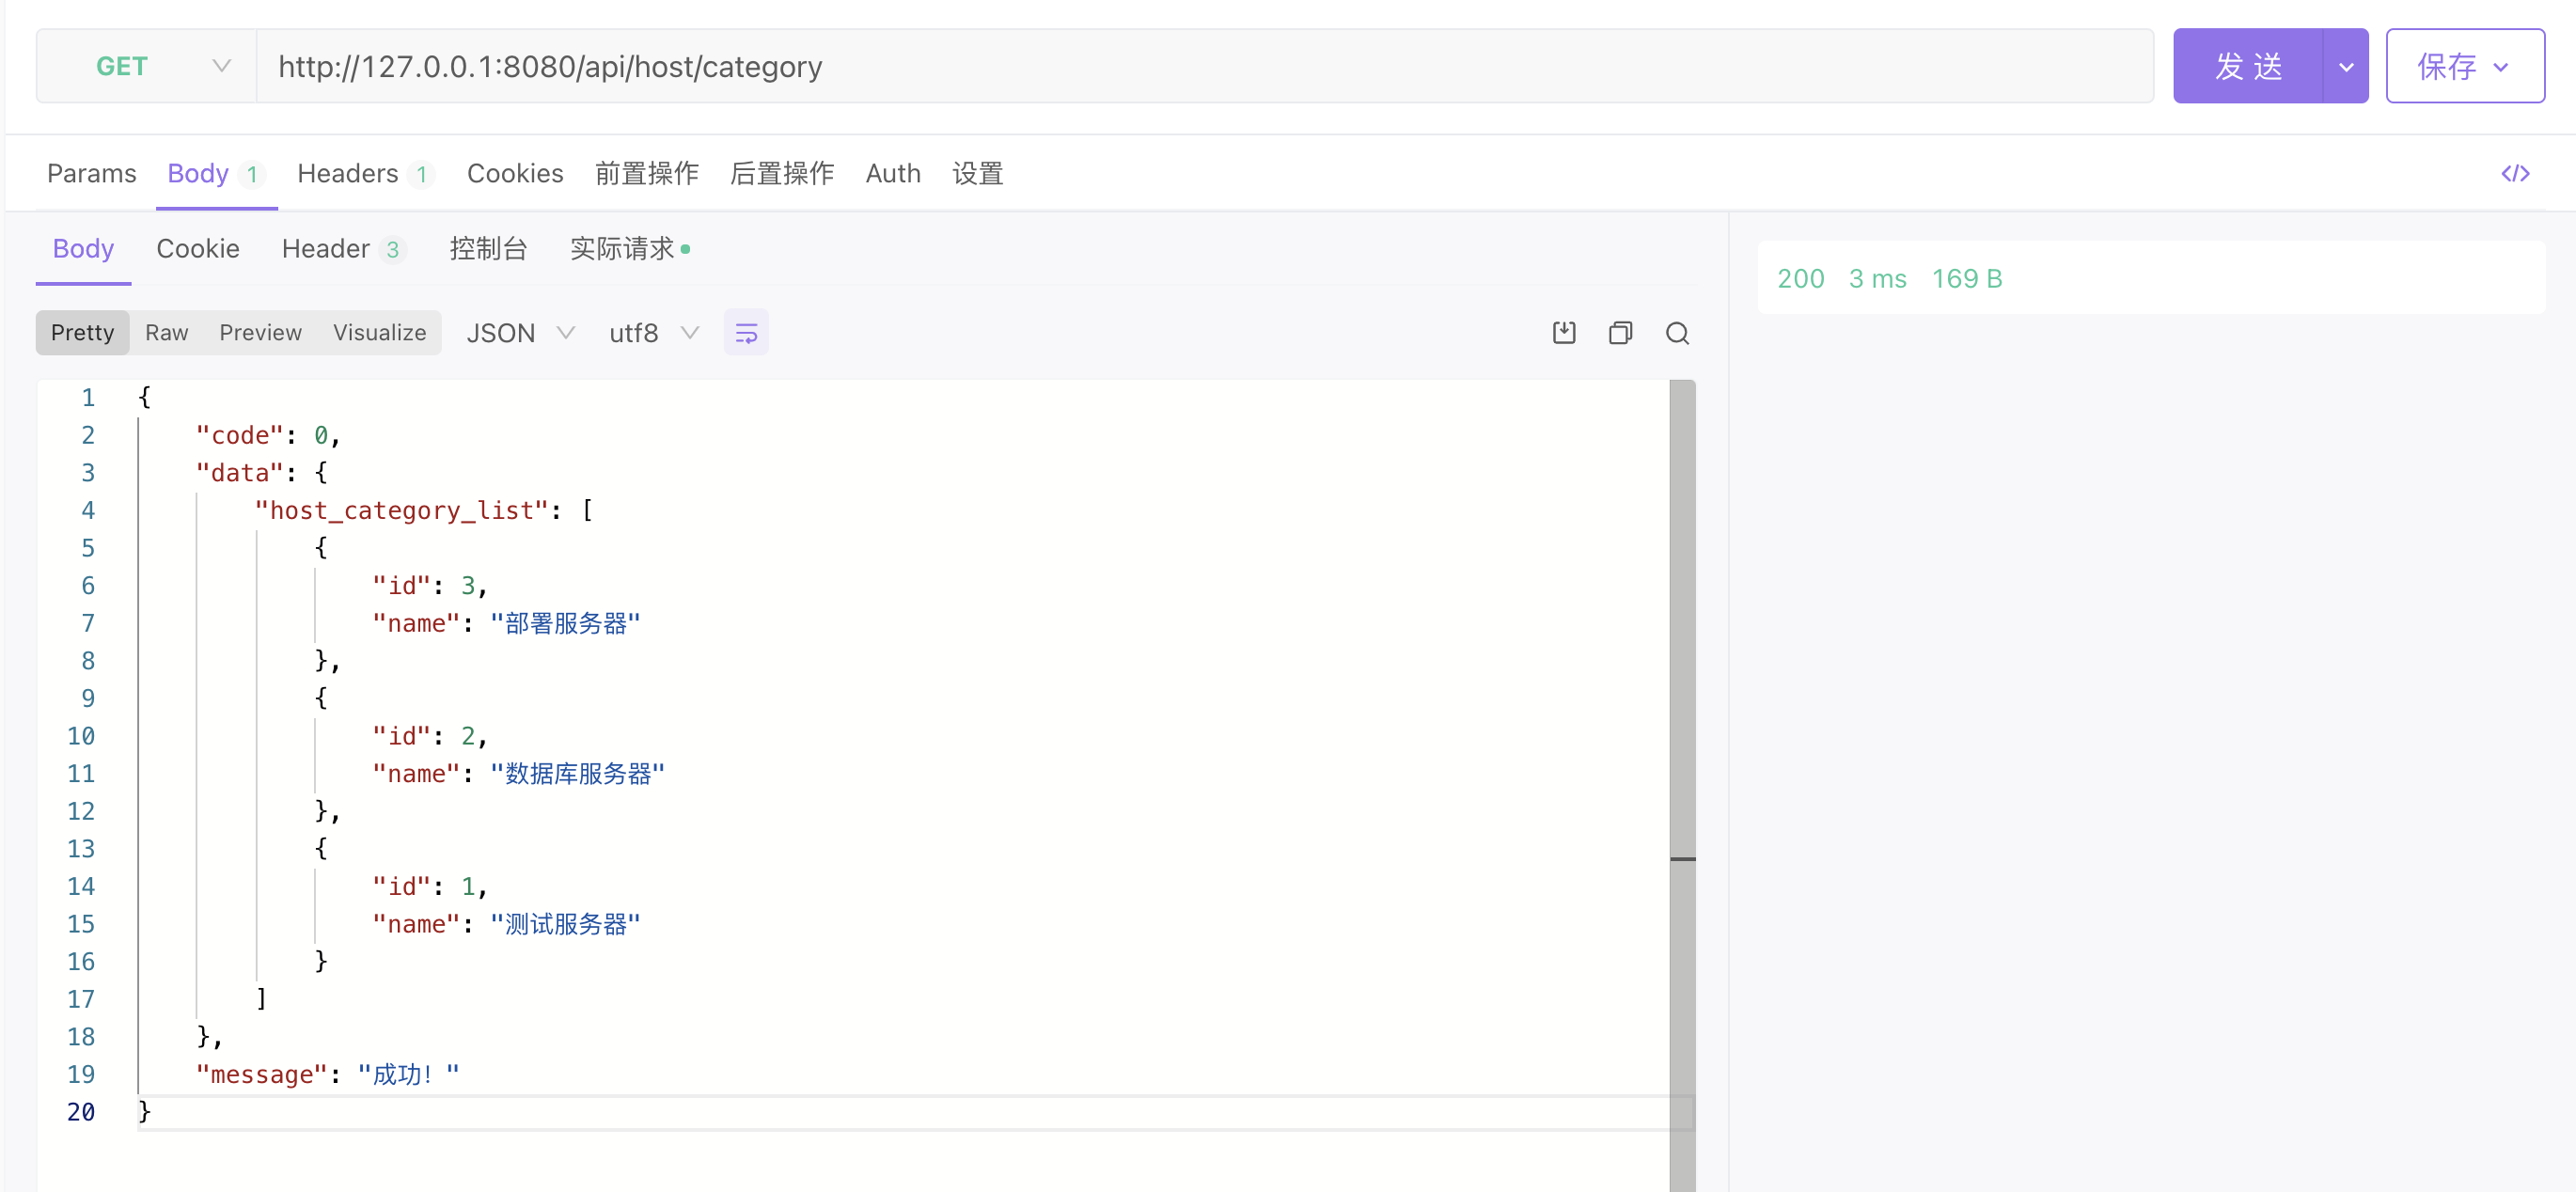
【3】添加主机
bingo_api/application/services/host.go,代码:
/**
添加主机
*/

func CreateHost(ctx *gin.Context) (HostInstance, error){
	host := Host{}
	var err error
	var instance HostInstance
	var hostCategory HostCategory
	if err = ctx.ShouldBindJSON(&host) ;err !=nil {
		return instance, err
	}

	if err = validator.HostValidator(&host); err != nil {
		return instance, err
	}

	err = host.Insert()
	if err != nil {
		return instance, err
	}

	err = hostCategory.GetOneById(host.HostCategoryID)
	if err != nil {
		return instance, err
	}

	instance = HostInstance{
		ID:               host.ID,
		Name:             host.Name,
		IpAddr:           host.IpAddr,
		Port:             host.Port,
		Username:         host.Username,
		Remark:           host.Remark,
		CategoryID:       host.HostCategoryID,
		CategoryName:     hostCategory.Name,
	}
	return instance, err
}
bingo_api/application/validator/host.go,代码:
/**
添加主机的验证器
*/

func HostValidator(host *Host) error {
	validate, trans := GenValidate()
	err := validate.Struct(host)
	if err != nil {
		for _, err := range err.(validator.ValidationErrors) {
			return errors.New(err.Translate(trans))
		}
	}

	if host.HostCategoryID < 1 {
		return errors.New(constants.HostCategoryNotExist)
	}

	var hostCategory HostCategory
	err = hostCategory.GetOneById(host.HostCategoryID)
	if err != nil {
		return errors.New(constants.HostCategoryNotExist)
	}

	return nil
}
bingo_api/application/constants/message.go,代码:
HostCategoryNotExist = "主机类别不存在!"
bingo_api/application/api/host.go,代码:
/**
添加主机
*/

func HostCreate(ctx *gin.Context){
	// 调用业务层创建主机信息
	host, err := CreateHost(ctx)
	if err != nil || host.ID < 1 {
		ctx.JSON(http.StatusBadRequest, gin.H{
			"code":    constants.CodeCreateHostFail,
			"message": err.Error(),
		})
		return
	}

	ctx.JSON(http.StatusOK, gin.H{
		"code":    constants.CodeSuccess,
		"message": constants.Success,
		"data": map[string]interface{}{
			"host": host,
		},
	})
}
bingo_api/application/router/host.go,代码:
package router

import (
	"github.com/gin-gonic/gin"
	"bingo_api/application/api"
	"bingo_api/application/middleware"
	"bingo_api/application/utils"
)

func InitHostRouter(Router *gin.RouterGroup) {
	/**
	主机相关的路由组
	*/
	HostRouter := Router.Group("host")

	{
		// 主机类别-添加
		utils.Register(HostRouter, []string{"POST"}, "category", middleware.JWTAuthorization(), api.HostCategoryCreate)
		// 主机类别-查看
		utils.Register(HostRouter, []string{"GET"}, "category", middleware.JWTAuthorization(), api.HostCategoryList)
		// 主机信息-添加
		utils.Register(HostRouter, []string{"POST"}, "", middleware.JWTAuthorization(), api.HostCreate)
	}
}

【4】查看主机
bingo_api/application/services/host.go,代码:
/**
获取主机列表信息
*/

func GetHostList(name string, hostCategoryId uint, hostname string) ([]HostInstance, error) {
	var hostList []Host
	var instanceList []HostInstance
	var host Host
	var err error
	hostList, err = host.GetAll(name, uint(hostCategoryId), hostname)
	for _, hostItem := range hostList {
		instanceList = append(instanceList, HostInstance{
			ID:           hostItem.ID,
			Name:         hostItem.Name,
			IpAddr:       hostItem.IpAddr,
			Port:         hostItem.Port,
			Username:     hostItem.Username,
			CategoryID:   hostItem.HostCategory.ID,
			CategoryName: hostItem.HostCategory.Name,
			Remark:       hostItem.Remark,
		})
	}
	return instanceList, err
}
bingo_api/application/api/host.go,代码:
/**
 主机列表
 */

func HostList(ctx *gin.Context){
	// 接受参数
	name, _ := ctx.GetQuery("name")
	hostname, _ := ctx.GetQuery("host")
	hostCategoryId, _ := strconv.Atoi(ctx.Query("host_category_id"))
	hostList, err := GetHostList(name, uint(hostCategoryId), hostname)
	if err != nil {
		ctx.JSON(http.StatusBadRequest, gin.H{
			"code":    constants.CodeGetHostFail,
			"message": err.Error(),
		})
		return
	}
	ctx.JSON(http.StatusOK, gin.H{
		"code":    constants.CodeSuccess,
		"message": constants.Success,
		"data": map[string]interface{}{
			"host_list": hostList,
		},
	})
}
bingo_api/application/router/host.go,代码:
package router

import (
	"github.com/gin-gonic/gin"
	"bingo_api/application/api"
	"bingo_api/application/middleware"
	"bingo_api/application/utils"
)

func InitHostRouter(Router *gin.RouterGroup) {
	/**
	主机相关的路由组
	*/
	HostRouter := Router.Group("host")

	{
		// 主机类别-添加
		utils.Register(HostRouter, []string{"POST"}, "category", middleware.JWTAuthorization(), api.HostCategoryCreate)
		// 主机类别-查看
		utils.Register(HostRouter, []string{"GET"}, "category", middleware.JWTAuthorization(), api.HostCategoryList)
		// 主机信息-添加
		utils.Register(HostRouter, []string{"POST"}, "", middleware.JWTAuthorization(), api.HostCreate)
		// 主机 - 列表
		utils.Register(HostRouter, []string{"GET"}, "", middleware.JWTAuthorization(), api.HostList)
	}
}

查看主机列表:
{
    "code": 0,
    "data": {
        "host_list": [
            {
                "id": 8,
                "name": "izbp13e05jqwodd605vm3gz",
                "ip_addr": "47.58.131.12",
                "port": 22,
                "username": "root",
                "category_id": 1,
                "category_name": "测试服务器",
                "remark": "remark..."
            },
            {
                "id": 2,
                "name": "iZbp1b1jw4l01ho53muhkkZ",
                "ip_addr": "47.98.101.89",
                "port": 22,
                "username": "root",
                "category_id": 1,
                "category_name": "测试服务器",
                "remark": "remark..."
            },
            {
                "id": 1,
                "name": "iZbp1b1xqfqw257gs563k2iZ",
                "ip_addr": "12.19.135.130",
                "port": 22,
                "username": "root",
                "category_id": 2,
                "category_name": "数据库服务器",
                "remark": "remark..."
            }
        ]
    },
    "message": "成功!"
}
【5】删除主机接口
bingo_api/application/services/host.go,代码:
/**
删除主机列表信息
*/

func DeleteHost(hostId uint) (HostInstance, error) {
	var delHost Host
	var instance HostInstance

	err := delHost.GetOneById(hostId)
	if err != nil {
		return instance, err
	}
	err = delHost.Delete()
	if err != nil {
		return instance, err
	}

	instance = HostInstance{
		Name:       delHost.Name,
		IpAddr:     delHost.IpAddr,
		Port:       delHost.Port,
		Username:   delHost.Username,
		Remark:     delHost.Remark,
		CategoryID: delHost.HostCategoryID,
	}

	return instance, err
}
bingo_api/application/api/host.go,代码:
/*
删除主机
*/

func HostDelete(ctx *gin.Context) {
	// 接受参数
	idStr, _ := ctx.GetQuery("id")
	delId, _ := strconv.Atoi(idStr)
	host, err := DeleteHost(uint(delId))
	if err != nil {
		ctx.JSON(http.StatusBadRequest, gin.H{
			"code":    constants.CodeDelHostFail,
			"message": err.Error(),
		})
		return
	}

	ctx.JSON(http.StatusOK, gin.H{
		"code":    constants.CodeSuccess,
		"message": constants.Success,
		"data": map[string]interface{}{
			"delete_host": host,
		},
	})
}
bingo_api/application/router/host.go,代码:
// 主机 - 删除
utils.Register(HostRouter, []string{"DELETE"}, "", middleware.JWTAuthorization(), api.HostDelete)

4、客户端与api联调
Host.vue
<template>
  <div class="host">

    <div>
      <a-button type="primary" @click="showModal" style="margin: 8px 0">添加主机</a-button>
      <a-modal width="860px" v-model:visible="visible" title="Basic Modal" @ok="handleOk" @cancel="cancelForm">

        <a-form
            ref="formRef"
            name="custom-validation"
            :model="hostForm.form"
            :rules="hostForm.rules"
            v-bind="layout"
            @finish="handleFinish"
            @validate="handleValidate"
            @finishFailed="handleFinishFailed"
        >
          <a-form-item label="主机类别" prop="zone" name="category">
            <a-row>
              <a-col :span="12">
                <a-select
                    ref="select"
                    v-model:value="hostForm.form.category"
                    @change="handleCategorySelectChange"

                >
                  <a-select-option :value="category.id" v-for="category in categoryList.data" :key="category.id">
                    {{ category.name }}
                  </a-select-option>
                </a-select>
              </a-col>

            </a-row>

          </a-form-item>

          <a-form-item has-feedback label="主机名称" name="name">
            <a-input v-model:value="hostForm.form.name" type="text" autocomplete="off"/>
          </a-form-item>


          <a-form-item label="连接地址" name="username">

            <a-row>
              <a-col :span="8">
                <a-input placeholder="用户名" addon-before="ssh" v-model:value="hostForm.form.username" type="text"
                         autocomplete="off"/>
              </a-col>
              <a-col :span="8">
                <a-input placeholder="ip地址" addon-before="@" v-model:value="hostForm.form.ip_addr" type="text"
                         autocomplete="off"/>
              </a-col>
              <a-col :span="8">
                <a-input placeholder="端口号" addon-before="-p" v-model:value="hostForm.form.port" type="text"
                         autocomplete="off"/>
              </a-col>
            </a-row>
          </a-form-item>

          <a-form-item has-feedback label="连接密码" name="password">
            <a-input v-model:value="hostForm.form.password" type="password" autocomplete="off"/>
          </a-form-item>

          <a-form-item has-feedback label="备注信息" name="remark">
            <a-textarea placeholder="请输入主机备注信息" v-model:value="hostForm.form.remark" type="text"
                        :auto-size="{ minRows: 3, maxRows: 5 }" autocomplete="off"/>
          </a-form-item>


          <a-form-item :wrapper-col="{ span: 14, offset: 4 }">
            <a-button @click="resetForm">Reset</a-button>
          </a-form-item>
        </a-form>

      </a-modal>
    </div>

    <a-table bordered :data-source="dataSource" :columns="columns">
      <template #bodyCell="{ column, text, record }">
        <template v-if="column.dataIndex === 'name'">
          <div class="editable-cell">
            <div v-if="editableData[record.key]" class="editable-cell-input-wrapper">
              <a-input v-model:value="editableData[record.key].name" @pressEnter="save(record.key)"/>
              <check-outlined class="editable-cell-icon-check" @click="save(record.key)"/>
            </div>
            <div v-else class="editable-cell-text-wrapper">
              {{ text || ' ' }}
              <edit-outlined class="editable-cell-icon" @click="edit(record.key)"/>
            </div>
          </div>
        </template>
        <template v-else-if="column.dataIndex === 'operation_edit'">

          <a>edit</a>

        </template>
        <template v-else-if="column.dataIndex === 'operation_del'">
          <a-popconfirm
              v-if="dataSource.length"
              title="Sure to delete?"
              @confirm="onDelete(record.key)"
          >
            <a>Delete</a>
          </a-popconfirm>
        </template>
      </template>
    </a-table>
  </div>
</template>

<script setup>
import {computed, reactive, ref,onMounted} from 'vue';
import {CheckOutlined, EditOutlined} from '@ant-design/icons-vue';
import {cloneDeep} from 'lodash-es';
import http from "../http/index.js";

// 主机表格
const columns = [{
  title: '类别',
  dataIndex: 'category_name',
}, {
  title: '主机名称',
  dataIndex: 'name',
}, {
  title: 'IP地址',
  dataIndex: 'ip_addr',
}, {
  title: '端口',
  dataIndex: 'port',
}, {
  title: '备注',
  dataIndex: 'remark',
}, {
  title: '编辑',
  dataIndex: 'operation_edit',
}, {
  title: '删除',
  dataIndex: 'operation_del',
}];
const dataSource = ref([
  {
    'id': 1,
    'category_name': '数据库服务器',
    'name': 'izbp13e05jqwodd605vm3gz',
    'ip_addr': '47.58.131.12',
    'port': 22,
    'remark': ''
  },
  {
    'id': 2,
    'category_name': '数据库服务器',
    'name': 'iZbp1a3jw4l12ho53ivhkkZ',
    'ip_addr': '12.18.125.22',
    'port': 22,
    'remark': ''
  },
  {
    'id': 3,
    'category_name': '缓存服务器',
    'name': 'iZbp1b1xqfqw257gs563k2iZ',
    'ip_addr': '12.19.135.130',
    'port': 22,
    'remark': ''
  },
  {
    'id': 4,
    'category_name': '缓存服务器',
    'name': 'iZbp1b1jw4l01ho53muhkkZ',
    'ip_addr': '47.98.101.89',
    'port': 22,
    'remark': ''
  }
]);
const count = computed(() => dataSource.value.length + 1);
const editableData = reactive({});
const edit = key => {
  editableData[key] = cloneDeep(dataSource.value.filter(item => key === item.key)[0]);
};
const save = key => {
  Object.assign(dataSource.value.filter(item => key === item.key)[0], editableData[key]);
  delete editableData[key];
};
const onDelete = key => {
  dataSource.value = dataSource.value.filter(item => item.key !== key);
};

// 添加主机
const visible = ref(false);
const showModal = () => {
  visible.value = true;
};
const handleOk = e => {
  resetForm()
  visible.value = false;
};

const cancelForm = e => {
  resetForm()
  visible.value = false;
};
const hostForm = reactive({
  labelCol: {span: 6},
  wrapperCol: {span: 14},
  other: '',
  form: {
    name: '',
    category: "",
    ip_addr: '',
    username: '',
    port: '',
    remark: '',
    password: ''
  },
  rules: {
    name: [
      {required: true, message: '请输入主机名称', trigger: 'blur'},
      {min: 3, max: 30, message: '长度在3-10位之间', trigger: 'blur'}
    ],
    password: [
      {required: true, message: '请输入连接密码', trigger: 'blur'},
      {min: 3, max: 30, message: '长度在3-10位之间', trigger: 'blur'}
    ],
    category: [
      {required: true, message: '请选择类别', trigger: 'change'}
    ],
    username: [
      {required: true, message: '请输入用户名', trigger: 'blur'},
      {min: 3, max: 30, message: '长度在3-10位', trigger: 'blur'}
    ],
    ip_addr: [
      {required: true, message: '请输入连接地址', trigger: 'blur'},
      {max: 30, message: '长度最大15位', trigger: 'blur'}
    ],
    port: [
      {required: true, message: '请输入端口号', trigger: 'blur'},
      {max: 5, message: '长度最大5位', trigger: 'blur'}
    ]
  }
});
const formRef = ref();
const layout = {
  labelCol: {
    span: 4,
  },
  wrapperCol: {
    span: 24,
  },
};
const handleFinish = values => {
  console.log(values, hostForm);
};

const handleFinishFailed = errors => {
  console.log(errors);
};

const resetForm = () => {
  formRef.value.resetFields();
};

const handleValidate = (...args) => {
  console.log(args);
};
const categoryList = reactive({
  data: []
})

// 前后端联调

// 查看主机列表
const getHostList = () => {
  http.get("/host").then((res) => {
    console.log("host_list:::", res)
    dataSource.value = res.data.data.host_list
  })
}
// 查看主机类别列表
const getHostCategory = () => {
  http.get("/host/category").then((res) => {
    console.log("host_category_list:::", res)
    categoryList.data = res.data.data.host_category_list
  })
}


onMounted(function (){
   // ajax请求:获取后端的主机列表
   getHostList()

   // ajax:获取主机类别列表
  getHostCategory()

})

</script>

<style scoped>

</style>
因为后端接口设置了token认证,所以在发请求时需要携带token,为了方便处理,放置在axios请求拦截器中,在utils/http.js中,代码:
import axios from "axios"
import storage from "@/utils/storage";

const http = axios.create({
    // timeout: 2500,                          // 请求超时,有大文件上传需要关闭这个配置
    baseURL: "http://api.bingo.cn:8080/api",     // 设置api服务端的默认地址[如果基于服务端实现的跨域,这里可以填写api服务端的地址,如果基于nodejs客户端测试服务器实现的跨域,则这里不能填写api服务端地址]
    withCredentials: false,                    // 是否允许客户端ajax请求时携带cookie
})

// 请求拦截器
http.interceptors.request.use((config) => {
    console.log("http请求之前");
    console.log("storage.state.token::::::::", storage.state.token)
    console.log("storage.state.user::::::::", storage.state.user)
    // 设置token ,每一个http发出的axios请求都会携带该请求头
    config.headers.Authorization = storage.state.token

    return config;
}, (error) => {
    console.log("http请求错误");
    return Promise.reject(error);
});

// 响应拦截器
http.interceptors.response.use((response) => {
    console.log("服务端响应数据成功以后,返回结果给客户端的第一时间,执行then之前");
    return response;
}, (error) => {
    console.log("服务端响应错误内容的时候。...");
    return Promise.reject(error);
});

export default http;
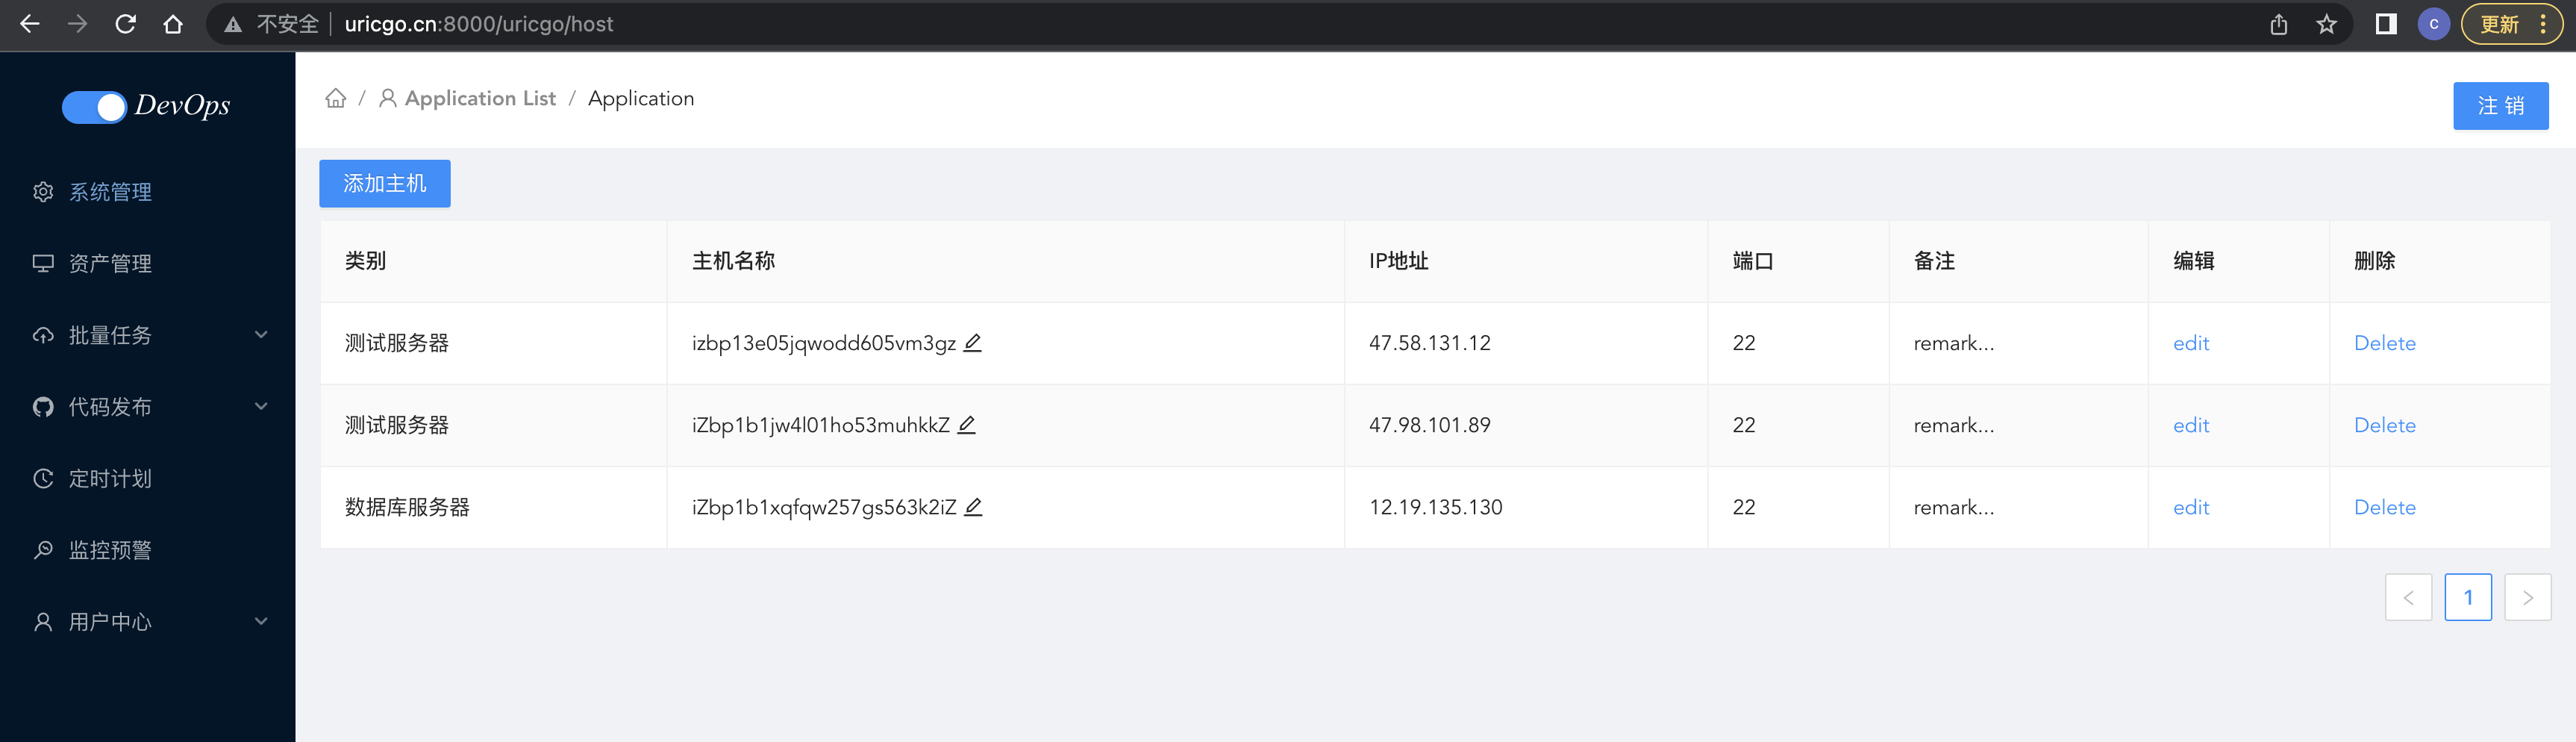
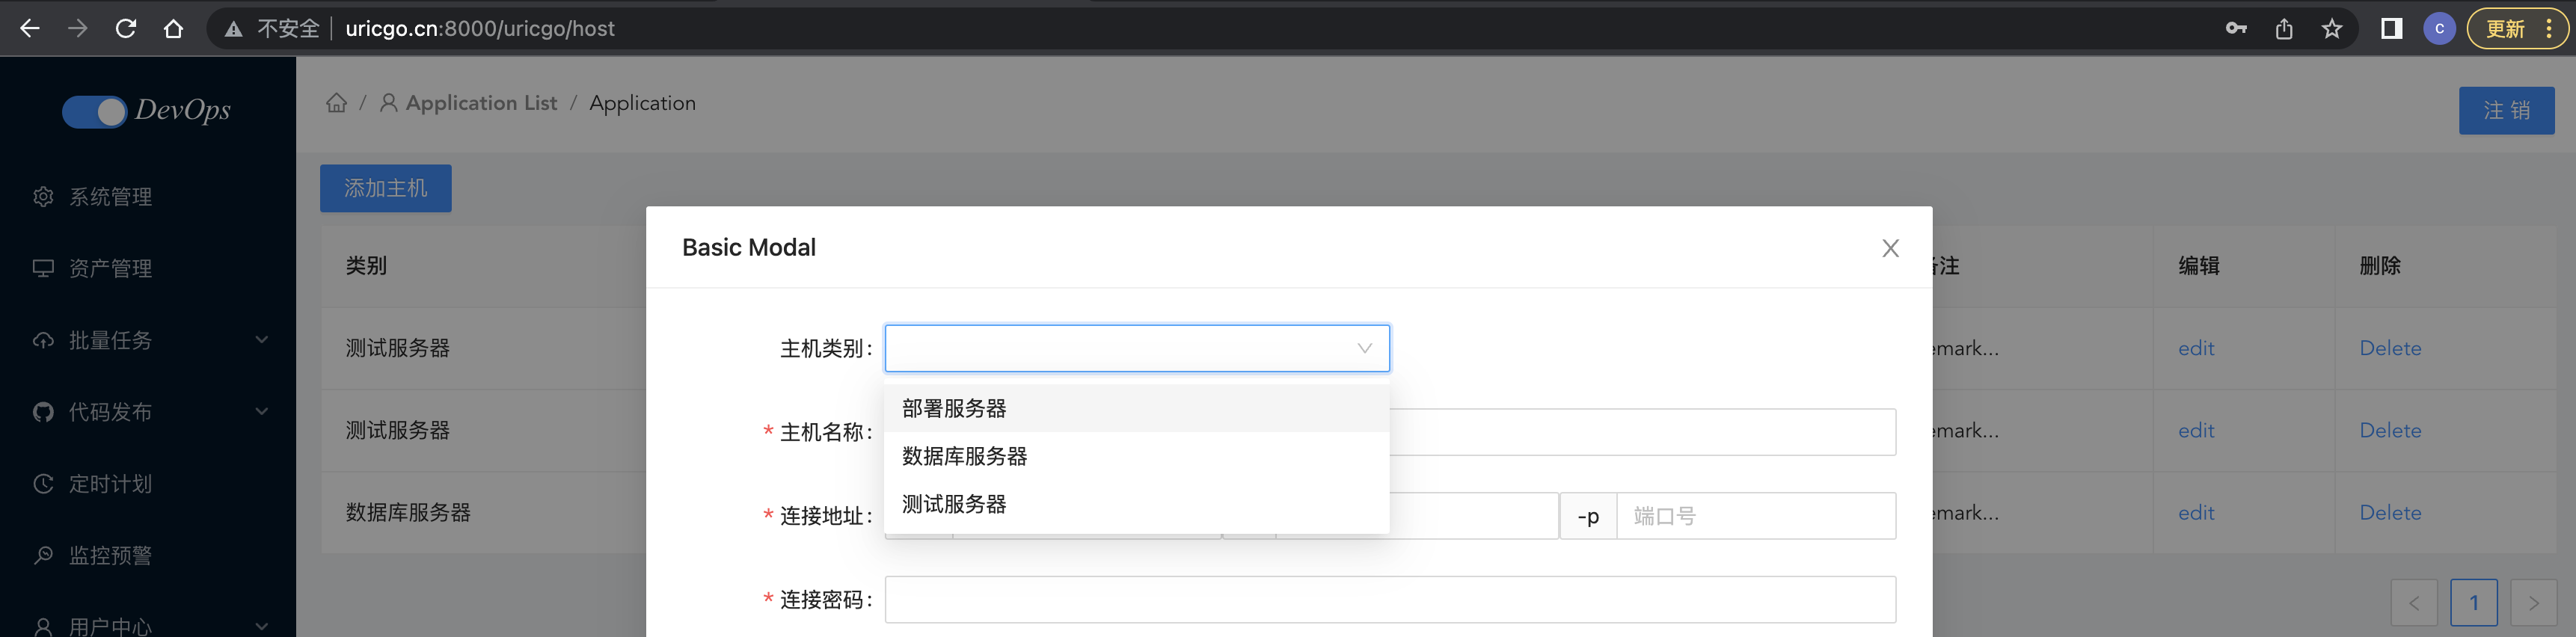
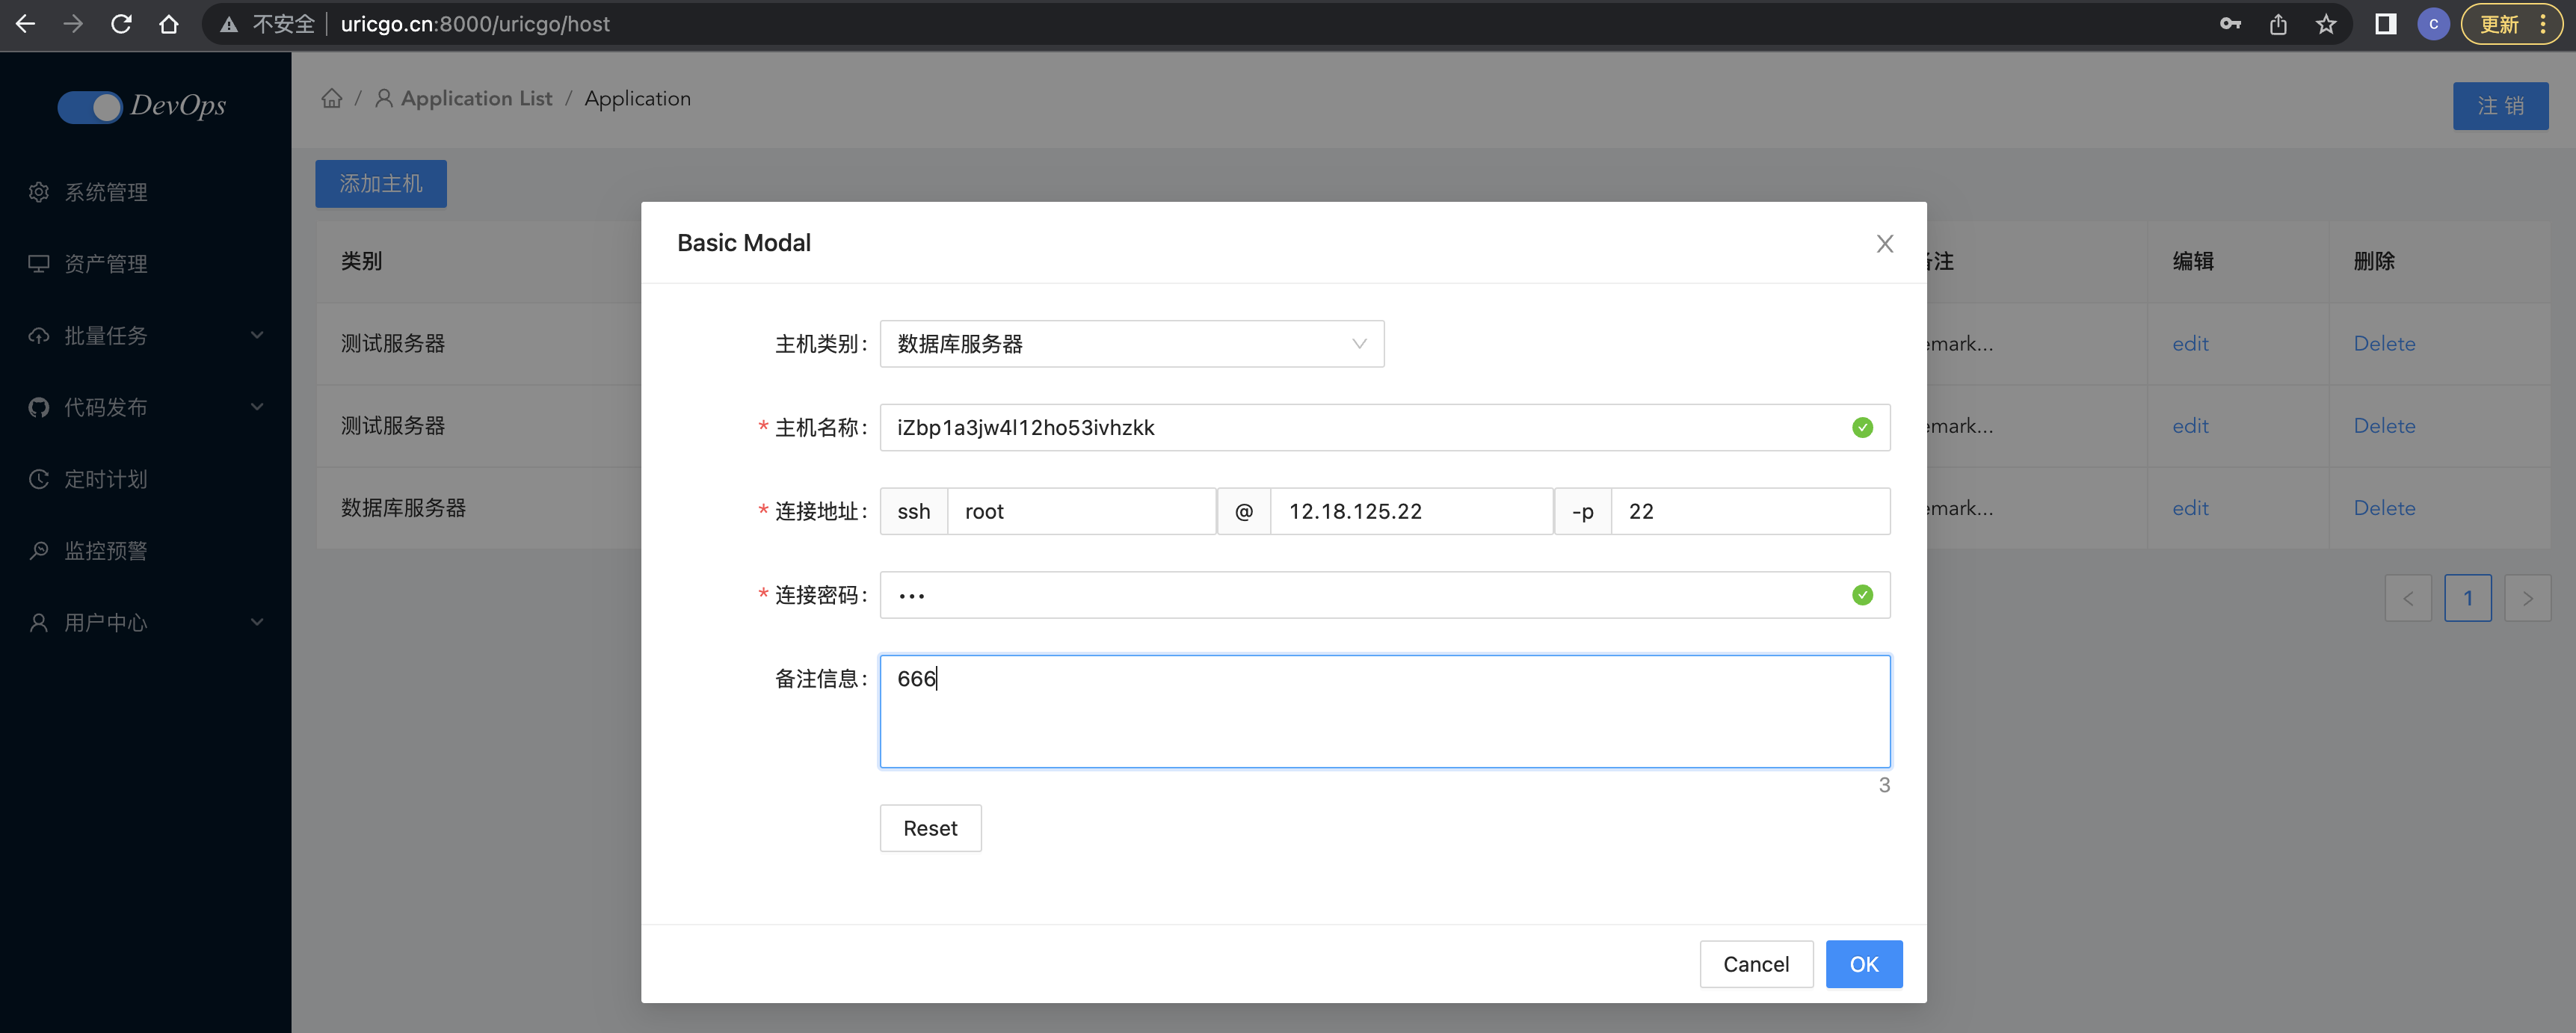
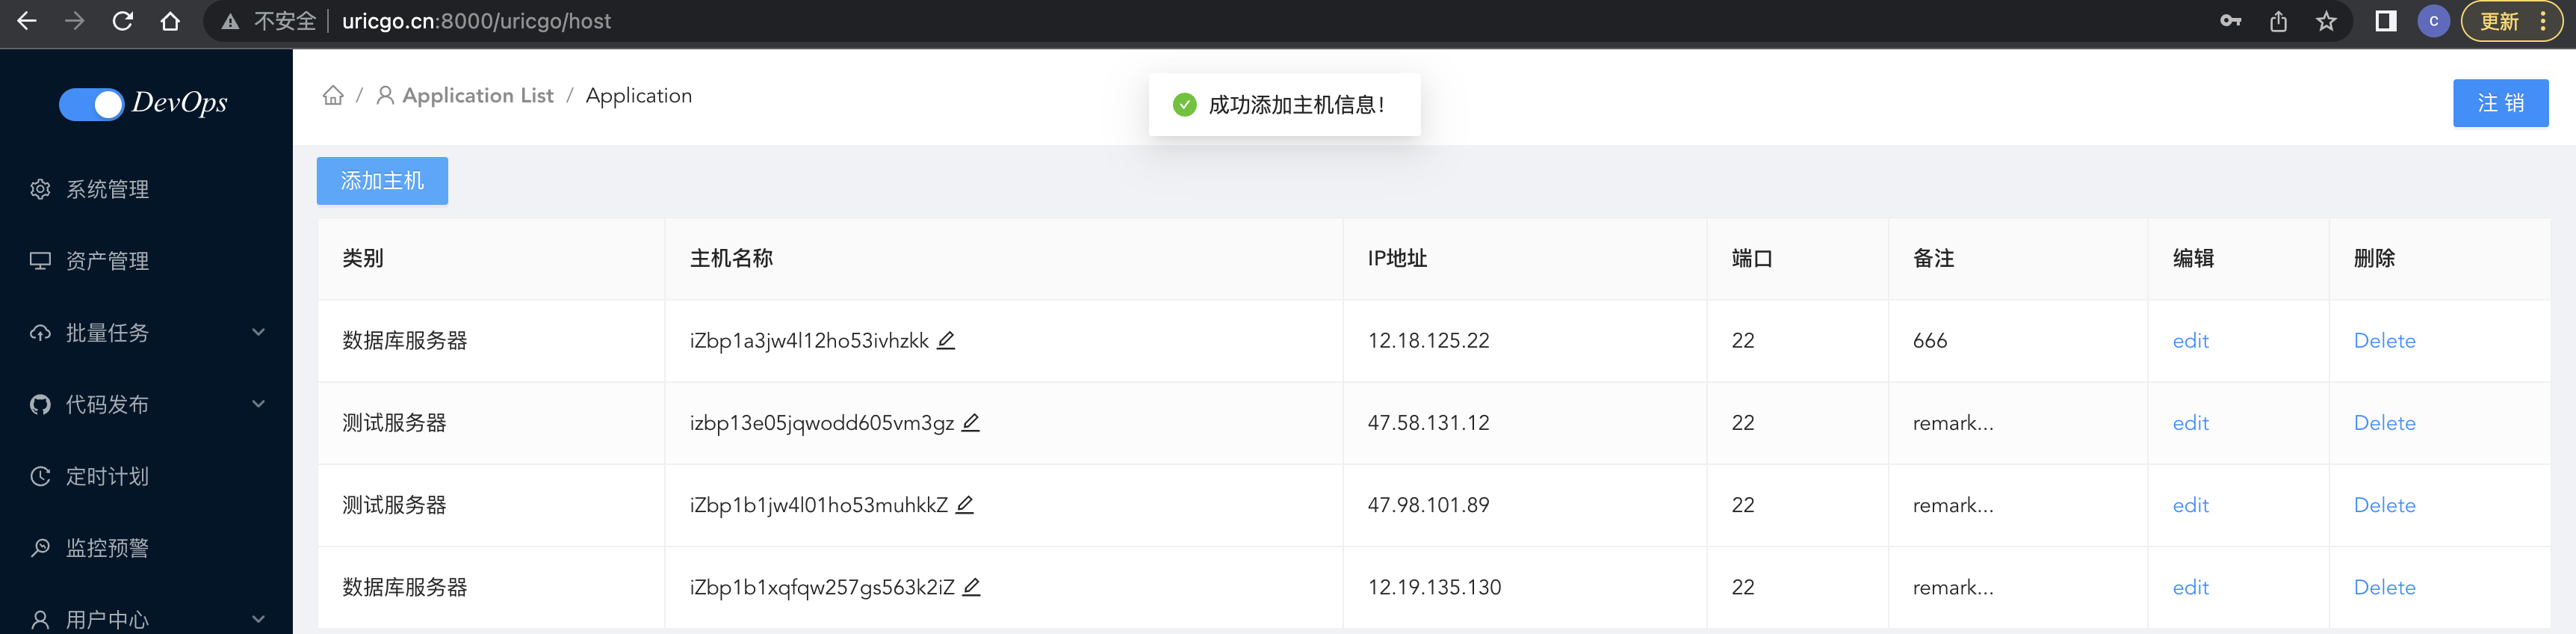

4.2、基于ssh的主机验证
4.2.1、ssh命令
ssh命令是openssh套件中的客户端连接工具,可以给予ssh加密协议实现安全的远程登录服务器,实现对服务器的远程管理。
简单说,SSH是一种网络协议,用于计算机之间的加密登录。如果一个用户从本地计算机,使用SSH协议登录另一台远程计算机,我们就可以认为,这种登录是安全的,即使被中途截获,密码也不会泄露。最早的时候,互联网通信都是明文通信,一旦被截获,内容就暴露无疑。1995年,芬兰学者Tatu Ylonen设计了SSH协议,将登录信息全部加密,成为互联网安全的一个基本解决方案,迅速在全世界获得推广,目前已经成为Linux系统的标准配置。
SSH(远程连接工具)连接原理:ssh服务是一个守护进程(demon),系统后台监听客户端的连接,ssh服务端的进程名为sshd,负责实时监听客户端的请求(IP 22端口),包括公共秘钥等交换等信息。
ssh服务端由2部分组成: openssh(提供ssh服务) openssl(提供加密的程序)
- 检查主机上有没有安装SSH服务,使用命令:ssh 若提示命令未找到��,则需要安装ssh服务;步骤如下:输入sudo apt-get update命令以实现更新Ubuntu系统–>输入sudo apt-get install openssh-server命令以安装ssh 若输出ssh命令的使用说明,则代表已经安装了。
- 检查主机上有没有启动SSH服务,使用命令:service –status-all | grep ssh 若服务已经启动的话,可以看到[+] ssh 若服务还没启动的话,可以看到[-] ssh
- 启动ssh服务,使用命令sudo service sshd start
SSH远程登录之口令登录
ssh 用户名@IP地址 -p 端口号SSH的默认端口是22


4.2.2、go语言的ssh包
依赖:
go get "golang.org/x/crypto/ssh"
go get "github.com/pkg/sftp"
ssh文档:https://pkg.go.dev/golang.org/x/crypto/ssh#Client
sftp文档:https://pkg.go.dev/github.com/pkg/sftp#Client
ssh/utils/ssh.go,代码:
package utils

import (
	"errors"
	"fmt"
	"github.com/pkg/sftp"
	"go.uber.org/zap"
	"golang.org/x/crypto/ssh"
	"strings"
	"time"
)

// SSH 客户端连接信息的结构体
type SSH struct {
	IP         string       // IP地址
	Port       int          // 端口号
	Username   string       // 用户名
	Mode       string       // 认证方式[password:密码,key:秘钥认证]
	Password   string       // 密码
	Key        string       // 认证私钥
	Client     *ssh.Client  // ssh客户端
	SftpClient *sftp.Client // sftp客户端
	LastResult string       // 最近一次执行命令的结果
}

func NewSSH(ip string, username string, password string, key string, mode string, port ...int) *SSH {
	/**
	创建命令行实例
	@param ip IP地址
	@param username 用户名
	@param password 登陆密码
	@param key 认证私钥
	@param mode 认证模式( password: 密码 | key: 秘钥 )
	@param port 端口号, 不填写则默认为22
	*/

	client := new(SSH)
	client.IP = ip
	client.Username = username
	client.Password = password
	client.Key = key
	client.Mode = mode

	if len(port) <= 0 {
		client.Port = 22
	} else {
		client.Port = port[0]
	}

	return client
}

func (s *SSH) Connect() error {
	/**
	SSH连接
	*/
	config := ssh.ClientConfig{
		User:            s.Username,
		HostKeyCallback: ssh.InsecureIgnoreHostKey(),
		Timeout:         10 * time.Second,
	}

	// 判断SSH连接的认证方式
	if s.Mode == "key" {
		signer, err := ssh.ParsePrivateKey([]byte(s.Key))
		if err != nil {
			zap.S().Fatalf("ssh key signer failed: %v", err)
		}
		config.Auth = []ssh.AuthMethod{ssh.PublicKeys(signer)}
	} else {
		fmt.Println("s.Password", s.Password)
		config.Auth = []ssh.AuthMethod{ssh.Password(s.Password)}
	}

	// 创建SSH客户端
	addr := fmt.Sprintf("%s:%d", s.IP, s.Port)
	sshClient, err := ssh.Dial("tcp", addr, &config)
	if err != nil {
		return err
	}
	s.Client = sshClient
	return nil
}

func (s SSH) Run(command string) (string, error) {
	/**
	执行Shell命令
	@param command 要执行的命令,多个命令采用 ; 隔开
	*/
	if s.Client == nil {
		if err := s.Connect(); err != nil {
			return "", err
		}
	}
	// 创建一个客户端SSH
	session, err := s.Client.NewSession()
	if err != nil {
		return "", err
	}
	defer session.Close()
	// 执行Shell命令
	buf, err := session.CombinedOutput(command)

	s.LastResult = string(buf)
	return s.LastResult, err
}

func (s SSH) AddPublicKeyToRemoteHost(publicKey string) error {
	/**
	将公钥写入目标主机
	700 是文档拥有可读可写可执行,同一组用户或者其他用户都不具有操作权限
	600 是文件拥有者可读可写,不可执行,同一组用户或者其他用户都不具有操作权限
	*/
	command := fmt.Sprintf("mkdir -p -m 700 ~/.ssh && echo %v >> ~/.ssh/authorized_keys && chmod 600 ~/.ssh/authorized_keys", strings.TrimSpace(publicKey))
	_, err := s.Run(command)
	if err != nil {
		message := fmt.Sprintf("%v: %v", "添加公钥失败!", err)
		return errors.New(message)
	}
	return nil
}
OK,接下来,我们就可以测试下封装效果了。
首先测试基于密码的ssh连接,test/ssh/main.go,代码:
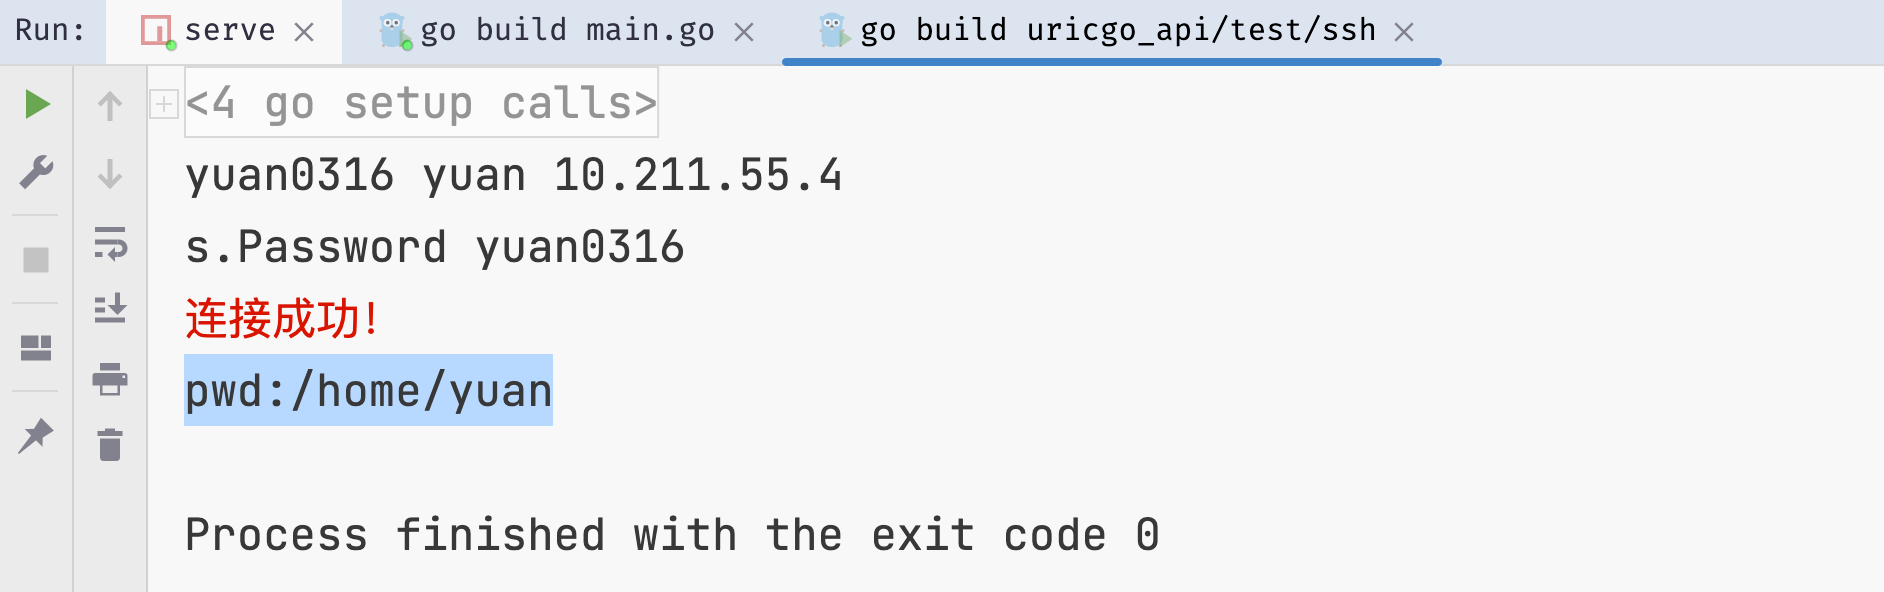
测试基于密钥的ssh连接,首先在本地创建公私钥,通过ssh相关命令
ssh-keygen -t rsa

运行结束以后,在$HOME/.ssh/目录下,会新生成两个文件:id_rsa.pub和id_rsa。前者是你的公钥,后者是你的私钥。
基于密码登录,将公钥发送到连接的远程服务器/.ssh/authorized_keys中,后面在基于私钥就可以免密登录了。
package main

import (
	"fmt"
	"os"
	"ssh_test/utils"
)

func main() {
	Host := "10.211.55.3"
	User := "root"
	Password := "yuan0316"
	Port := 22
	Key := ""
	Mode := "password"

	// 首次SSH连接使用密码
	cli := utils.NewSSH(Host, User, Password, Key, Mode, Port)
	fmt.Println(cli.Password, cli.Username, cli.IP)
	if err := cli.Connect(); err != nil {
		print("连接失败!", err.Error())
		return
	} else {
		print("连接成功!")
	}

	publicKey, _ := os.ReadFile("./keys/id_rsa.pub") // 这里放公钥字符串
	fmt.Println("publicKey:::", string(publicKey))
	err := cli.AddPublicKeyToRemoteHost(string(publicKey)) // 将本地的公钥发送到远程服务器的指定位置
	if err != nil {
		panic(err)
	}

}
接下来就可以基于私钥进行免密登录了。
package main

import (
	"fmt"
	"os"
	"ssh_test/utils"
)

func main() {
	Host := "10.211.55.3"
	User := "root"
	Password := "yuan0316"
	Port := 22
	Key := ""
	Mode := "password"

	// 第2次以后采用秘钥连接
	Mode = "key"
	Password = ""

	privateKey, _ := os.ReadFile("./keys/id_rsa") // 这里放公钥字符串

	Key = string(privateKey)

	cli := utils.NewSSH(Host, User, Password, Key, Mode, Port)

	if err := cli.Connect(); err != nil {
		fmt.Printf("连接失败:%v", err)
		return
	} else {
		print("连接成功!\n")
	}

	defer cli.Client.Close()

	output, err := cli.Run("ls")
	if err != nil {
		print("执行失败!")
	}
	fmt.Printf("output:\n%v", output)
}
4.2.3、基于ssh的主机验证
前面我们已经完成了主机列表展示和添加了,我们实现添加主机时,新添加主机需要填写连接主机的用户名和密码,我们接下来就需要通过密码来进行主机首次连接验证,如果用户名和密码没有问题,接着我们就要给该主机写入公钥设置免密登陆,之后才能添加到主机列表中,以后对这个主机的操作都能够完成免密操作,所以基于上面封装好的SSH工具包,我们有两件事情要做:
- 在添加主机时连接一次远程主机
- 配置远程的公私钥进行免密登录
流程图:
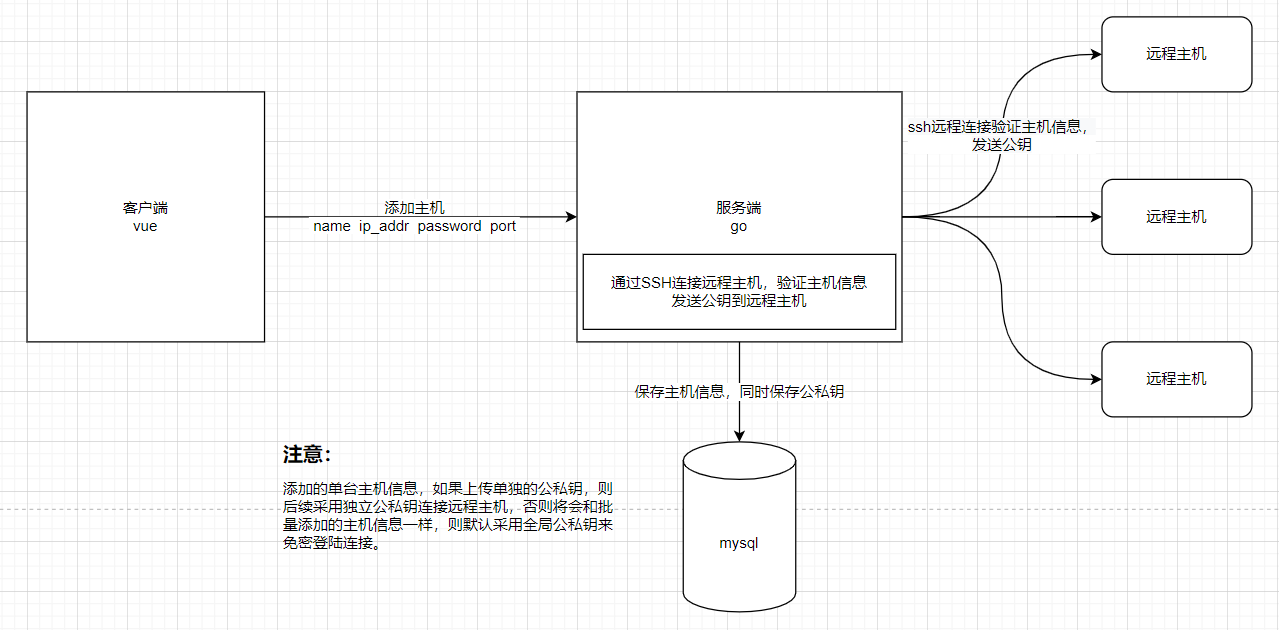
【1】设置全局公私钥
因为添加主机时,允许不上传秘钥,所以为了实现免密登陆,所以我们需要提前准备一个全局的秘钥对保存在服务端。
基于前面我们提到的生成公私钥的指令使用ssh-keygen生成一对秘钥。当然,前面如果已经生成了,则直接复制2个文件,保存到项目根目录下的keys目录下即可。
- bingo_api/keys/id_rsa文件保存私钥内容,bingo_api/keys/id_rsa.pub保存公钥内容
- 注意:生成的秘钥如果是换行的,不要胡乱修改!!!末尾没有空行的!!!切记!!!
- 保存了秘钥文件以后,接下来就在项目启动初始化项目配置的时候,读取到读取中。
application/config/config.go,代码:
// ...

// SSHGlobalKeys SSH全局秘钥对
type SSHGlobalKeys struct {
	PrivateKeyPath string `json:"private_key_path"`
	PublicKeyPath  string `json:"public_key_path"`
	PrivateKey     string `json:"private_key"`
	PublicKey      string `json:"public_key"`
}

// Config 整个项目的配置
type Config struct {
	Mode                string `json:"mode"`
	Port                int    `json:"port"`
	SecretKey           string `json:"secret_key"`
	*LogConfig          `json:"log"`
	*DatabaseConfig     `json:"database"`
	*RedisConfigGroup   `json:"redis"`
	*jwt.StandardClaims `json:"jwt"`
	*SSHGlobalKeys      `json:"ssh_global_keys"`
}

// Conf 全局配置变量
var Conf = new(Config)

// Init 初始化配置;从指定文件加载配置文件
func Init(filePath string) error {
	/**
	filePath 配置文件json文件的路径
	*/
	b, err := ioutil.ReadFile(filePath)
	if err != nil {
		return err
	}
	err = json.Unmarshal(b, Conf)
	// 读取SSH全局秘钥对
	publicKey, _ := ioutil.ReadFile(Conf.SSHGlobalKeys.PublicKeyPath)
	privateKey, _ := ioutil.ReadFile(Conf.SSHGlobalKeys.PrivateKeyPath)
	Conf.SSHGlobalKeys.PublicKey = string(publicKey)
	Conf.SSHGlobalKeys.PrivateKey = string(privateKey)
	return err
}
config.json中注意,务必填写绝对路径,否则无法识别,代码:
  "ssh_global_keys": {
    "private_key_path": "....../bingo/bingo_api/keys/id_rsa",
    "public_key_path": "....../bingo/bingo_api/keys/id_rsa.pub"
  }
完成上面步骤以后,那么我们的Urils项目中就存在了一对随时可以更新,随时可以使用的全局秘钥对了。
那么接下来就可以在添加主机时,直接完成主机信息的验证和写入公钥信息到远程主机了。
【2】主机管理实现免密登录
主机信息存储公私钥,原来的主机模型中,仅有一个key字段,所以为了方便保存公私钥,因此,我们可以拆分成2个字段保存。
application/models/host.go,代码:
type Host struct {
	gorm.Model
	Name           string       `json:"name" gorm:"type:varchar(255)"`
	IpAddr         string       `json:"ip_addr" gorm:"type:varchar(255)"`
	Port           uint         `json:"port" gorm:"type:int"`
	Username       string       `json:"username" gorm:"varchar(255)"`
	Password       string       `json:"password,omitempty" gorm:"varchar(255)"`
	Remark         string       `json:"remark,omitempty" gorm:"varchar(255)"`
	HostCategoryID uint         `json:"host_category_id"`
	HostCategory   HostCategory `json:"host_category"  gorm:"foreignKey:HostCategoryID;references:ID"`

	PrivateKey string `json:"private_key,omitempty" gorm:"type:text"`
	PublicKey  string `json:"public_key,omitempty" gorm:"type:text"`
}
调整了模型以后,我们就需要让orm框架重新迁移当前Host模型。
application/service/host.go
// 数据解析注释,在validator的host.go中解析
/*if err = ctx.ShouldBindJSON(&host); err != nil {
		return instance, err
	}*/
application/validator/host.go,代码:
package validator

import (
	"bingo_api/application/config"
	"bingo_api/application/constants"
	. "bingo_api/application/model"
	. "bingo_api/application/utils"
	"errors"
	"fmt"
	"github.com/gin-gonic/gin"
	"github.com/go-playground/validator/v10"
	"io/ioutil"
	"mime/multipart"
	"strconv"
	"strings"
)

/**
添加主机类别的验证器
*/

func HostCategoryValidator(hostCategory *HostCategory) error {
	validate, trans := GenValidate()
	err := validate.Struct(hostCategory)
	if err != nil {
		for _, err := range err.(validator.ValidationErrors) {
			return errors.New(err.Translate(trans))
		}
	}
	return nil
}

/**
添加主机的验证器
*/

func HostValidator(host *Host, ctx *gin.Context) error {
  // (1) 接收数据

	// 接收多文件上传的表单数据
	form, err := ctx.MultipartForm()
	if err != nil {
		return err
	}
	fmt.Println("form:::", form)

	// 手动接收表单信息并赋值
	// form.Value接收文本字段 form.File接收上传文件
	hostCategoryId, _ := strconv.Atoi(form.Value["host_category_id"][0])
	host.HostCategoryID = uint(hostCategoryId)
	port, _ := strconv.Atoi(form.Value["port"][0])
	host.Port = uint(port)
	host.Username = form.Value["username"][0]
	host.Password = form.Value["password"][0]
	host.Name = form.Value["name"][0]
	host.IpAddr = form.Value["ip_addr"][0]
	host.Remark = form.Value["remark"][0]
	fmt.Println("host:::", host)

  // (2) 校验数据
  // 校验基本规则
	validate, trans := GenValidate()
	err = validate.Struct(host)
	if err != nil {
		for _, err := range err.(validator.ValidationErrors) {
			fmt.Println("err:::", err)

			return errors.New(err.Translate(trans))
		}
	}

	// 校验类型范围
	if host.HostCategoryID < 1 {
		return errors.New(constants.HostCategoryNotExist)
	}

	var hostCategory HostCategory
	err = hostCategory.GetOneById(host.HostCategoryID)
	if err != nil {
		return errors.New(constants.HostCategoryNotExist)
	}
	// 校验主机是否可以ping通,可以的话,将公钥上传到服务器指定位置,方便后面的免密登录
	err = ping(host, form)
	if err != nil {
		return err
	}
	return nil
}

func ping(host *Host, form *multipart.Form) error {
	var err error

  // (1)获取公私钥
	// 从表单中提取上传文件
	keys := form.File["files[]"] // 务必与客户端上传时设置的字段名一致,否无接收不了
	// 根据上传文件个数判断
	if len(keys) == 1 {
		// 报错,允许上传一个文件
		return errors.New(constants.Missingkeys)
	} else if len(keys) == 2 {
		// 上传秘钥对两个文件
		// 获取第一个文件
		fileHandle1, err := keys[0].Open()
		if err != nil {
			return err
		}
		defer fileHandle1.Close()
		fileByte, _ := ioutil.ReadAll(fileHandle1)
		key1 := string(fileByte)

		// 获取第二个文件
		fileHandle2, err := keys[1].Open()
		defer fileHandle2.Close()
		fileByte, _ = ioutil.ReadAll(fileHandle2)
		key2 := string(fileByte)

		if strings.Contains(key1, "PRIVATE") { // 通过判断秘钥中的内容,区分公钥和私钥。
			host.PrivateKey, host.PublicKey = key1, key2
		} else {
			host.PrivateKey, host.PublicKey = key2, key1
		}

	} else {
		// todo 采用全局公私钥作为默认值
		host.PublicKey, host.PrivateKey = config.Conf.PublicKey, config.Conf.PrivateKey
	}

	// (2)确认好公私钥,创建ssh对象,进行ssh操作
	cli := NewSSH(host.IpAddr, host.Username, host.Password, "", "password", int(host.Port))
	// 基于密码首次SSH连接
	if err := cli.Connect(); err != nil {
		fmt.Println("err", err)
		return errors.New(constants.HostInfoEror)
	}
	fmt.Println("cli.Client:::", cli.Client)
	fmt.Println("host.PublicKey:::", host.PublicKey)

	// 验证主机信息成功以后,接下来就可以把公钥写入到远程主机了。
	if err := cli.AddPublicKeyToRemoteHost(host.PublicKey); err != nil {
		return errors.New(constants.SSHKeyIsInvalid)
	}

	return err

}
constants/message.go,代码:
package constants

const (
    // ....
	HostInfoEror    = "主机信息有误!!"
	SSHKeyIsInvalid = "无效的秘钥信息!"
	Missingkeys     = "丢失公钥或者私钥"
)
接下来,清除连接服务端的
cd ~/.ssh
cat authorized_keys
rm -rf authorized_keys
touch authorized_keys
这样该目标主机的ssh记录就全部删除了。我们就可以基于bingo_api/test/ssh/main.go文件的测试例子,验证是否已经给远程主机建立了免密登陆。
package main

import (
	"fmt"
	"os"
	"ssh_test/utils"
)

func main() {
	Host := "10.211.55.3"
	User := "root"
	Password := "yuan0316"
	Port := 22
	Key := ""
	Mode := "password"

	// 第2次以后采用秘钥连接
	Mode = "key"
	Password = ""

	privateKey, _ := os.ReadFile("./keys/id_rsa") // 这里放公钥字符串
	fmt.Println("publicKey:::", string(privateKey))

	Key = string(privateKey)

	cli := utils.NewSSH(Host, User, Password, Key, Mode, Port)

	if err := cli.Connect(); err != nil {
		fmt.Printf("连接失败:%v", err)
		return
	} else {
		print("连接成功!\n")
	}

	defer cli.Client.Close()

	output, err := cli.Run("ls")
	if err != nil {
		print("执行失败!")
	}
	fmt.Printf("output:\n%v", output)
}
正常远程服务器中的公钥删除后,直接运行上面的代码会连接失败。
【3】postman测试接口

【4】前端联调
Host.vue
<template>
  <div class="host">

    <div>
      <a-button type="primary" @click="showModal" style="margin: 8px 0">添加主机</a-button>
      <a-modal width="860px" v-model:visible="visible" title="Basic Modal" @ok="onHostFormSubmit" @cancel="cancelForm">

        <a-form
            ref="formRef"
            name="custom-validation"
            :model="hostForm.form"
            :rules="hostForm.rules"
            v-bind="layout"
            @finish="handleFinish"
            @validate="handleValidate"
            @finishFailed="handleFinishFailed"
        >
          <a-form-item label="主机类别" prop="zone" name="category">
            <a-row>
              <a-col :span="12">
                <a-select
                    ref="select"
                    v-model:value="hostForm.form.host_category_id"
                    @change="handleCategorySelectChange"
                >
                  <a-select-option :value="category.id" v-for="category in categoryList.data" :key="category.id">
                    {{ category.name }}
                  </a-select-option>
                </a-select>
              </a-col>

            </a-row>

          </a-form-item>

          <a-form-item has-feedback label="主机名称" name="name">
            <a-input v-model:value="hostForm.form.name" type="text" autocomplete="off"/>
          </a-form-item>


          <a-form-item label="连接地址" name="username">

            <a-row>
              <a-col :span="8">
                <a-input placeholder="用户名" addon-before="ssh" v-model:value="hostForm.form.username" type="text"
                         autocomplete="off"/>
              </a-col>
              <a-col :span="8">
                <a-input placeholder="ip地址" addon-before="@" v-model:value="hostForm.form.ip_addr" type="text"
                         autocomplete="off"/>
              </a-col>
              <a-col :span="8">
                <a-input placeholder="端口号" addon-before="-p" v-model:value="hostForm.form.port" type="number"
                         autocomplete="off"/>
              </a-col>
            </a-row>
          </a-form-item>

          <a-form-item has-feedback label="连接密码" name="password">
            <a-input v-model:value="hostForm.form.password" type="password" autocomplete="off"/>
          </a-form-item>

          <a-form-item has-feedback label="备注信息" name="remark">
            <a-textarea placeholder="请输入主机备注信息" v-model:value="hostForm.form.remark" type="text"
                        :auto-size="{ minRows: 3, maxRows: 5 }" autocomplete="off"/>
          </a-form-item>


          <a-form-item :wrapper-col="{ span: 14, offset: 4 }">
            <a-button @click="resetForm">Reset</a-button>
          </a-form-item>
        </a-form>

      </a-modal>
    </div>

    <a-table bordered :data-source="hostList.data" :columns="columns">
      <template #bodyCell="{ column, text, record }">
        <template v-if="column.dataIndex === 'name'">
          <div class="editable-cell">
            <div v-if="editableData[record.key]" class="editable-cell-input-wrapper">
              <a-input v-model:value="editableData[record.key].name" @pressEnter="save(record.key)"/>
              <check-outlined class="editable-cell-icon-check" @click="save(record.key)"/>
            </div>
            <div v-else class="editable-cell-text-wrapper">
              {{ text || ' ' }}
              <edit-outlined class="editable-cell-icon" @click="edit(record.key)"/>
            </div>
          </div>
        </template>
        <template v-else-if="column.dataIndex === 'operation_edit'">

          <a>
            <edit-outlined/>
          </a>

        </template>
        <template v-else-if="column.dataIndex === 'operation_del'">
          <a-popconfirm
              v-if="hostList.data.length"
              title="Sure to delete?"
              @confirm="onDelete(record)"
          >
            <a>
              <delete-outlined/>
            </a>
          </a-popconfirm>
        </template>
      </template>
    </a-table>
  </div>
</template>

<script setup>
import {computed, onMounted, reactive, ref} from 'vue';
import {CheckOutlined, DeleteOutlined, EditOutlined} from '@ant-design/icons-vue';
import {cloneDeep} from 'lodash-es';
import http from "@/utils/http";
import {message} from 'ant-design-vue';

// 主机表格
const columns = [{
  title: '类别',
  dataIndex: 'category_name',
}, {
  title: '主机名称',
  dataIndex: 'name',
}, {
  title: 'IP地址',
  dataIndex: 'ip_addr',
}, {
  title: '端口',
  dataIndex: 'port',
}, {
  title: '备注',
  dataIndex: 'remark',
}, {
  title: '编辑',
  dataIndex: 'operation_edit',
}, {
  title: '删除',
  dataIndex: 'operation_del',
}];
const hostList = reactive({data: []})
;
const count = computed(() => hostList.data.length + 1);
const editableData = reactive({});
const edit = key => {
  editableData[key] = cloneDeep(hostList.data.filter(item => key === item.key)[0]);
};
const save = key => {
  Object.assign(hostList.data.filter(item => key === item.key)[0], editableData[key]);
  delete editableData[key];
};
const onDelete = record => {

  console.log("delete id", record)
  http.delete(`/host`, {
    params: {
      "id": record.id
    }
  }).then((response) => {

    hostList.data = hostList.data.filter(item => item.id !== record.id);
    message.success('删除主机成功!')

  }).catch((err) => {
    message.error('删除主机失败!')
  });


};

// 添加主机
const visible = ref(false);
const showModal = () => {
  visible.value = true;
};

const onHostFormSubmit = () => {

  // 将数据提交到后台进行保存,但是先进行连接校验,验证没有问题,再保存
  hostForm.form.port = parseInt(hostForm.form.port)

  const formData = new FormData();
  for (let attr in hostForm.form) {
    formData.append(attr, hostForm.form[attr])
  }

  http.post(`/host`, formData).then((response) => {
    console.log("response.data.data.host:::", response.data.data.host)
    hostList.data.unshift(response.data.data.host)
    // 清空
    resetForm()
    visible.value = false;
    message.success('成功添加主机信息!', 1)

  }).catch((err) => {
    // 清空
    resetForm()
    visible.value = false;
    console.log("err:::", err)
    message.error('添加主机失败!', 1.5)
  });
}

const cancelForm = e => {
  resetForm()
  visible.value = false;
};
const hostForm = reactive({
  labelCol: {span: 6},
  wrapperCol: {span: 14},
  other: '',
  form: {
    name: '',
    host_category_id: "",
    ip_addr: '',
    username: '',
    port: '',
    remark: '',
    password: ''
  },
  rules: {
    name: [
      {required: true, message: '请输入主机名称', trigger: 'blur'},
      {min: 3, max: 30, message: '长度在3-10位之间', trigger: 'blur'}
    ],
    password: [
      {required: true, message: '请输入连接密码', trigger: 'blur'},
      {min: 3, max: 30, message: '长度在3-10位之间', trigger: 'blur'}
    ],
    host_category_id: [
      {required: true, message: '请选择类别', trigger: 'change'}
    ],
    username: [
      {required: true, message: '请输入用户名', trigger: 'blur'},
      {min: 3, max: 30, message: '长度在3-10位', trigger: 'blur'}
    ],
    ip_addr: [
      {required: true, message: '请输入连接地址', trigger: 'blur'},
      {max: 30, message: '长度最大15位', trigger: 'blur'}
    ],
    port: [
      {required: true, message: '请输入端口号', trigger: 'blur'},
      {max: 5, message: '长度最大5位', trigger: 'blur'}
    ]
  }
});
const formRef = ref();
const layout = {
  labelCol: {
    span: 4,
  },
  wrapperCol: {
    span: 24,
  },
};
const handleFinish = values => {
  console.log(values, hostForm);
};

const handleFinishFailed = errors => {
  console.log(errors);
};

const resetForm = () => {
  formRef.value.resetFields();
};

const handleValidate = (...args) => {
  console.log(args);
};

const handleCategorySelectChange = (value) => {
  // 切换主机类别的回调处理
  console.log(value)
}

const categoryList = reactive({
  data: []
})

// 查看主机列表
const getHostList = () => {
  http.get("/host").then((res) => {
    console.log("host_list:::", res)
    hostList.data = res.data.data.host_list
  })
}
// 查看主机类别列表
const getHostCategory = () => {
  http.get("/host/category").then((res) => {
    console.log("host_category_list:::", res.data.data.host_category_list)
    categoryList.data = res.data.data.host_category_list
  })
}


onMounted(() => {
  getHostList()
  getHostCategory()
})


</script>

<style scoped>


</style>


添加成功后检查远程服务器的~/.ssh/authorized_keys中是否添加公钥成功,成功后再执行上面的测试代码,即可连接成功。
这里有一个功能,在添加主机的模态对话框中应该配有上传公私钥的按钮,同学们可以自己补充!
到这里,我们的ssh免密登录功能就实现完成了。
4.3、基于ws实现Console
4.3.1、Websocket介绍
Websocket(简称:ws)是web前端HTML5提供的一种浏览器与服务器进行全双工通讯的网络技术,属于应用层协议,它基于TCP协议开发而来,并复用HTTP的握手通道。
- 调用简单,由浏览器进行了封装提供强大的操作接口,直接使用浏览器的websocket对象即可通过事件与服务端进行websocket通信。
- 支持二进制,
- 支持双向通信, 更灵活, 更实时性, 更高效,可扩展性更好
基于WebSocket实现WebSSH的目的在于解决以下几个问题:
- 取代xshell,secureRT,putty等ssh终端,达到主机信息管理和远程控制管理一体化。
- 可以方便身份认证, 访问控制
- 方便使用, 不受电脑环境的影响
流程图:
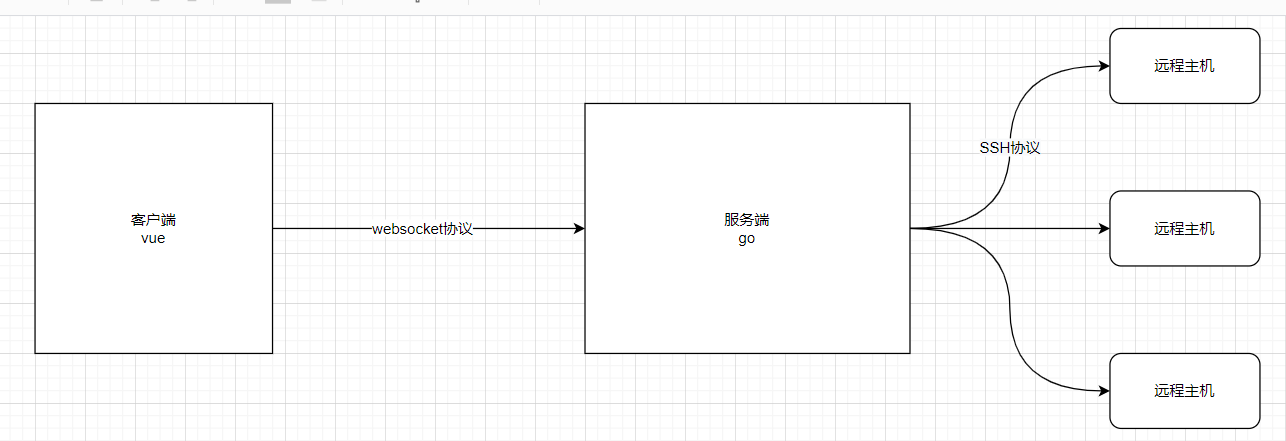
大概步骤:
1. 浏览器提供console点击按钮,当用户点击以后,将主机的id发送给gin后台, 并通过HTTP请求与后台协商升级ws协议. 协议升级完成后, 后续的数据交换则遵照webSocket的协议.

2. 后台将HTTP请求升级为web Socket协议, 得到一个和浏览器数据交换的连接通道

3. 后台将数据进行解密拿到主机信息, 创建一个SSH 客户端, 与远程主机的SSH 服务端协商加密, 互相认证, 然后通过OpenChannel建立一个SSH Channel

4. 后台和远程主机有了通讯的信道, 然后后台将终端的大小等信息通过SSH Channel请求远程主机创建一个 pty(伪终端), 并请求启动当前用户的默认 shell

5. 后台通过 Socket连接通道拿到用户输入, 再通过SSH Channel将输入传给pty, pty将这些数据交给远程主机处理后按照前面指定的终端标准输出到SSH Channel中, 同时键盘输入也会发送给SSH Channel

6. 后台从SSH Channel中拿到按照终端大小的标准输出后又通过Socket连接将输出返回给浏览器, 由此变实现了Web SSH Terminal
4.3.2、基于ws的websocket测试
前端实现
前端的终端效果我们使用xterm.js来完成。
Xterm.js的安装和使用
npm install xterm
初始化xterm.js,在src/main.js中添加代码:
import 'xterm/css/xterm.css'
import 'xterm/lib/xterm'
创建组件,views/Console.vue,代码:
<template>
  <div class="console">
    <div id="terminal"></div>
  </div>
</template>

<script setup>
import {onMounted} from "vue";
import {Terminal} from 'xterm'
import settings from "@/settings";
import {useRoute} from "vue-router"

const route = useRoute()

// 因爲xterm终端需要修改HTML代码,所以必须等vue显示了页面内容以后才能执行xterm相关的代码
onMounted(
    () => {
      let term = new Terminal({
        rendererType: 'canvas', // 渲染类型
        cols: 100, // 列数
        rows: 50, // 行数
        convertEol: true, // 启用时,光标将设置为下一行的开头
        scrollback: 100, // 终端中的回滚量
        disableStdin: false, // 是否应禁用输入。
        cursorStyle: 'underline', // 光标样式
        cursorBlink: true, // 光标闪烁
        theme: {
          foreground: '#ffffff', // 字体
          background: '#060101', // 背景色
          cursor: 'help' // 设置光标
        }
      })

      // 连接Websocket
      // let ws = new WebSocket(`${settings.wsHost}/host/${route.params.id}/console`)
      let ws = new WebSocket(`ws://localhost:8888/ping`)
      let cmd = '';  // 拼接用户输入的内容

      ws.onmessage = (event) => {
        term.write(event.data);
      }

      term.prompt = () => {
        term.write('\r\n')
      }

      // 当用户按了键盘时
      term.onKey(e => {
        console.log(e.key)
        const ev = e.domEvent
        const printable = !ev.altKey && !ev.altGraphKey && !ev.ctrlKey && !ev.metaKey

        if (ev.key === "Enter") { // 回车
          // 按下回车键进行指令的发送
          console.log("cmd", cmd)
          ws.send(cmd)
          term.write('\r\n')
        } else if (ev.key === "Backspace") { // 删除

          cmd -= e.key
          // Do not delete the prompt
          if (term._core.buffer.x > 2) {
            term.write('\b \b')
          }
        } else if (printable) {
          term.write(e.key)
          cmd += e.key
        }
      })

      // 显示一个ssh终端窗口
      term.open(document.getElementById('terminal'))
    }
)
</script>

<style scoped>

</style>
设置路由router:
import Console from '../views/Console'
// ...
{
    meta: {
        title: '远程主机管理',
        authentication: true
    },
    path: 'host/console/:id', // :id 就是当前点击的主机信息的ID主键
      name: 'Console',
      component: Console
},
在Host.vue中,主机列表后面的console对应的地址,实现参数跳转。
const columns = [
...
{
  title: 'console',
  dataIndex: 'console',
},
...
]
...
<template v-else-if="column.dataIndex === 'console'">
<router-link :to="`/bingo/host/console/${record.id}`">Console</router-link>
</template>
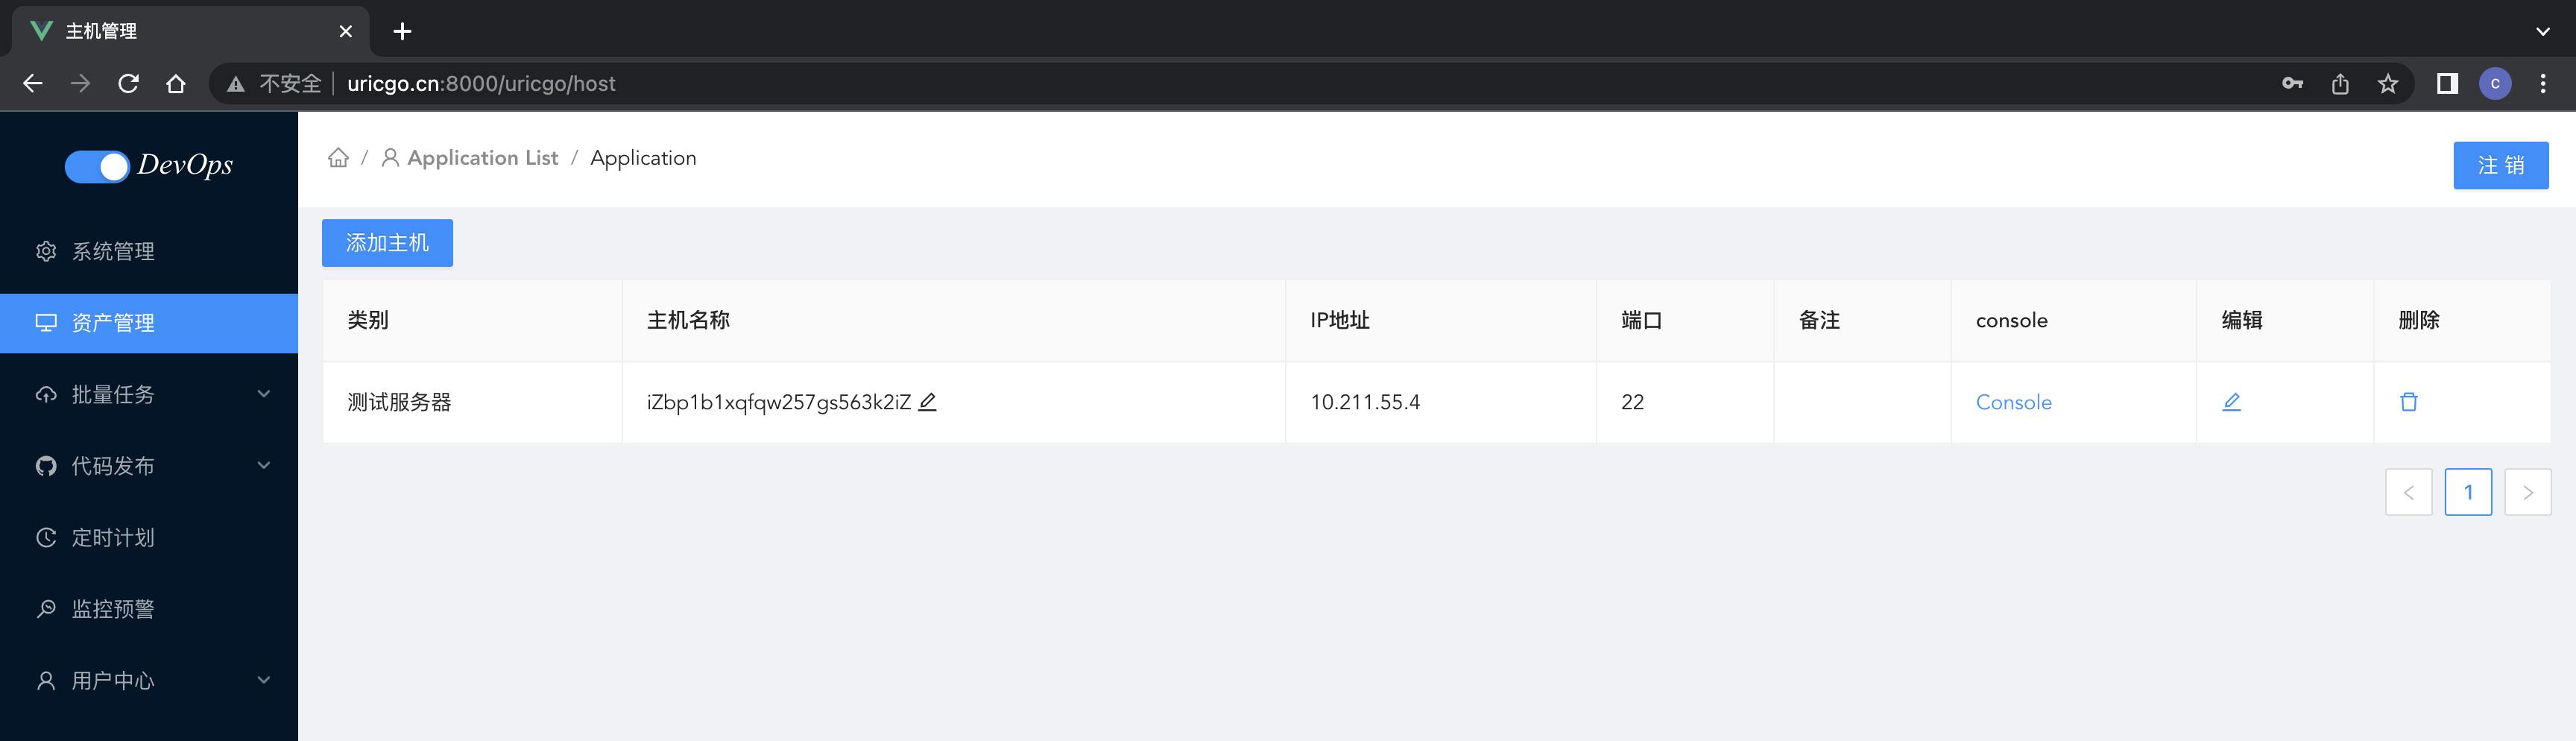
后端实现
安装依赖:
go get github.com/gorilla/websocket
官方文档:https://pkg.go.dev/github.com/gorilla/websocket
后端实现websocket的参考代码,在test/webssh/main.go中
package main

import (
	"github.com/gin-gonic/gin"
	"github.com/gorilla/websocket"
	"net/http"
)

var upGrader = websocket.Upgrader{
	CheckOrigin: func(r *http.Request) bool {
		return true
	},
}

//webSocket请求ping 返回pong
func ping(c *gin.Context) {
	//升级get请求为webSocket协议
	ws, err := upGrader.Upgrade(c.Writer, c.Request, nil)
	if err != nil {
		return
	}

	defer func(ws *websocket.Conn) {
		_ = ws.Close()
	}(ws)

	for {
		// 读取ws中的数据
		mt, message, err := ws.ReadMessage()
		if err != nil {
			break
		}
		if string(message) == "ping" {
			message = []byte("pong")
		}
		//写入ws数据
		err = ws.WriteMessage(mt, message)
		if err != nil {
			break
		}
	}
}

func main() {
	bindAddress := "localhost:8888"
	r := gin.Default()
	r.GET("/ping", ping)
	r.Run(bindAddress)
}

4.3.3、Console功能
【前端实现】
修改组件views/Console.vue,代码:
<template>
  <div className="console">
    <div id="terminal"></div>
  </div>
</template>

<script setup>
import {onMounted} from "vue";
import {Terminal} from 'xterm'
import settings from "@/settings";
import {useRoute} from "vue-router"

const route = useRoute()

// 因爲xterm终端需要修改HTML代码,所以必须等vue显示了页面内容以后才能执行xterm相关的代码
onMounted(
    () => {
      let term = new Terminal({
        rendererType: 'canvas', // 渲染类型
        cols: 100, // 列数
        rows: 50, // 行数
        convertEol: true, // 启用时,光标将设置为下一行的开头
        scrollback: 100, // 终端中的回滚量
        disableStdin: false, // 是否应禁用输入。
        cursorStyle: 'underline', // 光标样式
        cursorBlink: true, // 光标闪烁
        theme: {
          foreground: '#ffffff', // 字体
          background: '#060101', // 背景色
          cursor: 'help' // 设置光标
        }
      })

      // 连接Websocket
      let ws = new WebSocket(`${settings.wsHost}/host/${route.params.id}/console`)
      let cmd = '';  // 拼接用户输入的内容

      ws.onmessage = (event) => {

        console.log("cmd:", cmd)
        console.log("event.data:", event.data)

        if (!cmd) {
          //所要执行的操作
          term.write(event.data);
        } else {
          cmd = ''
          term.write(event.data)
        }
      }

      term.prompt = () => {
        term.write('\r\n')
      }

      // 当用户按了键盘时
      term.onKey(e => {
        console.log(e.key)
        const ev = e.domEvent
        const printable = !ev.altKey && !ev.altGraphKey && !ev.ctrlKey && !ev.metaKey

        if (ev.key === "Enter") { // 回车
          // 按下回车键进行指令的发送
          console.log("cmd", cmd)
          ws.send(cmd)
          term.write('\r\n')
        } else if (ev.key === "Backspace") { // 删除
          cmd = cmd.slice(0, cmd.length - 1)
          // Do not delete the prompt
          if (term._core.buffer.x > 2) {
            term.write('\b \b')
          }
        } else if (printable) {
          term.write(e.key)
          cmd += e.key
        }
      })

      // 显示一个ssh终端窗口
      term.open(document.getElementById('terminal'))
    }
)
</script>

<style scoped>

</style>
setting.js
const settings = {
    host: "http://127.0.0.1:8090/api",
    wsHost: 'ws://127.0.0.1:8090/api', // websocket服务端的api服务端地址
}

export default settings;
【后端实现】
application/utils/ws.go,代码:
package utils

import (
	"github.com/gorilla/websocket"
	"net/http"
)

var UpGrader = websocket.Upgrader{
	// 设置允许跨域进行ws通信
	CheckOrigin: func(r *http.Request) bool {
		return true
	},
}
application/utils/ssh.go,代码:
package utils
import (
"bingo_api/application/constants"
"errors"
"fmt"
"github.com/gorilla/websocket"
"go.uber.org/zap"
"golang.org/x/crypto/ssh"
"strings"
"time"
)
// SSH 客户端连接信息的结构体
type SSH struct {
IP string // IP��地址
Port int // 端口号
Username string // 用户名
Mode string // 认证方式[password:密码,key:秘钥认证]
Password string // 密码
Key string // 认证私钥
Client *ssh.Client // ssh客户端
// console
Session *ssh.Session // ssh会话对象
Channel ssh.Channel // ssh通信管道
LastResult string // 最近一次执行命令的结果
}
func NewSSH(ip string, username string, password string, key string, mode string, port ...int) *SSH {
/**
创建命令行实例
@param ip IP地址
@param username 用户名
@param password 登陆密码
@param key 认证私钥
@param mode 认证模式( password: 密码 | key: 秘钥 )
@param port 端口号, 不填写则默认为22
*/
client := new(SSH)
client.IP = ip
client.Username = username
client.Password = password
client.Key = key
client.Mode = mode
if len(port) <= 0 {
client.Port = 22
} else {
client.Port = port[0]
}
return client
}
func (s *SSH) Connect() error {
/**
SSH连接
*/
config := ssh.ClientConfig{
User: s.Username,
HostKeyCallback: ssh.InsecureIgnoreHostKey(),
Timeout: 10 * time.Second,
}
// 判断SSH连接的认证方式
if s.Mode == "key" {
//fmt.Println("s.Key", s.Key)
signer, err := ssh.ParsePrivateKey([]byte(s.Key))
fmt.Println("signer", signer)
if err != nil {
zap.S().Fatalf("ssh key signer failed: %v", err)
}
config.Auth = []ssh.AuthMethod{ssh.PublicKeys(signer)}
} else {
fmt.Println("s.Password", s.Password)
config.Auth = []ssh.AuthMethod{ssh.Password(s.Password)}
}
// 创建SSH客户端
addr := fmt.Sprintf("%s:%d", s.IP, s.Port)
sshClient, err := ssh.Dial("tcp", addr, &config)
if err != nil {
return err
}
s.Client = sshClient
fmt.Println("sshClient", sshClient)
// 创建一个客户端SSH
session, err := s.Client.NewSession()
if err != nil {
return err
}
s.Session = session
return nil
}
func (s SSH) Run(command string) (string, error) {
/**
执行Shell命令
@param command 要执行的命令,多个命令采用 ; 隔开
*/
if s.Client == nil {
if err := s.Connect(); err != nil {
return "", err
}
}
// 创建一个客户端SSH
session, err := s.Client.NewSession()
if err != nil {
return "", err
}
defer session.Close()
// 执行Shell命令
buf, err := session.CombinedOutput(command)
s.LastResult = string(buf)
return s.LastResult, err
}
func (s SSH) AddPublicKeyToRemoteHost(publicKey string) error {
/**
将公钥写入目标主机
700 是文档拥有可读可写可执行,同一组用户或者其他用户都不具有操作权限
600 是文件拥有者可读可写,不可执行,同一组用户或者其他用户都不具有操作权限
*/
command := fmt.Sprintf("mkdir -p -m 700 ~/.ssh && echo %v >> ~/.ssh/authorized_keys && chmod 600 ~/.ssh/authorized_keys", strings.TrimSpace(publicKey))
_, err := s.Run(command)
if err != nil {
message := fmt.Sprintf("%v: %v", constants.AddPublicKeyFail, err)
return errors.New(message)
}
return nil
}
/*
*************************** Web2SSH ***************************
*/
type MyReader struct {
// 监听websocket
ws *websocket.Conn
}
func (r MyReader) Read(p []byte) (n int, err error) {
// 从客户端(VUE)接受的命令字符串
fmt.Println("正在监听:", r.ws.RemoteAddr())
_, cmd, err := r.ws.ReadMessage()
fmt.Println("received cmd:", cmd)
if err != nil {
fmt.Println("err", err)
}
cmdB := []byte(string(cmd) + "\n")
// 将命令字符串写入到p中
for i, v := range cmdB {
p[i] = v
}
n = len(cmdB)
return n, err
}
type MyWriter struct {
ws *websocket.Conn
}
func (w MyWriter) Write(p []byte) (n int, err error) {
if len(p) != 0 {
err := w.ws.WriteMessage(websocket.TextMessage, p)
if err != nil {
fmt.Println("err", err)
return len(p), err
}
}
return len(p), err
}
func (s SSH) Web2SSH(ws *websocket.Conn) {
// (1)配置和创建一个伪终端
modes := ssh.TerminalModes{
ssh.ECHO: 0, // 关闭回显示,
ssh.TTY_OP_ISPEED: 14400, // 设置传输速率
ssh.TTY_OP_OSPEED: 14400, // 设置传输速率
}
// 激活终端
err := s.Session.RequestPty("xterm", 25, 80, modes)
if err != nil {
fmt.Println("err", err)
}
// (2)激活shell
// stdin,stdout赋值
r := new(MyReader)
r.ws = ws
w := new(MyWriter)
w.ws = ws
s.Session.Stdin = r
s.Session.Stdout = w
err = s.Session.Shell() // 关于session激活
if err != nil {
fmt.Println("err", err)
}
// 结果等待
err = s.Session.Wait()
if err != nil {
fmt.Println("err", err)
}
}
appliation/api/host.go,代码:
/*websocket请求*/

func HostConsole(ctx *gin.Context) {
	// 一、准备阶段
	// 同意升级websocket请求
	ws, err := UpGrader.Upgrade(ctx.Writer, ctx.Request, nil)
	if err != nil {
		ctx.JSON(http.StatusBadRequest, gin.H{
			"code":    constants.CodeFail,
			"message": err.Error(),
		})
		return
	}

	// 根据ID获取主机连接信息
	id, err := strconv.Atoi(ctx.Param("id"))
	fmt.Println("id", id)
	if err != nil {
		ctx.JSON(http.StatusBadRequest, gin.H{
			"code":    constants.CodeFail,
			"message": err.Error(),
		})
		return
	}

	host := model.Host{}
	err = host.GetOneById(uint(int(id)))
	if err != nil {
		ctx.JSON(http.StatusBadRequest, gin.H{
			"code":    constants.CodeFail,
			"message": err.Error(),
		})
		return
	}
	fmt.Println("host:::", host)

	// 创建SSh远程连接,
	cli := NewSSH(host.IpAddr, host.Username, "", host.PrivateKey, "key", int(host.Port))
	if err := cli.Connect(); err != nil {
		ctx.JSON(http.StatusBadRequest, gin.H{
			"code":    constants.CodeFail,
			"message": err.Error(),
		})
		return
	}
	fmt.Println("密钥登录成功!")

	// 二、实现一个web-ssh命令通信

	cli.Web2SSH(ws)

}
application/router/host.go,代码:
HostRouter := Router.Group("host")
// HostRouter.Use(middleware.JWTAuthorization())
{
// 用户认证登陆
HostRouter.POST("/", api.HostCreate)
HostRouter.GET("/", api.HostList)

// 主机类别-添加
utils.Register(HostRouter, []string{"POST"}, "category", api.HostCategoryCreate)
// 主机类别-查看
utils.Register(HostRouter, []string{"GET"}, "category", api.HostCategoryList)
// 主机 - 列表
utils.Register(HostRouter, []string{"GET"}, "", api.HostList)
// 主机 - 删除
utils.Register(HostRouter, []string{"DELETE"}, "", api.HostDelete)
// 主机 - console功能
utils.Register(HostRouter, []string{"GET"}, ":id/console", api.HostConsole)

	}
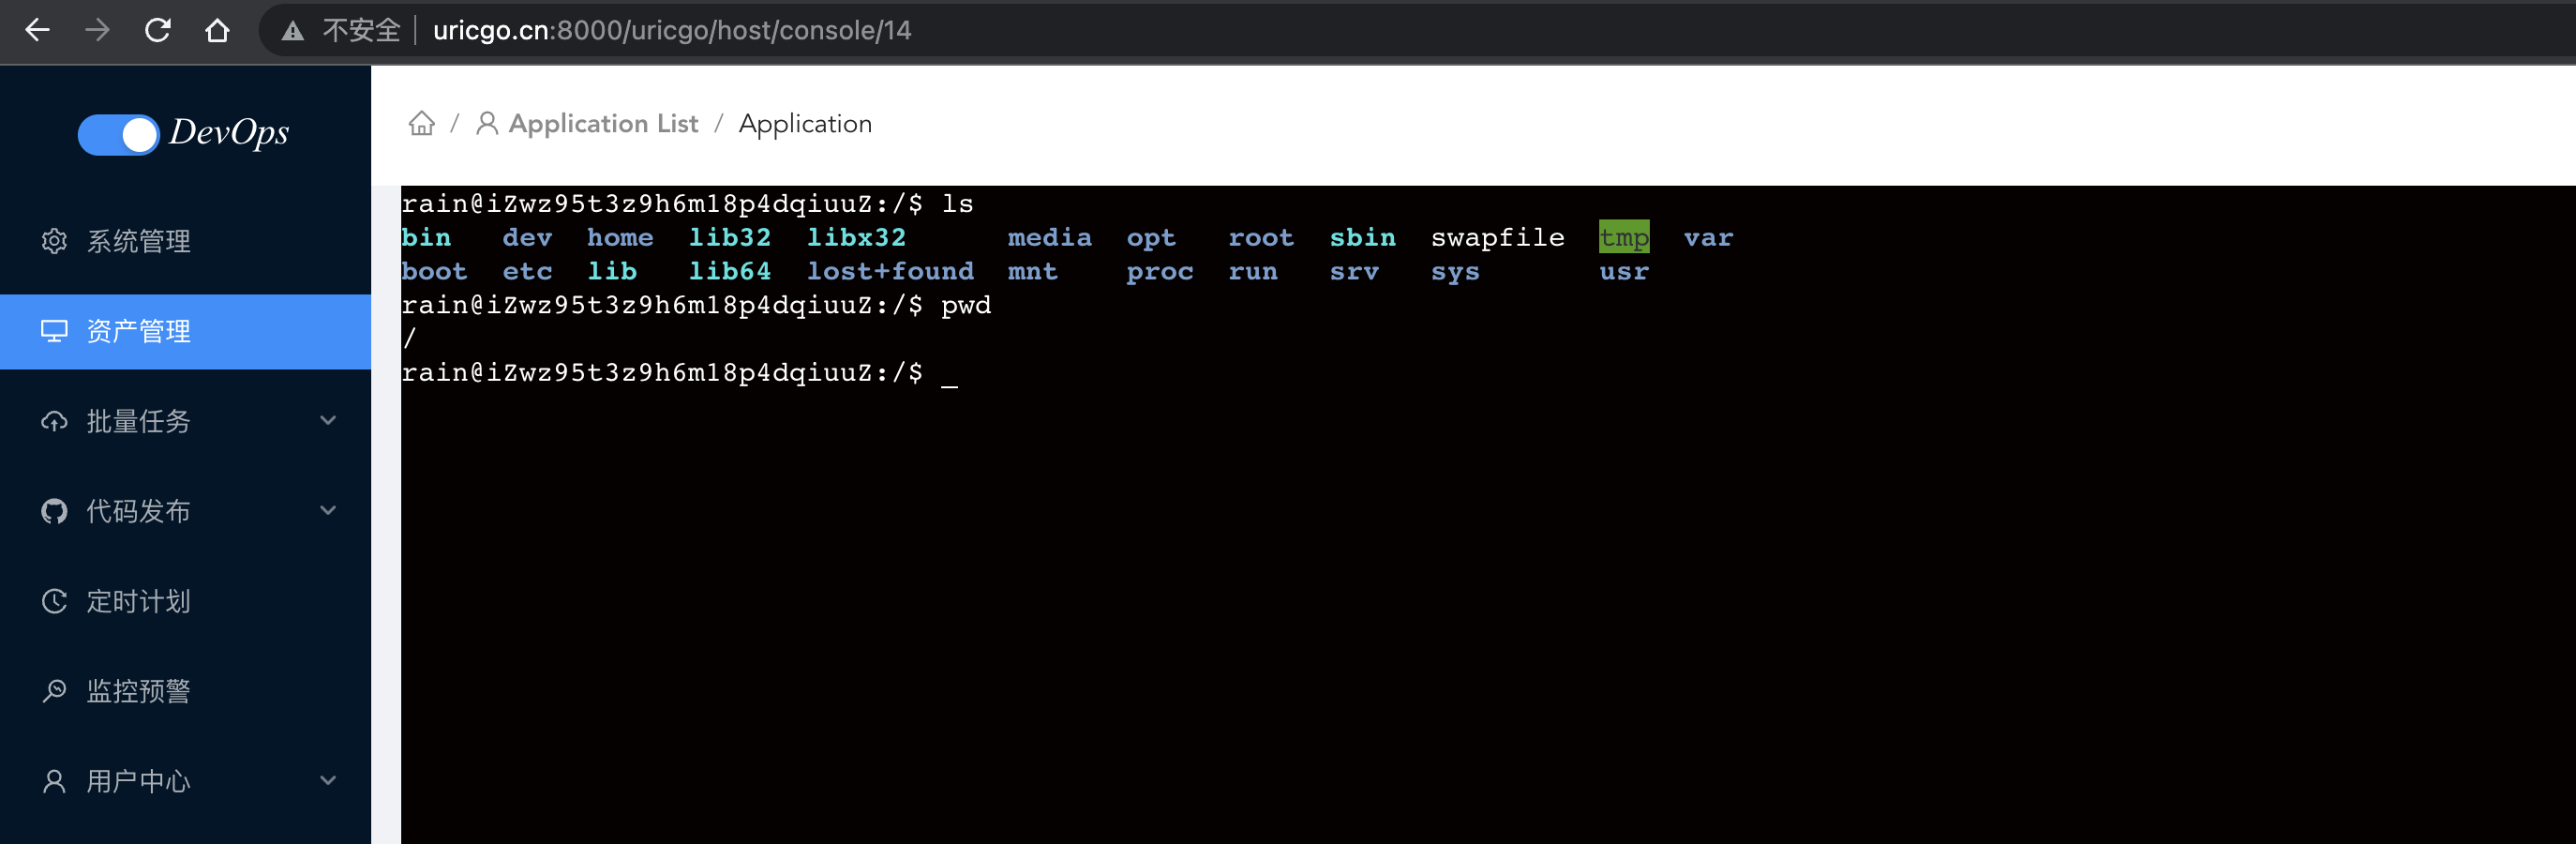
五、批量命令
5.1 展示主机信息
创建组件,src/views/MultiExec.vue,代码:
<template>
<div class="multi_exec">
<div>
<h3>执行主机:</h3>
<div>
<a-tag closable @close="log(info_index)" v-for="(info,info_index) in show_host_info.data" :key="info.id">
{{`${info.name}(${info.ip_addr}:${info.port})`}}
</a-tag>
</div>
</div>
<div style="margin-top: 10px;">
<a-button @click="showModal"><plus-outlined />从主机列表中选择</a-button>
<a-modal :visible="visible" title="选择执行主机" @ok="handleOk" @cancel="hideModel" width="960px">
<div>
<a-row>
<a-col :span="8">
<a-form-item label="主机类别:" :label-col="formItemLayout.labelCol" :wrapper-col="formItemLayout.wrapperCol">
<a-select style="width: 160px;" placeholder="请选择" v-model="host_form.form.category">
<a-select-option :value="value.id" v-for="(value, index) in category_list.data" :key="value.id">
{{value.name}}
</a-select-option>
</a-select>
</a-form-item>
</a-col>
<a-col :span="8">
<a-form-item :label-col="formItemLayout.labelCol" :wrapper-col="formItemLayout.wrapperCol" label="主机别名:">
<a-input placeholder="请输入"/>
</a-form-item>
</a-col>
<a-col :span="4">
<a-form-item :label-col="formItemLayout.labelCol" :wrapper-col="formItemLayout.wrapperCol" label="已选:">
<span style="margin-left: 8px">
<template v-if="hasSelected">
{{ `${selectedRowKeys.length}` }} 台主机
</template>
</span>
</a-form-item>
</a-col>
<a-col :span="4">
<a-button type="primary" style="margin-top: 3px;"> <sync-outlined></sync-outlined>刷新</a-button>
</a-col>
</a-row>
</div>
<div>
<a-table
:columns="columns"
:data-source="host_list.data"
:pagination="false"
:rowKey="record => record.id"
:row-selection="{ selectedRowKeys: selectedRowKeys, onChange: onSelectChange }"
></a-table>
</div>
</a-modal>
</div>
</div>
</template>
<script setup>
import {ref, reactive, computed} from "vue";
import {PlusOutlined, SyncOutlined} from '@ant-design/icons-vue';
// 表单分栏布局长度,弹窗的首行表单配置信息
const formItemLayout = reactive({
labelCol: {span: 8},
wrapperCol: {span: 14}
})
// 表单的字段设置,弹窗的表格的每一列数据的配置信息
const columns = ref([
{
slots: {title: 'customTitle'},
scopedSlots: {customRender: 'action'}
}, {
title: '类别',
dataIndex: 'category_name',
key: 'category_name'
}, {
title: '主机名称',
dataIndex: 'name',
key: 'name'
}, {
title: '连接地址',
dataIndex: 'ip_addr',
key: 'ip_addr',
width: 200
}, {
title: '端口',
dataIndex: 'port',
key: 'port'
}, {
title: '备注信息',
dataIndex: 'description',
key: 'description'
}
])
// 显示选中的所有主机内容
const show_host_info = reactive({
data:[]
})
const visible = ref(false) // 是否�显示主机列表的弹窗
// 主机表单信息
const host_form = reactive({
form: {
category: undefined // 当前选择的主机分类ID
}
})
// 当前显示咋表格中的主机列表数据
const host_list = reactive({
data: []
})
// 主机分类列表
const category_list = reactive({
data: []
})
// 已经勾选的主机ID列表
const selectedRowKeys = ref([])
// 选中的主机id列表
const selected_host_ids = ref([])
// 计算属性
const hasSelected = computed(()=>{
return selectedRowKeys.length > 0
})
// 显示弹窗
const showModal = ()=>{
visible.value = true
}
// 关闭弹窗
const hideModel = ()=>{
visible.value = false;
}
// 选中主机时触发的,selectedRowKeys被选中的主机id列表
const onSelectChange = (selectedKeys)=>{
selectedRowKeys.value = selectedKeys
}
const handleOk = ()=>{
}
</script>
<style scoped>
.multi_exec{
text-align: left;
}
</style>
路由代码,src/router/index.js,代码:
import MultiExec from '../views/MultiExec'
// ...
{
        meta: {
            title: '批量任务',
            authenticate: true
        },
        path: 'multi_exec',
        name: 'MultiExec',
        component: MultiExec
},

获取主机分类和主机信息的列表数据并展示,src/views/MultiExec.vue,代码:
<template>
  <div class="multi_exec">
    <div>
      <h3>执行主机:</h3>
      <div>
        <a-tag closable @close="delete_select_host(info_index)" v-for="(info,info_index) in show_host_info.data"
               :key="info.id">
          {{ `${info.name}(${info.ip_addr}:${info.port})` }}
        </a-tag>
      </div>
    </div>
    <div style="margin-top: 10px;">
      <a-button @click="showModal">
        <plus-outlined/>
        从主机列表中选择
      </a-button>
      <a-modal :visible="visible" title="选择执行主机" @ok="handleOk" @cancel="hideModel" width="960px">
        <div>
          <a-row>
            <a-col :span="8">
              <a-form-item label="主机类别:" :label-col="formItemLayout.labelCol" :wrapper-col="formItemLayout.wrapperCol">
                <a-select style="width: 160px;" placeholder="请选择" v-model:value="host_form.form.host_category_id"
                          @change="has_change_category">
                  <a-select-option :value="value.id" v-for="(value, index) in category_list.data" :key="value.id">
                    {{ value.name }}
                  </a-select-option>
                </a-select>
              </a-form-item>
            </a-col>
            <a-col :span="8">
              <a-form-item :label-col="formItemLayout.labelCol" :wrapper-col="formItemLayout.wrapperCol" label="主机别名:">
                <a-input @blur="nameFilter" v-model:value="host_form.form.name" placeholder="请输入"/>
              </a-form-item>
            </a-col>
            <a-col :span="4">
              <a-form-item :label-col="formItemLayout.labelCol" :wrapper-col="formItemLayout.wrapperCol" label="已选:">
                <span style="margin-left: 8px">
									{{ `${selectedRowKeys.length}` }}台主机
                </span>
              </a-form-item>
            </a-col>
            <a-col :span="4">
              <a-button type="primary" style="margin-top: 3px;" @click="refresh_data">
                <sync-outlined></sync-outlined>
                刷新
              </a-button>
            </a-col>
          </a-row>
        </div>
        <div>
          <a-table
              :columns="columns"
              :data-source="host_list.data"
              :pagination="false"
              :rowKey="record => record.id"
              :row-selection="{ selectedRowKeys: selectedRowKeys, onChange: onSelectChange }"
          ></a-table>
        </div>
      </a-modal>
    </div>
  </div>
</template>

<script setup>
import {computed, reactive, ref} from "vue";
import {PlusOutlined, SyncOutlined} from '@ant-design/icons-vue';
import settings from "../settings";
import axios from "@/utils/http";

// 表单分栏布局长度,弹窗的首行表单配置信息
const formItemLayout = reactive({
  labelCol: {span: 8},
  wrapperCol: {span: 14}
})
// 表单的字段设置,弹窗的表格的每一列数据的配置信息
const columns = ref([
  {
    slots: {title: 'customTitle'},
    scopedSlots: {customRender: 'action'}
  }, {
    title: '类别',
    dataIndex: 'category_name',
    key: 'category_name'
  }, {
    title: '主机名称',
    dataIndex: 'name',
    key: 'name'
  }, {
    title: '连接地址',
    dataIndex: 'ip_addr',
    key: 'ip_addr',
    width: 200
  }, {
    title: '端口',
    dataIndex: 'port',
    key: 'port'
  }, {
    title: '备注信息',
    dataIndex: 'description',
    key: 'description'
  }
])

// 显示选中的所有主机内容
const show_host_info = reactive({
  data: []
})
const visible = ref(false) // 是否显示主机列表的弹窗

// 主机表单信息
const host_form = reactive({
  form: {
    host_category_id: undefined,// 当前选择的主机分类ID
    name:""
  }
})

// 当前显示咋表格中的主机列表数据
const host_list = reactive({
  data: []
})

// 主机分类列表
const category_list = reactive({
  data: []
})

// 已经勾选的主机ID列表
const selectedRowKeys = ref([])
// 选中的主机id列表
const selected_host_ids = ref([])

// 计算属性
const hasSelected = computed(() => {
  return selectedRowKeys.length > 0
})

// 显示弹窗
const showModal = () => {
  visible.value = true
}

// 关闭弹窗
const hideModel = () => {
  visible.value = false;
}

// 选中主机时触发的,selectedRowKeys被选中的主机id列表
const onSelectChange = (selectedKeys) => {
  selectedRowKeys.value = selectedKeys
}

const get_host_category_list = () => {
  // 获取主机类别
  axios.get(`${settings.host}/host/category`).then((response) => {
    category_list.data = response.data.data.host_category_list
  })
}
get_host_category_list()


const get_host_list = () => {
  // 获取主机列表
  console.log("host_form.form",host_form.form)
  let params = host_form.form
  axios.get(`${settings.host}/host`, {
    params: params,
  }).then((response) => {
    host_list.data = response.data.data.host_list
  })
}

get_host_list()

const has_change_category = (category) => {
  // 切换主机分类时,重新获取主机列表
  console.log("category", category)
  get_host_list()
}

const nameFilter = (event) => {
  // 切换主机分类时,重新获取主机列表
  console.log(host_form.form.name)
  get_host_list()
}


const refresh_data = () => {
  // 刷新页面
  // location.reload()
  // 刷新数据
  get_host_list()
  host_form.form.host_category_id = undefined
  selectedRowKeys.value = []
}

const handleOk = () => {
  selected_host_ids.value = []
  show_host_info.data = []
  host_list.data.forEach((v, k) => {
    if (selectedRowKeys.value.includes(v.id)) { // 判断某元素是否在数组中用includes比较合适,不能用in
      show_host_info.data.push({
        id: v.id,
        name: v.name,
        ip_addr: v.ip_addr,
        port: v.port
      })
      selected_host_ids.value.push(v.id)
    }
  })
  // 关闭弹窗
  visible.value = false
}

const delete_select_host = (infoIndex) => {
  // 移除已经勾选的主机信息
  show_host_info.data.splice(infoIndex, 1)
  let idsList = selected_host_ids.value.splice(infoIndex, 1)
  let idIndex = selectedRowKeys.value.indexOf(idsList[0])
  selectedRowKeys.value.splice(idIndex, 1)
}

</script>

<style scoped>
.multi_exec {
  text-align: left;
}
</style>

5.2 指令输入框
5.2.1、Ace-editor 编辑器
文档地址: https://github.com/CarterLi/vue3-ace-editor
客户端根目录下,下载安装
npm install --save-dev vue3-ace-editor
在需要引入编辑器插件到MultiExec.vue中使用,src/views/MultiExec.vue,代码:
<div class="cmd">
      <div>执行指令: </div>
      <v-ace-editor v-model:value="content" lang="sh" theme="chrome" style="height: 300px; font-size: 20px;margin-bottom: 1rem;"></v-ace-editor>
</div>
<div>
  <a-button type="primary" ><thunderbolt-outlined></thunderbolt-outlined>开始执行</a-button>
</div>

...
<script setup>
...
import {VAceEditor} from 'vue3-ace-editor';
import 'ace-builds/src-noconflict/theme-chrome';
import 'ace-builds/src-noconflict/ext-language_tools';
import 'ace-builds/src-noconflict/mode-sh';
import {ThunderboltOutlined} from '@ant-design/icons-vue';
...


// 用户输入的模板命令
const content = ref("")
</script>
完整代码:
<template>
<div class="multi_exec">
<div>
<h3>执行主机:</h3>
<div>
<a-tag closable @close="delete_select_host(info_index)" v-for="(info,info_index) in show_host_info.data"
:key="info.id">
{{ `${info.name}(${info.ip_addr}:${info.port})` }}
</a-tag>
</div>
</div>
<div style="margin-top: 10px;">
<a-button @click="showModal">
<plus-outlined/>
从主机列表中选择
</a-button>
<a-modal :visible="visible" title="选择执行主机" @ok="handleOk" @cancel="hideModel" width="960px">
<div>
<a-row>
<a-col :span="8">
<a-form-item label="主机类别:" :label-col="formItemLayout.labelCol" :wrapper-col="formItemLayout.wrapperCol">
<a-select style="width: 160px;" placeholder="请选择" v-model:value="host_form.form.category"
@change="has_change_category">
<a-select-option :value="value.id" v-for="(value, index) in category_list.data" :key="value.id">
{{ value.name }}
</a-select-option>
</a-select>
</a-form-item>
</a-col>
<a-col :span="8">
<a-form-item :label-col="formItemLayout.labelCol" :wrapper-col="formItemLayout.wrapperCol" label="主机别名:">
<a-input placeholder="请输入"/>
</a-form-item>
</a-col>
<a-col :span="4">
<a-form-item :label-col="formItemLayout.labelCol" :wrapper-col="formItemLayout.wrapperCol" label="已选:">
<span style="margin-left: 8px">
{{ `${selectedRowKeys.length}` }}台主机
</span>
</a-form-item>
</a-col>
<a-col :span="4">
<a-button type="primary" style="margin-top: 3px;" @click="refresh_data">
<sync-outlined></sync-outlined>
刷新
</a-button>
</a-col>
</a-row>
</div>
<div>
<a-table
:columns="columns"
:data-source="host_list.data"
:pagination="false"
:rowKey="record => record.id"
:row-selection="{ selectedRowKeys: selectedRowKeys, onChange: onSelectChange }"
></a-table>
</div>
</a-modal>
</div>
<div class="cmd">
<div>执行指令�:</div>
<v-ace-editor v-model:value="content" lang="sh" theme="chrome"
style="height: 300px; font-size: 20px;margin-bottom: 1rem;"></v-ace-editor>
</div>
<div>
<a-button type="primary">
<thunderbolt-outlined></thunderbolt-outlined>
开始执行
</a-button>
</div>
</div>
</template>
<script setup>
import {computed, reactive, ref} from "vue";
import {PlusOutlined, SyncOutlined} from '@ant-design/icons-vue';
import settings from "../settings";
import axios from "@/utils/http";
// vue3-ace-editor
import {VAceEditor} from 'vue3-ace-editor';
import 'ace-builds/src-noconflict/theme-chrome';
import 'ace-builds/src-noconflict/ext-language_tools';
import 'ace-builds/src-noconflict/mode-sh';
import {ThunderboltOutlined} from '@ant-design/icons-vue';
// 表单分栏布局长度,弹窗的首行表单配置信息
const formItemLayout = reactive({
labelCol: {span: 8},
wrapperCol: {span: 14}
})
// 表单的字段设置,弹窗的表格的每一列数据的配置信息
const columns = ref([
{
slots: {title: 'customTitle'},
scopedSlots: {customRender: 'action'}
}, {
title: '类别',
dataIndex: 'category_name',
key: 'category_name'
}, {
title: '主机名称',
dataIndex: 'name',
key: 'name'
}, {
title: '连接地址',
dataIndex: 'ip_addr',
key: 'ip_addr',
width: 200
}, {
title: '端口',
dataIndex: 'port',
key: 'port'
}, {
title: '备注信息',
dataIndex: 'description',
key: 'description'
}
])
// 显示选中的所有主机内容
const show_host_info = reactive({
data: []
})
const visible = ref(false) // 是否显示主机列表的弹窗
// 主机表单信息
const host_form = reactive({
form: {
category: undefined // 当前选择的主机分类ID
}
})
// 当前显示咋表格中的主机列表数据
const host_list = reactive({
data: []
})
// 主机分类列表
const category_list = reactive({
data: []
})
// 已经勾选的主机ID列表
const selectedRowKeys = ref([])
// 选中的主机id列表
const selected_host_ids = ref([])
// 计算属性
const hasSelected = computed(() => {
return selectedRowKeys.length > 0
})
// 显示弹窗
const showModal = () => {
visible.value = true
}
// 关闭弹窗
const hideModel = () => {
visible.value = false;
}
// 选中主机时触发的,selectedRowKeys被选中的主机id列表
const onSelectChange = (selectedKeys) => {
selectedRowKeys.value = selectedKeys
}
const get_host_category_list = () => {
// 获取主机类别
axios.get(`${settings.host}/host/category`).then((response) => {
category_list.data = response.data.data.host_category_list
})
}
get_host_category_list()
const get_host_list = (category = null) => {
// 获取主机列表
let params = {}
if (category !== null) {
params.host_category_id = category
}
axios.get(`${settings.host}/host`, {
params: params,
}).then((response) => {
host_list.data = response.data.data.host_list
})
}
get_host_list()
const has_change_category = (category) => {
// 切换主机分类时,重新获取主机列表
get_host_list(category)
}
const refresh_data = () => {
// 刷新页面
// location.reload()
// 刷新数据
get_host_list()
host_form.form.category = undefined
selectedRowKeys.value = []
}
const handleOk = () => {
selected_host_ids.value = []
show_host_info.data = []
host_list.data.forEach((v, k) => {
if (selectedRowKeys.value.includes(v.id)) { // 判断某元素是否在数组中用includes比较合适,不能用in
show_host_info.data.push({
id: v.id,
name: v.name,
ip_addr: v.ip_addr,
port: v.port
})
selected_host_ids.value.push(v.id)
}
})
// 关闭弹窗
visible.value = false
}
const delete_select_host = (infoIndex) => {
// 移除已经勾选的主机信息
show_host_info.data.splice(infoIndex, 1)
let idsList = selected_host_ids.value.splice(infoIndex, 1)
let idIndex = selectedRowKeys.value.indexOf(idsList[0])
selectedRowKeys.value.splice(idIndex, 1)
}
// 用户输入的模板命令
const content = ref("")
</script>
<style scoped>
.multi_exec {
text-align: left;
}
</style>

5.2.2、发送执行指令请求
src/views/MultiExec.vue,代码:
<div>
			<a-button type="primary" @click="execute_cmd"><thunderbolt-outlined></thunderbolt-outlined>开始执行</a-button>
</div>
<script>
// 中间代码省略....
import {message} from "ant-design-vue";
// 中间代码省略....
const execute_cmd = () => {
  // 远程执行命令
  console.log(content.value)
  console.log(selected_host_ids)
  // 执行指令操作
  axios.post(`${settings.host}/host/cmd`, {
    host_ids: selected_host_ids.value,
    cmd: content.value
  }).then((res) => {
    message.success("远程主机已经执行命令...")
  }).catch((error => {
    message.error("远程主机执行命令失败!")
  }))
}
</script>
5.2.3、服务端批量处理指令
application/model/host.go,模型,代码:
type CmdParam struct {
	Cmd     string `json:"cmd"`
	HostIds []int  `json:"host_ids"`
}
application/services/host.go,业务,代码:
/**
执行终端命令
*/

func ExecuteCMD(id int, cmd string) (string, error) {
	host := Host{}
	err := host.GetOneById(uint(id))
	if err != nil {
		return "", err
	}

	cli := utils.NewSSH(host.IpAddr, host.Username, "", host.PrivateKey, "key", int(host.Port))
	if err := cli.Connect(); err != nil {
		return "", errors.New(constants.HostInfoEror)
	}

	defer func(cli *utils.SSH) {
		_ = cli.Client.Close()
		_ = cli.Session.Close()
	}(cli)

	output, err := cli.Run(cmd)
	if err != nil {
		return "", err
	}
	return output, err
}

/**
批量主机执行指令
*/

func ExecuteCMDList(HostIds []int, Cmd string) error {
	for _, id := range HostIds {
		fmt.Println(id)
		_, err := ExecuteCMD(id, Cmd)
		if err != nil {
			return err
		}
	}
	return nil
}
application/api/host.go,接口,代码:
/**
远程主机批量执行指令
*/
func HostRunCmdList(ctx *gin.Context) {
// 根据主机ID获取主机信息
var param = model.CmdParam{}
err := ctx.ShouldBindJSON(¶m)
fmt.Println("param:::", param)
if err != nil {
ctx.JSON(http.StatusBadRequest, gin.H{
"code": constants.ParamError,
"message": err,
})
return
}
err = ExecuteCMDList(param.HostIds, param.Cmd)
if err != nil {
ctx.JSON(http.StatusBadRequest, gin.H{
"code": constants.ExecuteCMDFail,
"message": err,
})
return
}
ctx.JSON(http.StatusOK, gin.H{
"code": constants.CodeSuccess,
"message": constants.Success,
})
}
application/constants/code.go,代码:
ParamError     = -3   // 客户端请求参数有误!
ExecuteCMDFail = 1015 // 执行命令失败!
application/router/host.go,路由,代码:
// 主机 - 批量任务-执行指令
utils.Register(HostRouter, []string{"POST"}, "cmd", middleware.JWTAuthorization(), api.HostRunCmdList)

在进入选中服务器的终端环境,便可以查到新创建的文件。
在日常运维过程中,有些指令会经常重复被调用,所以前端还可以通过创建指令模板持久化保存到数据库中,然后执行指令模板的方式来执行模板中提前写好的指��令。
5.3 指令模板
5.3.1 服务端实现指令模板管理
服务端提供指令模板的存储模型以及操作接口,application/model/command.go,模型,代码
package model

import (
	"github.com/jinzhu/gorm"
	. "uricgo_api/application/database"
)

/**
指令模板类别
*/

type CommandCategory struct {
	gorm.Model
	Name string `json:"name" gorm:"type:varchar(255);unique_index"`
}

type CommandCategoryInstance struct {
	ID   uint   `json:"id"`
	Name string `json:"name"`
}

/**
设置表名
*/

func (category CommandCategory) TableName() string {
	return "command_category"
}

/**
添加指令模板类别
*/

func (category *CommandCategory) Insert() error {
	err := Orm.Create(&category).Error
	return err
}

/**
获取指令模板分类列表
*/

func (category CommandCategory) GetAll() ([]CommandCategoryInstance, error) {
	var categories []CommandCategoryInstance
	err := Orm.Table(category.TableName()).Order(" id DESC ").Select("id, name").Scan(&categories).Error
	return categories, err
}

/**
根据指定ID获取指令模板类别
*/

func (category *CommandCategory) GetOneById(id uint) error {
	err := Orm.First(&category, id).Error
	return err
}

/**
指令模板
*/

type Command struct {
	gorm.Model
	Name              string          `json:"name" gorm:"type:varchar(255)"`
	Content           string          `json:"content" gorm:"type:text"`
	CommandCategoryID uint            `json:"command_category_id"`
	CommandCategory   CommandCategory `json:"command_category"  gorm:"foreignKey:CommandCategoryID;references:ID"`
}

type CommandInstance struct {
	ID           uint   `json:"id"`
	Name         string `json:"name"`
	Content      string `json:"content"`
	CategoryID   uint   `json:"category_id"`
	CategoryName string `json:"category_name"`
}

/**
设置表名
*/

func (command Command) TableName() string {
	return "command_template"
}

/**
添加指令模板
*/

func (command *Command) Insert() error {
	err := Orm.Create(&command).Error
	return err
}

/**
获取所有指令模板列表
*/

func (command Command) GetAll(name string, commandCategoryId uint) ([]Command, error) {
	var commands []Command
	query := Orm.Table(command.TableName())
	if name != "" {
		query = query.Where(" name LIKE ? ", "%"+name+"%")
	}
	if commandCategoryId > 0 {
		query = query.Where(" command_category_id = ? ", commandCategoryId)
	}

	err := query.Order(" id DESC ").Preload("CommandCategory").Find(&commands).Error
	return commands, err
}

/**
根据指定ID获取指令模板
*/

func (command *Command) GetOneById(id uint) error {
	err := Orm.Preload("CommandCategory").First(&command, id).Error
	return err
}

/**
删除指令模板
*/

func (command *Command) Delete() (err error) {
	err = Orm.Delete(&command).Error
	return err
}
注册路由,application/main.go,代码:
Orm.AutoMigrate(&model.CommandCategory{})
Orm.AutoMigrate(&model.Command{})
application/services/command.go,业务,代码:
package services

import (
	"github.com/gin-gonic/gin"
	. "uricgo_api/application/model"
)

/**
添加指令模板类别
*/

func CreateCmdCategory(ctx *gin.Context) (CommandCategoryInstance, error) {
	hostCategory := CommandCategory{}
	var instance CommandCategoryInstance
	var err error
	if err = ctx.ShouldBindJSON(&hostCategory); err != nil {
		return instance, err
	}
	err = hostCategory.Insert()
	instance = CommandCategoryInstance{
		ID:   hostCategory.ID,
		Name: hostCategory.Name,
	}
	return instance, err
}

/**
获取指令模板类别列表
*/

func GetCmdCategoryList(ctx *gin.Context) ([]CommandCategoryInstance, error) {
	hostCategory := CommandCategory{}
	hostCategoryList, err := hostCategory.GetAll()
	return hostCategoryList, err
}

/**
添加指令模板
*/

func CreateCmd(ctx *gin.Context) (CommandInstance, error) {
	cmd := Command{}
	var err error
	var instance CommandInstance
	var cmdCategory CommandCategory

	if err = ctx.ShouldBindJSON(&cmd); err != nil {
		return instance, err
	}

	err = cmd.Insert()
	if err != nil {
		return instance, err
	}

	err = cmdCategory.GetOneById(cmd.CommandCategoryID)
	if err != nil {
		return instance, err
	}

	instance = CommandInstance{
		ID:           cmd.ID,
		Name:         cmd.Name,
		Content:      cmd.Content,
		CategoryID:   cmdCategory.ID,
		CategoryName: cmdCategory.Name,
	}
	return instance, err
}

/**
获取指令模板列表
*/

func GetCmdList(name string, cmdCategoryId uint) ([]CommandInstance, error) {
	var cmdList []Command
	var instanceList []CommandInstance
	var cmd Command
	var err error
	cmdList, err = cmd.GetAll(name, cmdCategoryId)
	for _, cmdItem := range cmdList {
		instanceList = append(instanceList, CommandInstance{
			ID:           cmdItem.ID,
			Name:         cmdItem.Name,
			Content:      cmdItem.Content,
			CategoryID:   cmdItem.CommandCategory.ID,
			CategoryName: cmdItem.CommandCategory.Name,
		})
	}
	return instanceList, err
}

/**
获取指令模板信息
*/

func GetCmd(id int) (CommandInstance, error) {
	cmd := Command{}
	err := cmd.GetOneById(uint(id))
	instance := CommandInstance{
		ID:           uint(id),
		Name:         cmd.Name,
		Content:      cmd.Content,
		CategoryID:   cmd.CommandCategory.ID,
		CategoryName: cmd.CommandCategory.Name,
	}
	return instance, err
}
application/api/command.go,接口,代码:
package api

import (
	"github.com/gin-gonic/gin"
	"net/http"
	"strconv"
	"urils/application/constants"
	"urils/application/services"
)

/**
添加指令模板类别
*/

func CmdCategoryCreate(ctx *gin.Context) {
	// 调用业务层完成指令模板类别的添加操作
	cmdCategory, err := services.CreateCmdCategory(ctx)
	if err != nil || cmdCategory.ID < 1 {
		ctx.JSON(http.StatusBadRequest, gin.H{
			"code":    constants.CodeCreateCmdCategoryFail,
			"message": err.Error(),
		})
		return
	}

	ctx.JSON(http.StatusOK, gin.H{
		"code":    constants.CodeSuccess,
		"message": constants.Success,
		"data": map[string]interface{}{
			"cmdCategory": cmdCategory,
		},
	})
}

/**
获取所有指令模板类别
*/

func CmdCategoryList(ctx *gin.Context) {
	// 调用业务层获取指令模板类别列表
	cmdCategoryList, err := services.GetCmdCategoryList(ctx)
	if err != nil {
		ctx.JSON(http.StatusBadRequest, gin.H{
			"code":    constants.CodeGetCmdCategoryFail,
			"message": err.Error(),
		})
		return
	}

	ctx.JSON(http.StatusOK, gin.H{
		"code":    constants.CodeSuccess,
		"message": constants.Success,
		"data": map[string]interface{}{
			"cmd_category_list": cmdCategoryList,
		},
	})
}

/**
添加指令模板
*/

func CmdCreate(ctx *gin.Context) {
	// 调用业务层创建指令模板信息
	cmd, err := services.CreateCmd(ctx)
	if err != nil || cmd.ID < 1 {
		ctx.JSON(http.StatusBadRequest, gin.H{
			"code":    constants.CodeCreateCmdFail,
			"message": err.Error(),
		})
		return
	}

	ctx.JSON(http.StatusOK, gin.H{
		"code":    constants.CodeSuccess,
		"message": constants.Success,
		"data": map[string]interface{}{
			"cmd": cmd,
		},
	})
}

/**
指令模板列表
*/

func CmdList(ctx *gin.Context) {
	// 接受查询指令模板列表时的筛选参数
	name, _ := ctx.GetQuery("name")
	cmdCategoryId, _ := strconv.Atoi(ctx.Query("command_category_id"))
	// 调用业务层获取指令模板列表
	cmdList, err := services.GetCmdList(name, uint(cmdCategoryId))
	if err != nil {
		ctx.JSON(http.StatusBadRequest, gin.H{
			"code":    constants.CodeGetCmdFail,
			"message": err.Error(),
		})
		return
	}

	ctx.JSON(http.StatusOK, gin.H{
		"code":    constants.CodeSuccess,
		"message": constants.Success,
		"data": map[string]interface{}{
			"cmd_list": cmdList,
		},
	})
}

/**
指令模板信息
*/

func CmdInfo(ctx *gin.Context) {
	// 根据模板ID获取指令模板信息
	id, err := strconv.Atoi(ctx.Param("id"))
	if err != nil {
		ctx.JSON(http.StatusBadRequest, gin.H{
			"code":    constants.CodeGetCmdFail,
			"message": err.Error(),
		})
		return
	}

	cmd, err := services.GetCmd(id)
	if err != nil {
		ctx.JSON(http.StatusBadRequest, gin.H{
			"code":    constants.CodeGetCmdFail,
			"message": err.Error(),
		})
		return
	}
	ctx.JSON(http.StatusOK, gin.H{
		"code":    constants.CodeSuccess,
		"message": constants.Success,
		"data": map[string]interface{}{
			"cmd": cmd,
		},
	})
}
常量,constants/code.go,代码:
CodeCreateCmdCategoryFail = 1020  // 创建指令模板类别失败
CodeGetCmdCategoryFail = 1021 // 无法获取指令模板类别列表!
CodeCreateCmdFail = 1022 // 添加指令模板信息失败!
CodeGetCmdFail = 1023 // 指令模板不存在!!
application/router/command.go,路由,代码:
package router

import (
	"github.com/gin-gonic/gin"
	"uricgo_api/application/api"
	"uricgo_api/application/middleware"
	"uricgo_api/application/utils"
)

func InitCmdRouter(Router *gin.RouterGroup) {
	/**
	指令模板相关的路由组
	*/
	cmdRouter := Router.Group("cmd")

	{
		// 指令模板类别-添加
		utils.Register(cmdRouter, []string{"POST"}, "category", middleware.JWTAuthorization(), api.CmdCategoryCreate)
		// 指令模板类别-列表
		utils.Register(cmdRouter, []string{"GET"}, "category", middleware.JWTAuthorization(), api.CmdCategoryList)
		// 指令模板-添加
		utils.Register(cmdRouter, []string{"POST"}, "", middleware.JWTAuthorization(), api.CmdCreate)
		// 指令模板-列表
		utils.Register(cmdRouter, []string{"GET"}, "", middleware.JWTAuthorization(), api.CmdList)
		// 指令模板-信息
		utils.Register(cmdRouter, []string{"GET"}, ":id/info", middleware.JWTAuthorization(), api.CmdInfo)
	}
}
路由初始化文件中加载command.go中的路由组,application/initialize/router.go,代码:
package initialize

import (
	"github.com/gin-gonic/gin"
	"go.uber.org/zap"
	"uricgo_api/application/middleware"
	"uricgo_api/application/router"
)

func InitRouter() *gin.Engine {
	// 1. 创建路由
	Router := gin.Default()
	Router.Use(middleware.GinLogger(), middleware.GinRecovery(true))
	Router.Use(middleware.ExceptionMiddleware)
	Router.Use(middleware.CORS)
	// 2. Api路由分组
	ApiGroup := Router.Group("/api")
	// 3. 初始化用户相关路由
	router.InitUserRouter(ApiGroup)
	router.InitHostRouter(ApiGroup)
	router.InitCmdRouter(ApiGroup)
	zap.S().Info("路由初始化完成....")
	return Router
}
5.3.2、客户端展示指令模板界面与功能的实现
展示模板列表页面以及获取模板分类和模板信息的列表数据,创建组件,src/views/TemplateManage.vue,代码:
<template>
  <div class="template_manager">
    <div class="template-top">
      <a-row>
        <a-col :span="5">
          <a-form-item label="模板类别:" :label-col="formItemLayout.labelCol" :wrapper-col="formItemLayout.wrapperCol">
            <a-select style="width: 160px;" placeholder="请选择" @change="handleSelectChange"
                      v-model:value="search.category_id">
              <a-select-option :value="value.id" v-for="(value) in template_category_list.data" :key="value.id">
                {{ value.name }}
              </a-select-option>
            </a-select>
          </a-form-item>
        </a-col>
        <a-col :span="10">
          <a-form-item :label-col="formItemLayout.labelCol" :wrapper-col="formItemLayout.wrapperCol" label="模板名称:">
            <a-input v-model:value="search.name" placeholder="请输入" @change="handleInputChange"/>
          </a-form-item>
        </a-col>
        <a-col :span="2">
          <a-button type="primary" style="margin-top: 3px;" @click="refresh_data">
            <sync-outlined></sync-outlined>
            刷新
          </a-button>
        </a-col>
      </a-row>
    </div>
    <div style="margin-top: 20px;">
      <a-button type="primary" @click="showModal">
        <plus-outlined></plus-outlined>
        新建
      </a-button>
      <!-- 新建指令模板的弹窗 -->
      <a-modal :visible="visible" title="新建模板" ok-text="添加" cancel-text="取消" @ok="handleSubmit" @cancel="hideModel"
               width="960px">
        <a-form-item label="模板类别">
          <a-row>
            <a-col :span="6">
              <a-select placeholder="" v-model:value="template_form.category_id">
                <a-select-option :value="value.id" v-for="(value) in template_category_list.data" :key="value.id">
                  {{ value.name }}
                </a-select-option>
              </a-select>
            </a-col>
            <a-col :span="6">
              <a-button type="link" @click="showTemplateCategoryFormModal">添加类别</a-button>
            </a-col>
          </a-row>
        </a-form-item>
        <a-form-item label="模板名称">
          <a-input v-model:value="template_form.name"/>
        </a-form-item>
        <a-form-item label="模板内容">
          <v-ace-editor v-model:value="template_form.content" lang="sh" theme="chrome"
                        style="height: 300px; font-size: 20px;margin-bottom: 1rem;"></v-ace-editor>
        </a-form-item>
      </a-modal>
    </div>
    <!-- 新建模板分类弹窗 -->
    <a-modal
        :width="600"
        title="新建模板类别"
        :visible="templateCategoryFromVisible"
        @cancel="templateCategoryFormCancel"
        ok-text="提交"
        cancel-text="取消"
        @ok="onTemplateCategoryFromSubmit"
    >
      <a-form-model ref="hostCategoryRuleForm" :model="templateCategoryForm.form" :rules="templateCategoryForm.rules"
                    :label-col="templateCategoryForm.labelCol" :wrapper-col="templateCategoryForm.wrapperCol">
        <a-form-model-item ref="name" label="类别名称" prop="name">
          <a-row>
            <a-col :span="24">
              <a-input placeholder="请输入模板类别名称" v-model:value="templateCategoryForm.form.name"/>
            </a-col>
          </a-row>
        </a-form-model-item>
      </a-form-model>
    </a-modal>
    <div style="margin-top: 10px;">
      <a-table :columns="columns" :data-source="templates_list.data" :rowKey="record => record.id">
        <template #bodyCell="{ column, text, record }">
          <template v-if="column.dataIndex === 'action'">
            <a-popconfirm v-if="templates_list.data.length" title="您确认要删除当前主机信息吗?">
              <a href="javascript:;">删除</a> |
            </a-popconfirm>
            <a href="javascript:;">编辑</a>
          </template>
        </template>
      </a-table>
    </div>
  </div>
</template>

<script setup>
import {reactive, ref} from "vue";
import axios from "@/utils/http";
import {message} from "ant-design-vue";
import settings from "@/settings";
import {PlusOutlined, SyncOutlined} from '@ant-design/icons-vue';
import {VAceEditor} from 'vue3-ace-editor';
import 'ace-builds/src-noconflict/theme-chrome';
import 'ace-builds/src-noconflict/ext-language_tools';
import 'ace-builds/src-noconflict/mode-sh';

const formItemLayout = reactive({
  labelCol: {span: 6},
  wrapperCol: {span: 14}
})

const columns = ref([
  {
    title: 'ID',
    dataIndex: 'id',
    key: 'id',
    sorter: {
      compare: (a, b) => a.id - b.id,
      multiple: 3,
    },
  },
  {
    title: '模板类型',
    dataIndex: 'category_name',
    key: 'category_name'
  },
  {
    title: '模板名称',
    dataIndex: 'name',
    key: 'name',
  },
  {
    title: '模板内容',
    dataIndex: 'content',
    key: 'content',
    width: 200
  },
  {
    title: '操作',
    key: 'action',
    dataIndex: 'action',
    width: 200,
    scopedSlots: {customRender: 'action'}
  }
])

// 是否显示弹窗
const visible = ref(false)

// 指令模板分类列表
const template_category_list = reactive({
  data: []
})

// 指令模板列表
const templates_list = reactive({
  data: []
})

// 添加指令模板时的cmd指令
const content = ref('')

const template_form = reactive({
  category_id: undefined,
  name: '',
  content: ''
})

const search = reactive({
  category: null,
  name: "",
})


const showModal = () => {
  visible.value = true
}

const hideModel = () => {
  visible.value = false;
}

const refresh_data = () => {
  search.category = null
  search.name = "";
  get_templates_list(search.category)
}

const handleSelectChange = (value) => {
  // 切换模板分类
  search.name = "";
  get_templates_list(value)
}

const handleInputChange = () => {
  search.category_id = undefined
  console.log(search.name)
  get_templates_list(null, search.name)
}

// 获取指令模板列表
const get_templates_list = (category = null, template_name = null) => {
  // 查询参数
  let params = {}
  if (category !== null) {
    // 如果有指定模板分类ID,则根据模板分类ID查询模板列表
    params.command_category_id = category
  }
  if (template_name !== null) {
    // 如果有执行模板名称,则根据模板名称查询模板列表
    params.name = template_name
  }
  axios.get(`${settings.host}/cmd`, {
    params: params,
  }).then(response => {
    templates_list.data = response.data.data.cmd_list
  })
}

get_templates_list()


// 获取模板指令分类列表
const get_templates_category_list = () => {
  axios.get(`${settings.host}/cmd/category`).then(response => {
    template_category_list.data = response.data.data.cmd_category_list
  })
}
get_templates_category_list()

const handleSubmit = () => { // handleSubmit必须声明并使用这个方法,名字不能改
  let params = {}
  params.name = template_form.name
  params.command_category_id = template_form.category_id
  params.content = template_form.content
  // 拿到验证成功之后的数据
  // 发送添加模板的请求
  axios.post(`${settings.host}/cmd`, params)
      .then(response => {
        console.log(response)
        visible.value = false
        get_templates_list()
      })
}

// 是否显示添加主机类别的弹窗
const templateCategoryFromVisible = ref(false)

// 添加模板类别需要的数据属性
const templateCategoryForm = reactive({
  labelCol: {span: 6},
  wrapperCol: {span: 14},
  other: '',
  form: {
    name: ''
  },
  rules: {
    name: [
      {required: true, message: '请输入类别名称', trigger: 'blur'},
      {min: 3, max: 10, message: '长度在3-10位之间', trigger: 'blur'}
    ]
  }
})

const showTemplateCategoryFormModal = () => {
  // 显示新建主机类别的表单窗口
  templateCategoryFromVisible.value = true
}

const hostCategoryFormCancel = () => {
  // 取消并关闭添加主机类别的表单窗口
  resetTemplateCategoryForm() // 清空表单内容
  templateCategoryFromVisible.value = false // 关闭对话框
}

const resetTemplateCategoryForm = () => {
  // 重置添加主机类别的表单信息
  templateCategoryForm.form.name = "";
}

const templateCategoryFormCancel = () => {
  // 取消并关闭添加主机类别的表单窗口
  resetTemplateCategoryForm() // 清空表单内容
  templateCategoryFromVisible.value = false // 关闭对话框
}

const onTemplateCategoryFromSubmit = () => {
  // 添加主机类别的表单提交处理
  axios.post("cmd/category", templateCategoryForm.form).then(response => {
    if (response.data.code === 0) {
      message.success({
        content: "创建模板类别成功!",
        duration: 2,
      }).then(() => {
        template_category_list.data.push(response.data.data.cmdCategory)
        // 清空表单数据,并关闭添加主机分类表单窗口
        hostCategoryFormCancel()
      })
    }
  })
}

</script>

<style scoped>
.template-top {
  margin-top: 15px;
  margin-bottom: 15px;
}

.template_manager {
  text-align: left;
}
</style>
路由,代码:
 // 代码省略。。。。
 {
 meta: {
 		title: '指令模板',
 		authenticate: true
 },
 path: 'template_manage',
 name: 'TemplateManage',
 component: TemplateManage
 },
好了,指令模板可以创建了,那么我们可以在批量执行指令的功能上,添加上选择模板执行指令的功能,并点击执行。


5.3.3、执行已有的指令
在src/views/MultiExec.vue,中新增选择指令模板功能,代码:
<template>
  <div class="multi_exec">
    <div>
      <h3>执行主机:</h3>
      <div>
        <a-tag closable @close="delete_select_host(info_index)" v-for="(info,info_index) in show_host_info.data"
               :key="info.id">
          {{ `${info.name}(${info.ip_addr}:${info.port})` }}
        </a-tag>
      </div>
    </div>
    <div style="margin-top: 10px;">
      <a-button @click="showModal">
        <plus-outlined/>
        从主机列表中选择
      </a-button>
      <a-modal :visible="visible" title="选择执行主机" @ok="handleOk" @cancel="hideModel" width="960px">
        <div>
          <a-row>
            <a-col :span="8">
              <a-form-item label="主机类别:" :label-col="formItemLayout.labelCol" :wrapper-col="formItemLayout.wrapperCol">
                <a-select style="width: 160px;" placeholder="请选择" v-model:value="host_form.form.category"
                          @change="has_change_category">
                  <a-select-option :value="value.id" v-for="(value, index) in category_list.data" :key="value.id">
                    {{ value.name }}
                  </a-select-option>
                </a-select>
              </a-form-item>
            </a-col>
            <a-col :span="8">
              <a-form-item :label-col="formItemLayout.labelCol" :wrapper-col="formItemLayout.wrapperCol" label="主机别名:">
                <a-input placeholder="请输入"/>
              </a-form-item>
            </a-col>
            <a-col :span="4">
              <a-form-item :label-col="formItemLayout.labelCol" :wrapper-col="formItemLayout.wrapperCol" label="已选:">
                <span style="margin-left: 8px">
									{{ `${selectedRowKeys.length}` }}台主机
                </span>
              </a-form-item>
            </a-col>
            <a-col :span="4">
              <a-button type="primary" style="margin-top: 3px;" @click="refresh_data">
                <sync-outlined></sync-outlined>
                刷新
              </a-button>
            </a-col>
          </a-row>
        </div>
        <div>
          <a-table
              :columns="columns"
              :data-source="host_list.data"
              :pagination="false"
              :rowKey="record => record.id"
              :row-selection="{ selectedRowKeys: selectedRowKeys, onChange: onSelectChange }"
          ></a-table>
        </div>
      </a-modal>
    </div>

    <div class="cmd">
      <div>执行指令:</div>
      <v-ace-editor v-model:value="content" lang="sh" theme="chrome"
                    style="height: 300px; font-size: 20px;margin-bottom: 1rem;"></v-ace-editor>
    </div>
    <div style="margin-top: 20px; margin-bottom: 20px;">
      <a-button @click="showModal2">
        <plus-outlined/>
        从执行模板中选择
      </a-button>
      <a-modal :visible="visible2" title="选择执行模板" @ok="handleOk2" width="960px" @cancel="hideModel2">
        <div>
          <a-row>
            <a-col :span="10">
              <a-form-item label="模板类别:" :label-col="formItemLayout.labelCol" :wrapper-col="formItemLayout.wrapperCol">
                <a-select style="width: 160px;" placeholder="请选择" @change="handleSelectChange2"
                          v-model="template_form.form.category">
                  <a-select-option :value="value.id" v-for="(value) in template_category_list.data" :key="value.id">
                    {{ value.name }}
                  </a-select-option>
                </a-select>
              </a-form-item>
            </a-col>
            <a-col :span="10">
              <a-form-item :label-col="formItemLayout.labelCol" :wrapper-col="formItemLayout.wrapperCol" label="模板名称:">
                <a-input placeholder="请输入" v-model:value="template_form.form.name"/>
              </a-form-item>
            </a-col>
            <a-col :span="4">
              <a-button type="primary" style="margin-top: 3px;" @click="refresh_data2">
                <sync-outlined></sync-outlined>
                刷新
              </a-button>
            </a-col>
          </a-row>
        </div>
        <div>
          <a-table
              :columns="tem_columns"
              :data-source="template_list.data"
              :rowKey="record => record.id"
              :row-selection="{ radioselectedRow: radioselectedRow, onChange: onSelectChange2,type: 'radio' }"
          >
          </a-table>
        </div>
      </a-modal>
    </div>
    <div>
      <a-button type="primary" @click="execute_cmd">
        <thunderbolt-outlined></thunderbolt-outlined>
        开始执行
      </a-button>
    </div>

  </div>
</template>

<script setup>
import {computed, reactive, ref} from "vue";
import {PlusOutlined, SyncOutlined, ThunderboltOutlined} from '@ant-design/icons-vue';
import settings from "../settings";
import axios from "@/utils/http";
import {message} from "ant-design-vue";

import {VAceEditor} from 'vue3-ace-editor';
import 'ace-builds/src-noconflict/theme-chrome';
import 'ace-builds/src-noconflict/ext-language_tools';
import 'ace-builds/src-noconflict/mode-sh';


// 表单分栏布局长度,弹窗的首行表单配置信息
const formItemLayout = reactive({
  labelCol: {span: 8},
  wrapperCol: {span: 14}
})
// 表单的字段设置,弹窗的表格的每一列数据的配置信息
const columns = ref([
  {
    slots: {title: 'customTitle'},
    scopedSlots: {customRender: 'action'}
  }, {
    title: '类别',
    dataIndex: 'category_name',
    key: 'category_name'
  }, {
    title: '主机名称',
    dataIndex: 'name',
    key: 'name'
  }, {
    title: '连接地址',
    dataIndex: 'ip_addr',
    key: 'ip_addr',
    width: 200
  }, {
    title: '端口',
    dataIndex: 'port',
    key: 'port'
  }, {
    title: '备注信息',
    dataIndex: 'description',
    key: 'description'
  }
])

// 显示选中的所有主机内容
const show_host_info = reactive({
  data: []
})
const visible = ref(false) // 是否显示主机列表的弹窗

// 主机表单信息
const host_form = reactive({
  form: {
    category: undefined // 当前选择的主机分类ID
  }
})

// 当前显示咋表格中的主机列表数据
const host_list = reactive({
  data: []
})

// 主机分类列表
const category_list = reactive({
  data: []
})

// 已经勾选的主机ID列表
const selectedRowKeys = ref([])
// 选中的主机id列表
const selected_host_ids = ref([])

// 计算属性
const hasSelected = computed(() => {
  return selectedRowKeys.length > 0
})

// 显示弹窗
const showModal = () => {
  visible.value = true
}

// 关闭弹窗
const hideModel = () => {
  visible.value = false;
}

// 选中主机时触发的,selectedRowKeys被选中的主机id列表
const onSelectChange = (selectedKeys) => {
  selectedRowKeys.value = selectedKeys
}

const get_host_category_list = () => {
  // 获取主机类别
  axios.get(`${settings.host}/host/category`).then((response) => {
    category_list.data = response.data.data.host_category_list
  })
}
get_host_category_list()


const get_host_list = (category = null) => {
  // 获取主机列表
  let params = {}
  if (category !== null) {
    params.host_category_id = category
  }
  axios.get(`${settings.host}/host`, {
    params: params,
  }).then((response) => {
    host_list.data = response.data.data.host_list
  })
}

get_host_list()

const has_change_category = (category) => {
  // 切换主机分类时,重新获取主机列表
  get_host_list(category)
}

const refresh_data = () => {
  // 刷新页面
  // location.reload()
  // 刷新数据
  get_host_list()
  host_form.form.category = undefined
  selectedRowKeys.value = []
}

const handleOk = () => {
  selected_host_ids.value = []
  show_host_info.data = []
  host_list.data.forEach((v, k) => {
    if (selectedRowKeys.value.includes(v.id)) { // 判断某元素是否在数组中用includes比较合适,不能用in
      show_host_info.data.push({
        id: v.id,
        name: v.name,
        ip_addr: v.ip_addr,
        port: v.port
      })
      selected_host_ids.value.push(v.id)
    }
  })
  // 关闭弹窗
  visible.value = false
}

const delete_select_host = (infoIndex) => {
  // 移除已经勾选的主机信息
  show_host_info.data.splice(infoIndex, 1)
  let idsList = selected_host_ids.value.splice(infoIndex, 1)
  let idIndex = selectedRowKeys.value.indexOf(idsList[0])
  selectedRowKeys.value.splice(idIndex, 1)
}

// 用户输入的模板命令
const content = ref("")

const execute_cmd = () => {
  // 远程执行命令
  // console.log(content.value)
  // console.log(selected_host_ids)
  // 执行指令操作
  axios.post(`${settings.host}/host/cmd`, {
    host_ids: selected_host_ids.value,
    cmd: content.value
  }).then((res) => {
    message.success("远程主机已经执行命令...")
  }).catch((error => {
    message.error("远程主机执行命令失败!")
  }))
}

// 是否显示选择指令模板的窗口
const visible2 = ref(false);
// 搜索指令模板的数据的表单
const template_form = reactive({
  form: {
    category: undefined,
    name: "",
  }
})

// 指令模板分类列表
const template_category_list = reactive({
  data: [],
})

const tem_columns = ref([
  {
    title: '模板类型',
    dataIndex: 'category_name',
    key: 'category_name'
  },
  {
    title: '模板名称',
    dataIndex: 'name',
    key: 'name'

  },
  {
    title: '模板内容',
    dataIndex: 'content',
    key: 'content',
    width: 200
  }
])

// 指令模板列表
const template_list = reactive({
  data: [],
})

// 选项的指令模板的列表
const radioselectedRow = ref([]);

// 显示选择指令模板的弹窗
const showModal2 = () => {
  visible2.value = true
}

// 隐藏选择指令模板的弹窗
const hideModel2 = () => {
  visible2.value = false;
}

// 当选择指令模板时
const handleOk2 = (e) => {
  let tid = radioselectedRow.value[0] // 选中的模板id值
  // 通过模板id值,找到该模板记录中的cmd值,并赋值给content属性
  template_list.data.forEach((v, k) => {
    if (v.id === tid) {
      // 把用户选择的指令模板内容显示到编辑器中
      content.value = v.content
    }
  })
  visible2.value = false
}

const onSelectChange2 = (selectedRow) => {
  // [6, 7, 8, 9]
  console.log('>>>>> ', selectedRow)
  radioselectedRow.value = selectedRow
}

const handleSelectChange2 = (value) => {
  // 切换模板分类
  get_templates_list(value)
}

const refresh_data2 = () => {
  get_templates_list();
}

// 获取指令模板分类列表
const get_templates_category_list = () => {
  axios.get(`${settings.host}/cmd/category`)
      .then(response => {
        template_category_list.data = response.data.data.cmd_category_list
      })
}

get_templates_category_list()

// 获取指令模板列表
const get_templates_list = (category = null) => {
  let params = {}
  if (category !== null) {
    params.command_category_id = category
  }
  axios.get(`${settings.host}/cmd`, {
    params: params,
  }).then(response => {
    template_list.data = response.data.data.cmd_list
  })
}

get_templates_list()

</script>

<style scoped>
.multi_exec {
  text-align: left;
}
</style>